This is the multi-page printable view of this section.
Click here to print.
Return to the regular view of this page.
Documentation
Dolittle is an open-source, decentralized, distributed and event-driven microservice platform. The platform has been designed to build Line of Business applications without sacrificing architectural quality, code quality, maintainability or scalability.
Dedicated Runtime
Dolittle uses it’s own dedicated Runtime for managing connections to the event logs and other runtimes. This allows for easier decoupling of event producers and consumers and frees the pieces to be scaled independently.
Microservice First
At the heart of Dolittle sits the notion of decoupling. This makes it possible to take a system and break it into small focused components
that can be assembled together in any way one wants to. When it is broken up you get the benefit of scaling each individual piece on its own, rather than scaling the monolith
equally across a number of machines. This gives a higher density, better resource utilization and ultimately better cost
control.
Event-Driven
Dolittle is based on Event Sourcing, which means that the systems state is based on events.
EDA promotes loose coupling because the producers of events do not know about subscribers that are listening to this event. This makes an Event-Driven Architecture more suited to today’s distributed applications than the traditional request-response model.
PaaS Ready
Dolittle has it’s own PaaS (Platform as a Service) for hosting your Dolittle code, get in contact with us to learn more!
1 - Tutorials
Tutorials for the Dolittle open-source framework
1.1 - Getting started
Get started with the Dolittle open-source framework
Welcome to the tutorial for Dolittle, where you learn how to write a Microservice that keeps track of foods prepared by the chefs.
After this tutorial you will have:
Use the tabs to switch between the C# and TypeScript code examples. Full tutorial code available on GitHub for C# and TypeScript.
For a deeper dive into our Runtime, check our overview.
Setup
This tutorial expects you to have a basic understanding of C#, .NET and Docker.
Prerequisites:
Setup a .NET Core console project:
$ dotnet new console
$ dotnet add package Dolittle.SDK
This tutorial expects you to have a basic understanding of TypeScript, npm and Docker.
Prerequisites:
Setup a TypeScript NodeJS project using your favorite package manager. For this tutorial we use npm.
$ npm init
$ npm -D install typescript ts-node
$ npm install @dolittle/sdk
$ npx tsc --init --experimentalDecorators --target es6
Create an EventType
First we’ll create an EventType that represents that a dish has been prepared. Events represents changes in the system, a “fact that has happened”. As the event “has happened”, it’s immutable by definition, and we should name it in the past tense accordingly.
An EventType is a class that defines the properties of the event. It acts as a wrapper for the type of the event.
// DishPrepared.cs
using Dolittle.SDK.Events;

[EventType("1844473f-d714-4327-8b7f-5b3c2bdfc26a")]
public class DishPrepared
{
    public DishPrepared (string dish, string chef)
    {
        Dish = dish;
        Chef = chef;
    }

    public string Dish { get; }
    public string Chef { get; }
}
The GUID given in the [EventType()] attribute is the EventTypeId, which is used to identify this EventType type in the Runtime.
// DishPrepared.ts
import { eventType } from '@dolittle/sdk.events';

@eventType('1844473f-d714-4327-8b7f-5b3c2bdfc26a')
export class DishPrepared {
    constructor(readonly Dish: string, readonly Chef: string) {}
}
The GUID given in the @eventType() decorator is the EventTypeId, which is used to identify this EventType in the Runtime.
Create an EventHandler
Now we need something that can react to dishes that have been prepared. Let’s create an EventHandler which prints the prepared dishes to the console.
// DishHandler.cs
using Dolittle.SDK.Events;
using Dolittle.SDK.Events.Handling;
using Microsoft.Extensions.Logging;

[EventHandler("f2d366cf-c00a-4479-acc4-851e04b6fbba")]
public class DishHandler
{
    readonly ILogger _logger;

    public DishHandler(ILogger<DishHandler> logger)
    {
        _logger = logger;
    }

    public void Handle(DishPrepared @event, EventContext eventContext)
    {
        _logger.LogInformation("{Chef} has prepared {Dish}. Yummm!", @event.Chef, @event.Dish);
    }
}
When an event is committed, the Handle() method will be called for all the EventHandlers that handle that EventType.
The [EventHandler()] attribute identifies this event handler in the Runtime, and is used to keep track of which event it last processed, and retrying the handling of an event if the handler fails (throws an exception).
// DishHandler.ts
import { inject } from '@dolittle/sdk.dependencyinversion';
import { EventContext } from '@dolittle/sdk.events';
import { eventHandler, handles } from '@dolittle/sdk.events.handling';
import { Logger } from 'winston';

import { DishPrepared } from './DishPrepared';

@eventHandler('f2d366cf-c00a-4479-acc4-851e04b6fbba')
export class DishHandler {
    constructor(
        @inject('Logger') private readonly _logger: Logger
    ) {}

    @handles(DishPrepared)
    dishPrepared(event: DishPrepared, eventContext: EventContext) {
        this._logger.info(`${event.Chef} has prepared ${event.Dish}. Yummm!`);
    }
}
When an event is committed, the method decorated with the @handles(EventType) for that specific EventType will be called.
The @eventHandler() decorator identifies this event handler in the Runtime, and is used to keep track of which event it last processed, and retrying the handling of an event if the handler fails (throws an exception).
Connect the client and commit an event
Let’s build a client that connects to the Runtime for a Microservice with the id "f39b1f61-d360-4675-b859-53c05c87c0e6". This sample Microservice is pre-configured in the development Docker image.
While configuring the client we register the EventTypes and EventHandlers so that the Runtime knows about them. Then we can prepare a delicious taco and commit it to the EventStore for the specified tenant.
// Program.cs
using Dolittle.SDK;
using Dolittle.SDK.Tenancy;
using Microsoft.Extensions.Hosting;

var host = Host.CreateDefaultBuilder()
    .UseDolittle()
    .Build();

await host.StartAsync();

var client = await host.GetDolittleClient();
await client.EventStore
    .ForTenant(TenantId.Development)
    .CommitEvent(
        content: new DishPrepared("Bean Blaster Taco", "Mr. Taco"),
        eventSourceId: "Dolittle Tacos");

await host.WaitForShutdownAsync();
The string given as eventSourceId is the EventSourceId, which is used to identify where the events come from.
// index.ts
import { DolittleClient } from '@dolittle/sdk';
import { TenantId } from '@dolittle/sdk.execution';

import './DishHandler';
import { DishPrepared } from './DishPrepared';

(async () => {
    const client = await DolittleClient
        .setup()
        .connect();

    const preparedTaco = new DishPrepared('Bean Blaster Taco', 'Mr. Taco');

    await client.eventStore
        .forTenant(TenantId.development)
        .commit(preparedTaco, 'Dolittle Tacos');
})();
The string given in the commit() call is the EventSourceId, which is used to identify where the events come from.
Start the Dolittle environment
Start the Dolittle environment with all the necessary dependencies with the following command:
$ docker run -p 50053:50053 -p 51052:51052 -p 27017:27017 -d dolittle/runtime:latest-development
This will start a container with the Dolittle Development Runtime on port 50053 and 51052 and a MongoDB server on port 27017.
The Runtime handles committing the events and the event handlers while the MongoDB is used for persistence.
Docker on Windows
Docker on Windows using the WSL2 backend can use massive amounts of RAM if not limited. Configuring a limit in the
.wslconfig file can help greatly, as mentioned in
this issue. The RAM usage is also lowered if you disable the WSL2 backend in Docker for Desktop settings.
Run your microservice
Run your code, and get a delicious serving of taco:
$ dotnet run
info: Dolittle.SDK.DolittleClientService[0]
      Connecting Dolittle Client
info: Microsoft.Hosting.Lifetime[0]
      Application started. Press Ctrl+C to shut down.
info: Microsoft.Hosting.Lifetime[0]
      Hosting environment: Production
info: Microsoft.Hosting.Lifetime[0]
      Content root path: .../GettingStarted
info: Dolittle.SDK.Events.Processing.EventProcessors[0]
      EventHandler f2d366cf-c00a-4479-acc4-851e04b6fbba registered with the Runtime, start handling requests
info: DishHandler[0]
      Mr. Taco has prepared Bean Blaster Taco. Yummm!
$ npx ts-node index.ts
info: EventHandler f2d366cf-c00a-4479-acc4-851e04b6fbba registered with the Runtime, start handling requests.
info: Mr. Taco has prepared Bean Blaster Taco. Yummm!
Check the status of your microservice
With everything is up and running you can use the Dolittle CLI to check what’s going on.
Open a new terminal.
Now you can list the registered event types with the following command:
$ dolittle runtime eventtypes list
EventType
------------
DishPrepared
And check the status of the event handler with the following commands:
$ dolittle runtime eventhandlers list
EventHandler  Scope    Partitioned  Status
------------------------------------------
DishHandler   Default  ✅            ✅

$ dolittle runtime eventhandlers get DishHandler
Tenant                                Position  Status
------------------------------------------------------
445f8ea8-1a6f-40d7-b2fc-796dba92dc44  1         ✅
What’s next
1.2 - Aggregates
Get started with Aggregates
Welcome to the tutorial for Dolittle, where you learn how to write a Microservice that keeps track of foods prepared by the chefs.
After this tutorial you will have:
- a running Dolittle environment with a Runtime and a MongoDB,
- a Microservice that commits and handles Events and
- a stateful aggregate root that applies events and is controlled by an invariant
Use the tabs to switch between the C# and TypeScript code examples. Full tutorial code available on GitHub for C# and TypeScript.
Pre requisites
This tutorial builds directly upon and that you have gone through our getting started guide; done the setup, created the EventType, EventHandler and connected the client
Create an AggregateRoot
An aggregate root is a class that upholds the rules (invariants) in your domain.
An aggregate root is responsible for deciding which events should be committed.
It exposes public methods that represents actions to be performed, and holds internal state to decide if the action is allowed.
Before one of the public methods is called, the internal state is rehydrated by calling the On-methods for all the events the aggregate root has already applied.
These On-methods updates the internal state of the aggregate root, and must not have any other side-effects.
When a public action method is executed, it can use this internal state decide either to apply events to be committed, or throw an error if the action is not allowed.
The following code implements an aggregate root for a Kitchen that only has enough ingredients to prepare two dishes:
// Kitchen.cs
using System;
using Dolittle.SDK.Aggregates;
using Dolittle.SDK.Events;

[AggregateRoot("01ad9a9f-711f-47a8-8549-43320f782a1e")]
public class Kitchen : AggregateRoot
{
    int _ingredients = 2;

    public Kitchen(EventSourceId eventSource)
        : base(eventSource)
    {
    }

    public void PrepareDish(string dish, string chef)
    {
        if (_ingredients <= 0) throw new Exception("We have run out of ingredients, sorry!");
        Apply(new DishPrepared(dish, chef));
        Console.WriteLine($"Kitchen {EventSourceId} prepared a {dish}, there are {_ingredients} ingredients left.");
    }

    void On(DishPrepared @event)
        => _ingredients--;
}
The GUID given in the [AggregateRoot()] attribute is the AggregateRootId, which is used to identify this AggregateRoot in the Runtime.
// Kitchen.ts
import { aggregateRoot, AggregateRoot, on } from '@dolittle/sdk.aggregates';
import { EventSourceId } from '@dolittle/sdk.events';

import { DishPrepared } from './DishPrepared';

@aggregateRoot('01ad9a9f-711f-47a8-8549-43320f782a1e')
export class Kitchen extends AggregateRoot {
    private _ingredients: number = 2;

    constructor(eventSourceId: EventSourceId) {
        super(eventSourceId);
    }

    prepareDish(dish: string, chef: string) {
        if (this._ingredients <= 0) throw new Error('We have run out of ingredients, sorry!');
        this.apply(new DishPrepared(dish, chef));
        console.log(`Kitchen ${this.eventSourceId} prepared a ${dish}, there are ${this._ingredients} ingredients left.`);
    }

    @on(DishPrepared)
    onDishPrepared(event: DishPrepared) {
        this._ingredients--;
    }
}
The GUID given in the @aggregateRoot() decorator is the AggregateRootId, which is used to identify this AggregateRoot in the Runtime.
Apply the event through an aggregate of the Kitchen aggregate root
Let’s expand upon the client built in the getting started guide. But instead of committing the event to the event store directly we perform an action on the aggregate that eventually applies and commits the event.
// Program.cs
using Dolittle.SDK;
using Dolittle.SDK.Tenancy;
using Microsoft.Extensions.Hosting;

var host = Host.CreateDefaultBuilder()
    .UseDolittle()
    .Build();

await host.StartAsync();

var client = await host.GetDolittleClient();

await client.Aggregates
    .ForTenant(TenantId.Development)
    .Get<Kitchen>("Dolittle Tacos")
    .Perform(kitchen => kitchen.PrepareDish("Bean Blaster Taco", "Mr. Taco"));

await host.WaitForShutdownAsync();
The string given in AggregateOf<Kitchen>() is the EventSourceId, which is used to identify the aggregate of the aggregate root to perform the action on.
Note that we also register the aggregate root class on the client builder using .WithAggregateRoots(...).
// index.ts
import { DolittleClient } from '@dolittle/sdk';
import { TenantId } from '@dolittle/sdk.execution';

import  './DishHandler';
import { Kitchen } from './Kitchen';

(async () => {
    const client = await DolittleClient
        .setup()
        .connect();

    await client.aggregates
        .forTenant(TenantId.development)
        .get(Kitchen, 'Dolittle Tacos')
        .perform(kitchen => kitchen.prepareDish('Bean Blaster Taco', 'Mr. Taco'));
})();
The string given in the aggregateOf() call is the EventSourceId, which is used to identify the aggregate of the aggregate root to perform the action on.
Note that we also register the aggregate root class on the client builder using .withAggregateRoots(...).
Start the Dolittle environment
If you don’t have a Runtime already going from a previous tutorial, start the Dolittle environment with all the necessary dependencies with the following command:
$ docker run -p 50053:50053 -p 51052:51052 -p 27017:27017 -d dolittle/runtime:latest-development
This will start a container with the Dolittle Development Runtime on port 50053 and 51052 and a MongoDB server on port 27017.
The Runtime handles committing the events and the event handlers while the MongoDB is used for persistence.
Docker on Windows
Docker on Windows using the WSL2 backend can use massive amounts of RAM if not limited. Configuring a limit in the
.wslconfig file can help greatly, as mentioned in
this issue. The RAM usage is also lowered if you disable the WSL2 backend in Docker for Desktop settings.
Run your microservice
Run your code twice, and get a two delicious servings of taco:
$ dotnet run
info: Dolittle.SDK.DolittleClientService[0]
      Connecting Dolittle Client
info: Microsoft.Hosting.Lifetime[0]
      Application started. Press Ctrl+C to shut down.
info: Microsoft.Hosting.Lifetime[0]
      Hosting environment: Production
info: Microsoft.Hosting.Lifetime[0]
      Content root path: .../Aggregates
info: Dolittle.SDK.Events.Processing.EventProcessors[0]
      EventHandler f2d366cf-c00a-4479-acc4-851e04b6fbba registered with the Runtime, start handling requests
Kitchen Dolittle Tacos prepared a Bean Blaster Taco, there are 1 ingredients left.
info: DishHandler[0]
      Mr. Taco has prepared Bean Blaster Taco. Yummm!


$ dotnet run
info: Dolittle.SDK.DolittleClientService[0]
      Connecting Dolittle Client
info: Microsoft.Hosting.Lifetime[0]
      Application started. Press Ctrl+C to shut down.
info: Microsoft.Hosting.Lifetime[0]
      Hosting environment: Production
info: Microsoft.Hosting.Lifetime[0]
      Content root path: .../Aggregates
info: Dolittle.SDK.Events.Processing.EventProcessors[0]
      EventHandler f2d366cf-c00a-4479-acc4-851e04b6fbba registered with the Runtime, start handling requests
Kitchen Dolittle Tacos prepared a Bean Blaster Taco, there are 0 ingredients left.
info: DishHandler[0]
      Mr. Taco has prepared Bean Blaster Taco. Yummm!
$ npx ts-node index.ts
info: EventHandler f2d366cf-c00a-4479-acc4-851e04b6fbba registered with the Runtime, start handling requests.
Kitchen Dolittle Tacos prepared a Bean Blaster Taco, there are 1 ingredients left.
info: Mr. Taco has prepared Bean Blaster Taco. Yummm!

$ npx ts-node index.ts
info: EventHandler f2d366cf-c00a-4479-acc4-851e04b6fbba registered with the Runtime, start handling requests.
Kitchen Dolittle Tacos prepared a Bean Blaster Taco, there are 0 ingredients left.
info: Mr. Taco has prepared Bean Blaster Taco. Yummm!
Check the status of your Kitchen aggregate root
Open a new terminal for the Dolittle CLI and run the following commands:
$ dolittle runtime aggregates list
AggregateRoot  Instances
------------------------
Kitchen        1

$ dolittle runtime aggregates get Kitchen --wide
Tenant                                EventSource     AggregateRootVersion
--------------------------------------------------------------------------
445f8ea8-1a6f-40d7-b2fc-796dba92dc44  Dolittle Tacos  2

$ dolittle runtime aggregates events Kitchen "Dolittle Tacos" --wide
AggregateRootVersion  EventLogSequenceNumber  EventType     Public  Occurred
----------------------------------------------------------------------------------------------
0                     0                       DishPrepared  False   11/04/2021 14:04:19 +00:00
1                     1                       DishPrepared  False   11/04/2021 14:04:37 +00:00
Try to prepare a dish without any ingredients
Since we have already used up all the available ingredients, the Kitchen aggregate root should not allow us to prepare any more dishes.
Run your code a third time, and you will see that the exception gets thrown from the aggregate root.
$ dotnet run
info: Dolittle.SDK.DolittleClientService[0]
      Connecting Dolittle Client
info: Microsoft.Hosting.Lifetime[0]
      Application started. Press Ctrl+C to shut down.
info: Microsoft.Hosting.Lifetime[0]
      Hosting environment: Production
info: Microsoft.Hosting.Lifetime[0]
      Content root path: .../Aggregates
info: Dolittle.SDK.Events.Processing.EventProcessors[0]
      EventHandler f2d366cf-c00a-4479-acc4-851e04b6fbba registered with the Runtime, start handling requests
Unhandled exception. System.Exception: We have run out of ingredients, sorry!
... stack trace ...
$ npx ts-node index.ts
info: EventHandler f2d366cf-c00a-4479-acc4-851e04b6fbba registered with the Runtime, start handling requests.

.../Kitchen.ts:20
        if (this._ingredients <= 0) throw new Error('We have run out of ingredients, sorry!');
                                          ^
Error: We have run out of ingredients, sorry!
... stack trace ...
You can verify that the Kitchen did not allow a third dish to be prepared, by checking the committed events:
$ dolittle runtime aggregates events Kitchen "Dolittle Tacos" --wide
AggregateRootVersion  EventLogSequenceNumber  EventType     Public  Occurred
----------------------------------------------------------------------------------------------
0                     0                       DishPrepared  False   11/04/2021 14:04:19 +00:00
1                     1                       DishPrepared  False   11/04/2021 14:04:37 +00:00
Events from aggregate roots are just normal events
The events applied (committed) from aggregate roots are handled the same way as events committed directly to the event store.
You can verify this by checking the status of the DishHandler:
$ dolittle runtime eventhandlers get DishHandler
Tenant                                Position  Status
------------------------------------------------------
445f8ea8-1a6f-40d7-b2fc-796dba92dc44  2         ✅
Committing events outside of an aggregate root
If you went through the getting started tutorial and this tutorial without stopping the Dolittle environment in between, the last command will show that the DishHandler has handled 3 events - even though the Kitchen can only prepare two dishes.
This is fine, and expected behavior.
Events committed outside of the Kitchen aggregate root (even if they are the same type), does not update the internal state.
What’s next
1.3 - Projections
Get started with Projections
Welcome to the tutorial for Projections in Dolittle, where you learn how to write a Microservice that keeps track of food prepared by the chefs.
After this tutorial you will have:
Use the tabs to switch between the C# and TypeScript code examples. Full tutorial code available on GitHub for C# and TypeScript.
Setup
This tutorial builds directly upon the getting started guide and the files from the it.
Prerequisites:
Before getting started, your directory should look something like this:
└── Projections/
    ├── DishHandler.cs
    ├── DishPrepared.cs
    ├── Program.cs
    └── Projections.csproj
Prerequisites:
Before getting started, your directory should look something like this:
└── projections/
    ├── .eslintrc
    ├── DishHandler.ts
    ├── DishPrepared.ts
    ├── index.ts
    ├── package.json
    └── tsconfig.json
Start the Dolittle environment
If you don’t have a Runtime already going from a previous tutorial, start the Dolittle environment with all the necessary dependencies with the following command:
$ docker run -p 50053:50053 -p 51052:51052 -p 27017:27017 -d dolittle/runtime:latest-development
This will start a container with the Dolittle Development Runtime on port 50053 and 51052 and a MongoDB server on port 27017.
The Runtime handles committing the events and the event handlers while the MongoDB is used for persistence.
Docker on Windows
Docker on Windows using the WSL2 backend can use massive amounts of RAM if not limited. Configuring a limit in the
.wslconfig file can help greatly, as mentioned in
this issue. The RAM usage is also lowered if you disable the WSL2 backend in Docker for Desktop settings.
Create a DishCounter Projection
First, we’ll create a Projection that keeps track of the dishes and how many times the chefs have prepared them. Projections are a special type of event handler that mutate a read model based on incoming events.
// DishCounter.cs
using Dolittle.SDK.Projections;

[Projection("98f9db66-b6ca-4e5f-9fc3-638626c9ecfa")]
public class DishCounter
{
    public string Name = "Unknown";
    public int NumberOfTimesPrepared = 0;

    [KeyFromProperty("Dish")]
    public void On(DishPrepared @event, ProjectionContext context)
    {
        Name = @event.Dish;
        NumberOfTimesPrepared ++;
    }
}
The [Projection()] attribute identifies this Projection in the Runtime, and is used to keep track of the events that it processes, and retrying the handling of an event if the handler fails (throws an exception). If the Projection is changed somehow (eg. a new On() method or the EventType changes), it will replay all of its events.
When an event is committed, the On() method is called for all the Projections that handle that EventType. The attribute [KeyFromEventProperty()] defines what property on the event will be used as the read model’s key (or id). You can choose the [KeyFromEventSource], [KeyFromPartitionId] or a property from the event with [KeyFromEventProperty(@event => @event.Property)].
// DishCounter.ts
import { ProjectionContext, projection, on } from '@dolittle/sdk.projections';

import { DishPrepared } from './DishPrepared';

@projection('98f9db66-b6ca-4e5f-9fc3-638626c9ecfa')
export class DishCounter {
    name: string = 'Unknown';
    numberOfTimesPrepared: number = 0;

    @on(DishPrepared, _ => _.keyFromProperty('Dish'))
    on(event: DishPrepared, projectionContext: ProjectionContext) {
        this.name = event.Dish;
        this.numberOfTimesPrepared ++;
    }
}
The @projection() decorator identifies this Projection in the Runtime, and is used to keep track of the events that it processes, and retrying the handling of an event if the handler fails (throws an exception). If the Projection is changed somehow (eg. a new @on() decorator or the EventType changes), it will replay all of it’s events.
When an event is committed, the method decoratored with @on() will be called for all the Projections that handle that EventType. The second parameter in the @on decorator is a callback function, that defines what property on the event will be used as the read model’s key (or id). You can choose either _ => _.keyFromEventSource(), _ => _.keyFromPartitionId() or a property from the event with _ => _.keyFromProperty('propertyName').
Register and get the DishCounter Projection
Let’s register the projection, commit new DishPrepared events and get the projection to see how it reacted.
// Program.cs
using System;
using System.Threading.Tasks;
using Dolittle.SDK;
using Dolittle.SDK.Tenancy;
using Microsoft.Extensions.Hosting;

var host = Host.CreateDefaultBuilder()
    .UseDolittle()
    .Build();
await host.StartAsync();

var client = await host.GetDolittleClient();
var eventStore = client.EventStore.ForTenant(TenantId.Development);
await eventStore.CommitEvent(new DishPrepared("Bean Blaster Taco", "Mr. Taco"), "Dolittle Tacos");
await eventStore.CommitEvent(new DishPrepared("Bean Blaster Taco", "Mrs. Tex Mex"), "Dolittle Tacos");
await eventStore.CommitEvent(new DishPrepared("Avocado Artillery Tortilla", "Mr. Taco"), "Dolittle Tacos");
await eventStore.CommitEvent(new DishPrepared("Chili Canon Wrap", "Mrs. Tex Mex"), "Dolittle Tacos");

await Task.Delay(TimeSpan.FromSeconds(1)).ConfigureAwait(false);

var dishes = await client.Projections
    .ForTenant(TenantId.Development)
    .GetAll<DishCounter>().ConfigureAwait(false);

foreach (var dish in dishes)
{
    Console.WriteLine($"The kitchen has prepared {dish.Name} {dish.NumberOfTimesPrepared} times");
}

await host.WaitForShutdownAsync();
The GetAll<DishCounter>() method returns all read models of that Projection as an IEnumerable<DishCounter>.
The string given in FromEventSource() is the EventSourceId, which is used to identify where the events come from.
// index.ts
import { DolittleClient } from '@dolittle/sdk';
import { TenantId } from '@dolittle/sdk.execution';
import { setTimeout } from 'timers/promises';

import { DishCounter } from './DishCounter';
import { DishPrepared } from './DishPrepared';

(async () => {
    const client = await DolittleClient
        .setup()
        .connect();

    const eventStore = client.eventStore.forTenant(TenantId.development);

    await eventStore.commit(new DishPrepared('Bean Blaster Taco', 'Mr. Taco'), 'Dolittle Tacos');
    await eventStore.commit(new DishPrepared('Bean Blaster Taco', 'Mrs. Tex Mex'), 'Dolittle Tacos');
    await eventStore.commit(new DishPrepared('Avocado Artillery Tortilla', 'Mr. Taco'), 'Dolittle Tacos');
    await eventStore.commit(new DishPrepared('Chili Canon Wrap', 'Mrs. Tex Mex'), 'Dolittle Tacos');

    await setTimeout(1000);

    for (const { name, numberOfTimesPrepared } of await client.projections.forTenant(TenantId.development).getAll(DishCounter)) {
        client.logger.info(`The kitchen has prepared ${name} ${numberOfTimesPrepared} times`);
    }
})();
The getAll(DishCounter) method returns all read models for that Projection as an array DishCounter[].
The string given in commit(event, 'event-source-id') is the EventSourceId, which is used to identify where the events come from.
Docker on Windows
Docker on Windows using the WSL2 backend can use massive amounts of RAM if not limited. Configuring a limit in the
.wslconfig file can help greatly, as mentioned in
this issue. The RAM usage is also lowered if you disable the WSL2 backend in Docker for Desktop settings.
Run your microservice
Run your code, and see the different dishes:
$ dotnet run
info: Dolittle.SDK.DolittleClientService[0]
      Connecting Dolittle Client
info: Microsoft.Hosting.Lifetime[0]
      Application started. Press Ctrl+C to shut down.
info: Microsoft.Hosting.Lifetime[0]
      Hosting environment: Production
info: Microsoft.Hosting.Lifetime[0]
      Content root path: .../Projections
info: Dolittle.SDK.Events.Processing.EventProcessors[0]
      Projection 98f9db66-b6ca-4e5f-9fc3-638626c9ecfa registered with the Runtime, start handling requests
The kitchen has prepared Bean Blaster Taco 2 times
The kitchen has prepared Avocado Artillery Tortilla 1 times
The kitchen has prepared Chili Canon Wrap 1 times
$ npx ts-node index.ts
info: Projection 98f9db66-b6ca-4e5f-9fc3-638626c9ecfa registered with the Runtime, start handling requests.
info: The kitchen has prepared Bean Blaster Taco 2 times
info: The kitchen has prepared Avocado Artillery Tortilla 1 times
info: The kitchen has prepared Chili Canon Wrap 1 times
Add Chef read model
Let’s add another read model to keep track of all the chefs and . This time let’s only create the class for the read model:
// Chef.cs
using System.Collections.Generic;

public class Chef
{
    public string Name = "";
    public List<string> Dishes = new();
}
// Chef.ts
export class Chef {
    constructor(
        public name: string = '',
        public dishes: string[] = []
    ) { }
}
Create and get the inline projection for Chef read model
You can also create a Projection inline in the client building steps instead of declaring a class for it.
Let’s create an inline Projection for the Chef read model:
// Program.cs
using System;
using System.Threading.Tasks;
using Dolittle.SDK;
using Dolittle.SDK.Tenancy;
using Microsoft.Extensions.Hosting;

var host = Host.CreateDefaultBuilder()
    .UseDolittle(_ => _
        .WithProjections(_ => _
            .Create("0767bc04-bc03-40b8-a0be-5f6c6130f68b")
                .ForReadModel<Chef>()
                .On<DishPrepared>(_ => _.KeyFromProperty(_ => _.Chef), (chef, @event, projectionContext) =>
                {
                    chef.Name = @event.Chef;
                    if (!chef.Dishes.Contains(@event.Dish)) chef.Dishes.Add(@event.Dish);
                    return chef;
                })
        )
    )
    .Build();
await host.StartAsync();

var client = await host.GetDolittleClient();
var eventStore = client.EventStore.ForTenant(TenantId.Development);
await eventStore.CommitEvent(new DishPrepared("Bean Blaster Taco", "Mr. Taco"), "Dolittle Tacos");
await eventStore.CommitEvent(new DishPrepared("Bean Blaster Taco", "Mrs. Tex Mex"), "Dolittle Tacos");
await eventStore.CommitEvent(new DishPrepared("Avocado Artillery Tortilla", "Mr. Taco"), "Dolittle Tacos");
await eventStore.CommitEvent(new DishPrepared("Chili Canon Wrap", "Mrs. Tex Mex"), "Dolittle Tacos");

await Task.Delay(TimeSpan.FromSeconds(1)).ConfigureAwait(false);

var dishes = await client.Projections
    .ForTenant(TenantId.Development)
    .GetAll<DishCounter>().ConfigureAwait(false);

foreach (var dish in dishes)
{
    Console.WriteLine($"The kitchen has prepared {dish.Name} {dish.NumberOfTimesPrepared} times");
}

var chef = await client.Projections
    .ForTenant(TenantId.Development)
    .Get<Chef>("Mrs. Tex Mex").ConfigureAwait(false);
Console.WriteLine($"{chef.Name} has prepared {string.Join(", ", chef.Dishes)}");

await host.WaitForShutdownAsync();
The Get<Chef>('key') method returns a Projection instance with that particular key. The key is declared by the KeyFromProperty(_.Chef) callback function on the On() method. In this case, the key of each Chef projection instance is based on the chefs name.
// index.ts
(async () => {
    const client = await DolittleClient
        .setup(builder => builder
            .withProjections(_ => _
                .create('0767bc04-bc03-40b8-a0be-5f6c6130f68b')
                    .forReadModel(Chef)
                    .on(DishPrepared, _ => _.keyFromProperty('Chef'), (chef, event, projectionContext) => {
                        chef.name = event.Chef;
                        if (!chef.dishes.includes(event.Dish)) chef.dishes.push(event.Dish);
                        return chef;
                    })
            )
        )
        .connect();

    const eventStore = client.eventStore.forTenant(TenantId.development);

    await eventStore.commit(new DishPrepared('Bean Blaster Taco', 'Mr. Taco'), 'Dolittle Tacos');
    await eventStore.commit(new DishPrepared('Bean Blaster Taco', 'Mrs. Tex Mex'), 'Dolittle Tacos');
    await eventStore.commit(new DishPrepared('Avocado Artillery Tortilla', 'Mr. Taco'), 'Dolittle Tacos');
    await eventStore.commit(new DishPrepared('Chili Canon Wrap', 'Mrs. Tex Mex'), 'Dolittle Tacos');

    await setTimeout(1000);

    for (const { name, numberOfTimesPrepared } of await client.projections.forTenant(TenantId.development).getAll(DishCounter)) {
        client.logger.info(`The kitchen has prepared ${name} ${numberOfTimesPrepared} times`);
    }

    const chef = await client.projections.forTenant(TenantId.development).get(Chef, 'Mrs. Tex Mex');
    client.logger.info(`${chef.name} has prepared ${chef.dishes.join(', ')}`);
})();
The get(Chef, 'key') method returns a Projection instance with that particular key. The key is declared by the keyFromProperty('Chef') callback function on the on() method. In this case, the key of each Chef projection instance is based on the chefs name.
Run your microservice with the inline Chef projection
Run your code, and get a delicious serving of taco:
$ dotnet run
info: Dolittle.SDK.DolittleClientService[0]
      Connecting Dolittle Client
info: Microsoft.Hosting.Lifetime[0]
      Application started. Press Ctrl+C to shut down.
info: Microsoft.Hosting.Lifetime[0]
      Hosting environment: Production
info: Microsoft.Hosting.Lifetime[0]
      Content root path: .../Projections
info: Dolittle.SDK.Events.Processing.EventProcessors[0]
      Projection 0767bc04-bc03-40b8-a0be-5f6c6130f68b registered with the Runtime, start handling requests
info: Dolittle.SDK.Events.Processing.EventProcessors[0]
      Projection 98f9db66-b6ca-4e5f-9fc3-638626c9ecfa registered with the Runtime, start handling requests
The kitchen has prepared Bean Blaster Taco 4 times
The kitchen has prepared Avocado Artillery Tortilla 2 times
The kitchen has prepared Chili Canon Wrap 2 times
Mrs. Tex Mex has prepared Bean Blaster Taco, Chili Canon Wrap
$ npx ts-node index.ts
info: Projection 0767bc04-bc03-40b8-a0be-5f6c6130f68b registered with the Runtime, start handling requests.
info: Projection 98f9db66-b6ca-4e5f-9fc3-638626c9ecfa registered with the Runtime, start handling requests.
info: The kitchen has prepared Bean Blaster Taco 4 times
info: The kitchen has prepared Avocado Artillery Tortilla 2 times
info: The kitchen has prepared Chili Canon Wrap 2 times
info: Mrs. Tex Mex has prepared Bean Blaster Taco,Chili Canon Wrap
What’s next
1.4 - Event Horizon
Get started with the Event Horizon
Welcome to the tutorial for Event Horizon, where you learn how to write a Microservice that produces public events of dishes prepared by chefs, and another microservice consumes those events.
After this tutorial you will have:
Use the tabs to switch between the C# and TypeScript code examples. Full tutorial code available on GitHub for C# and TypeScript.
Prerequisites
This tutorial builds directly upon the getting started guide and the files from the it.
Setup
This tutorial will have a setup with two microservices; one that produces public events, and a consumer that subscribes to those public events. Let’s make a folder structure that resembles that:
└── event-horizon-tutorial/
    ├── consumer/
    ├── producer/
    └── environment/
        └── docker-compose.yml
Go into both the consumer and the producer folders and initiate the project as we’ve gone through in our getting started guide. I.e copy over all the code from the getting started tutorial to the consumer and producer folders. You can choose different languages for the microservices if you want to.
We’ll come back to the docker-compose later in this tutorial.
Producer
Create a Public Filter
A public filter filters all public events that pass the filter into a public stream, which is special stream that another microservice can subscribe to.
A public filter is defined as a method that returns a partitioned filter result, which is an object with two properties:
- a boolean that says whether the event should be included in the public stream
- a partition id which is the partition that the event should belong to in the public stream.
Only public events get filtered through the public filters.
// Program.cs
using System;
using System.Threading.Tasks;
using Dolittle.SDK;
using Dolittle.SDK.Events.Filters;
using Dolittle.SDK.Tenancy;
using Microsoft.Extensions.Hosting;

var host = Host.CreateDefaultBuilder()
    .UseDolittle(_ => _
        .WithFilters(_ => _
            .CreatePublic("2c087657-b318-40b1-ae92-a400de44e507")
            .Handle((@event, eventContext) =>
            {
                Console.WriteLine($"Filtering event {@event} to public streams");
                return Task.FromResult(new PartitionedFilterResult(true, eventContext.EventSourceId.Value));
            })))
    .Build();

await host.StartAsync();
await host.WaitForShutdownAsync();
// index.ts
import { DolittleClient } from '@dolittle/sdk';
import { EventContext } from '@dolittle/sdk.events';
import { PartitionedFilterResult } from '@dolittle/sdk.events.filtering';
import { TenantId } from '@dolittle/sdk.execution';

import './DishHandler';
import { DishPrepared } from './DishPrepared';

(async () => {
    const client = await DolittleClient
        .setup(_ => _
            .withFilters(_ => _
                .createPublic('2c087657-b318-40b1-ae92-a400de44e507')
                    .handle((event: any, context: EventContext) => {
                        client.logger.info(`Filtering event ${JSON.stringify(event)} to public stream`);
                        return new PartitionedFilterResult(true, 'Dolittle Tacos');
                    })
            )
        )
        .connect();
})();
Notice that the returned PartitionedFilterResult has true and an unspecified PartitionId (which is the same as an empty GUID). This means that this filter creates a public stream that includes all public events, and that they are put into the unspecified partition of that stream.
Commit the public event
Now that we have a public stream we can commit public events to start filtering them. Let’s commit a DishPrepared event as a public event from the producer microservice:
// Program.cs
using System;
using System.Threading.Tasks;
using Dolittle.SDK;
using Dolittle.SDK.Events.Filters;
using Dolittle.SDK.Tenancy;
using Microsoft.Extensions.Hosting;

var host = Host.CreateDefaultBuilder()
    .UseDolittle(_ => _
        .WithFilters(_ => _
            .CreatePublic("2c087657-b318-40b1-ae92-a400de44e507")
            .Handle((@event, eventContext) =>
            {
                Console.WriteLine($"Filtering event {@event} to public streams");
                return Task.FromResult(new PartitionedFilterResult(true, eventContext.EventSourceId.Value));
            })))
    .Build();

await host.StartAsync();

var client = await host.GetDolittleClient();
var preparedTaco = new DishPrepared("Bean Blaster Taco", "Mr. Taco");
await client.EventStore
    .ForTenant(TenantId.Development)
    .CommitPublicEvent(preparedTaco, "Dolittle Tacos");

await host.WaitForShutdownAsync();
// index.ts
import { DolittleClient } from '@dolittle/sdk';
import { EventContext } from '@dolittle/sdk.events';
import { PartitionedFilterResult } from '@dolittle/sdk.events.filtering';
import { TenantId } from '@dolittle/sdk.execution';

import './DishHandler';
import { DishPrepared } from './DishPrepared';

(async () => {
    const client = await DolittleClient
        .setup(_ => _
            .withFilters(_ => _
                .createPublic('2c087657-b318-40b1-ae92-a400de44e507')
                    .handle((event: any, context: EventContext) => {
                        client.logger.info(`Filtering event ${JSON.stringify(event)} to public stream`);
                        return new PartitionedFilterResult(true, 'Dolittle Tacos');
                    })
            )
        )
        .connect();

    const preparedTaco = new DishPrepared('Bean Blaster Taco', 'Mr. Taco');

    await client.eventStore
        .forTenant(TenantId.development)
        .commitPublic(preparedTaco, 'Dolittle Tacos');
})();
Now we have a producer microservice with a public stream of DishPrepared events.
Consumer
Subscribe to the public stream of events
Let’s create another microservice that subscribes to the producer’s public stream.
// Program.cs
using System;
using Dolittle.SDK;
using Dolittle.SDK.Tenancy;
using Microsoft.Extensions.Hosting;

Host.CreateDefaultBuilder()
    .UseDolittle(_ => _
        .WithEventHorizons(_ => _
            .ForTenant(TenantId.Development, subscriptions =>
                subscriptions
                    .FromProducerMicroservice("f39b1f61-d360-4675-b859-53c05c87c0e6")
                    .FromProducerTenant(TenantId.Development)
                    .FromProducerStream("2c087657-b318-40b1-ae92-a400de44e507")
                    .FromProducerPartition("Dolittle Tacos")
                    .ToScope("808ddde4-c937-4f5c-9dc2-140580f6919e"))
        )
        .WithEventHandlers(_ => _
            .Create("6c3d358f-3ecc-4c92-a91e-5fc34cacf27e")
            .InScope("808ddde4-c937-4f5c-9dc2-140580f6919e")
            .Partitioned()
            .Handle<DishPrepared>((@event, context) => Console.WriteLine($"Handled event {@event} from public stream"))
        ),
        configuration => configuration.WithRuntimeOn("localhost", 50055))
    .Build()
    .Run();
// index.ts
import { DolittleClient } from '@dolittle/sdk';
import { TenantId } from '@dolittle/sdk.execution';

import { DishPrepared } from './DishPrepared';

(async () => {
    const client = await DolittleClient
        .setup(_ => _
            .withEventHorizons(_ => {
                _.forTenant(TenantId.development, _ => _
                    .fromProducerMicroservice('f39b1f61-d360-4675-b859-53c05c87c0e6')
                        .fromProducerTenant(TenantId.development)
                        .fromProducerStream('2c087657-b318-40b1-ae92-a400de44e507')
                        .fromProducerPartition('Dolittle Tacos')
                        .toScope('808ddde4-c937-4f5c-9dc2-140580f6919e'));
            })
            .withEventHandlers(_ => _
                .create('6c3d358f-3ecc-4c92-a91e-5fc34cacf27e')
                    .inScope('808ddde4-c937-4f5c-9dc2-140580f6919e')
                    .partitioned()
                    .handle(DishPrepared, (event, context) => {
                        client.logger.info(`Handled event ${JSON.stringify(event)} from public stream`);
                     })
            )
        )
        .connect(_ => _
            .withRuntimeOn('localhost', 50055)
        );
})();
Now we have a consumer microservice that:
- Connects to another Runtime running on port
50055
- Subscribes to the producer’s public stream with the id of
2c087657-b318-40b1-ae92-a400de44e507 (same as the producer’s public filter)
- Puts those events into a Scope with id of
808ddde4-c937-4f5c-9dc2-140580f6919e
- Handles them incoming events in a scoped event handler with an id of
6c3d358f-3ecc-4c92-a91e-5fc34cacf27e
There’s a lot of stuff going on the code so let’s break it down:
Connection to the Runtime
configuration => configuration.WithRuntimeOn("localhost", 50055))
.withRuntimeOn('localhost', 50055)
This line configures the hostname and port of the Runtime for this client. By default, it connects to the Runtimes default port of 50053 on localhost.
Since we in this tutorial will end up with two running instances of the Runtime, they will have to run with different ports. The producer Runtime will be running on the default 50053 port, and the consumer Runtime will be running on port 50055.
We’ll see this reflected in the docker-compose.yml file later in this tutorial.
Event Horizon
// Program.cs
.WithEventHorizons(_ => _
    .ForTenant(TenantId.Development, subscriptions =>
        subscriptions
            .FromProducerMicroservice("f39b1f61-d360-4675-b859-53c05c87c0e6")
            .FromProducerTenant(TenantId.Development)
            .FromProducerStream("2c087657-b318-40b1-ae92-a400de44e507")
            .FromProducerPartition("Dolittle Tacos")
            .ToScope("808ddde4-c937-4f5c-9dc2-140580f6919e"))
)
.withEventHorizons(_ => {
    _.forTenant(TenantId.development, _ => _
        .fromProducerMicroservice('f39b1f61-d360-4675-b859-53c05c87c0e6')
            .fromProducerTenant(TenantId.development)
            .fromProducerStream('2c087657-b318-40b1-ae92-a400de44e507')
            .fromProducerPartition('Dolittle Tacos')
            .toScope('808ddde4-c937-4f5c-9dc2-140580f6919e'));
})
Here we define an event horizon subscription. Each subscription is submitted and managed by the Runtime. A subscription defines:
When the consumer’s Runtime receives a subscription, it will send a subscription request to the producer’s Runtime. If the producer accepts that request, the producer’s Runtime will start sending the public stream over to the consumer’s Runtime, one event at a time.
The acceptance depends on two things:
- The consumer needs to know where to access the other microservices, ie the URL address.
- The producer needs to give formal Consent for a tenant in another microservice to subscribe to public streams of a tenant.
We’ll setup the consent later.
The consumer will receive events from the producer and put those events in a specialized event-log that is identified by the scope’s id, so that events received over the event horizon don’t mix with private events. We’ll talk more about the scope when we talk about the scoped event handler.
Scoped Event Handler
// Program.cs
.WithEventHandlers(_ => _
    .Create("6c3d358f-3ecc-4c92-a91e-5fc34cacf27e")
    .InScope("808ddde4-c937-4f5c-9dc2-140580f6919e")
    .Partitioned()
    .Handle<DishPrepared>((@event, context) => Console.WriteLine($"Handled event {@event} from public stream"))
)
.withEventHandlers(_ => _
    .create('6c3d358f-3ecc-4c92-a91e-5fc34cacf27e')
        .inScope('808ddde4-c937-4f5c-9dc2-140580f6919e')
        .partitioned()
        .handle(DishPrepared, (event, context) => {
            client.logger.info(`Handled event ${JSON.stringify(event)} from public stream`);
        })
)
Here we use the opportunity to create an event handler inline by using the client’s builder function. This way we don’t need to create a class and register it as an event handler.
This code will create a partitioned event handler with id 6c3d358f-3ecc-4c92-a91e-5fc34cacf27e (same as from getting started) in a specific scope.
Remember, that the events from an event horizon subscription get put into a scoped event-log that is identified by the scope id. Having the scope id defined when creating an event handler signifies that it will only handle events in that scope and no other.
Setup your environment
Now we have the producer and consumer microservices Heads coded, we need to setup the environment for them to run in and configure their Runtimes to be connected.
This configuration is provided by Dolittle when you’re running your microservices in our platform, but when running multiple services on your local machine you need to configure some of it yourself.
Let’s go to the environment folder we created in the beginning of this tutorial. Here we’ll need to configure:
platform.json configures the environment of a microservice. We have 2 microservices so they need to be configured with different identifiers and names.
Let’s create 2 files, consumer-platform.json and producer-producer.json:
//consumer-platform.json
{
    "applicationName": "EventHorizon Tutorial",
    "applicationID": "5bd8762f-6c39-4ba2-a141-d041c8668894",
    "microserviceName": "Consumer",
    "microserviceID": "a14bb24e-51f3-4d83-9eba-44c4cffe6bb9",
    "customerName": "Dolittle Tacos",
    "customerID": "c2d49e3e-9bd4-4e54-9e13-3ea4e04d8230",
    "environment": "Tutorial"
}
//producer-platform.json
{
    "applicationName": "EventHorizon Tutorial",
    "applicationID": "5bd8762f-6c39-4ba2-a141-d041c8668894",
    "microserviceName": "Producer",
    "microserviceID": "f39b1f61-d360-4675-b859-53c05c87c0e6",
    "customerName": "Dolittle Tacos",
    "customerID": "c2d49e3e-9bd4-4e54-9e13-3ea4e04d8230",
    "environment": "Tutorial"
}
Resources
resources.json configures where a microservices stores its event store. We have 2 microservices so they both need their own event store database. By default the database is called event_store.
Create 2 more files, consumer-resources.json and producer-resources.json:
//consumer-resources.json
{
    // the tenant to define this resource for
    "445f8ea8-1a6f-40d7-b2fc-796dba92dc44": {
        "eventStore": {
            "servers": [
                // hostname of the mongodb
                "mongo"
            ],
            // the database name for the event store
            "database": "consumer_event_store"
        }
    }
}
//producer-resources.json
{
    // the tenant to define this resource for
    "445f8ea8-1a6f-40d7-b2fc-796dba92dc44": {
        "eventStore": {
            "servers": [
                // hostname of the mongodb
                "mongo"
            ],
            // the database name for the event store
            "database": "producer_event_store"
        }
    }
}
Development Tenant
The tenant id 445f8ea8-1a6f-40d7-b2fc-796dba92dc44 is the value of TenantId.Development.
Microservices
microservices.json configures where the producer microservice is so that the consumer can connect to it and subscribe to its events.
Let’s create a consumer-microservices.json file to define where the consumer can find the producer:
// consumer-microservices.json
{
    // the producer microservices id, hostname and port
    "f39b1f61-d360-4675-b859-53c05c87c0e6": {
        "host": "producer-runtime",
        "port": 50052
    }
}
Consent
event-horizon-consents.json configures the Consents that the producer gives to consumers.
Let’s create producer-event-horizon-consents.json where we give a consumer consent to subscribe to our public stream.
// producer-event-horizon-consents.json
{
    // the producer's tenant that gives the consent
    "445f8ea8-1a6f-40d7-b2fc-796dba92dc44": [
        {
            // the consumer's microservice and tenant to give consent to
            "microservice": "a14bb24e-51f3-4d83-9eba-44c4cffe6bb9",
            "tenant": "445f8ea8-1a6f-40d7-b2fc-796dba92dc44",
            // the producer's public stream and partition to give consent to subscribe to
            "stream": "2c087657-b318-40b1-ae92-a400de44e507",
            "partition": "Dolittle Tacos",
            // an identifier for this consent. This is random
            "consent": "ad57aa2b-e641-4251-b800-dd171e175d1f"
        }
    ]
}
Now we can glue all the configuration files together in the docker-compose.yml. The configuration files are mounted inside /app.dolittle/ inside the dolittle/runtime image.
version: '3.8'
services:
  mongo:
    image: dolittle/mongodb
    hostname: mongo
    ports:
      - 27017:27017
    logging:
      driver: none

  consumer-runtime:
    image: dolittle/runtime:latest
    volumes:
      - ./consumer-platform.json:/app/.dolittle/platform.json
      - ./consumer-resources.json:/app/.dolittle/resources.json
      - ./consumer-microservices.json:/app/.dolittle/microservices.json
    ports:
      - 50054:50052
      - 50055:50053

  producer-runtime:
    image: dolittle/runtime:latest
    volumes:
      - ./producer-platform.json:/app/.dolittle/platform.json
      - ./producer-resources.json:/app/.dolittle/resources.json
      - ./producer-event-horizon-consents.json:/app/.dolittle/event-horizon-consents.json
    ports:
      - 50052:50052
      - 50053:50053
Resource file naming
The configuration files mounted inside the image need to be named as they are defined in the
configuration reference. Otherwise the Runtime can’t find them.
Start the environment
Start the docker-compose with this command
This will spin up a MongoDB container and two Runtimes in the background.
Docker on Windows
Docker on Windows using the WSL2 backend can use massive amounts of RAM if not limited. Configuring a limit in the
.wslconfig file can help greatly, as mentioned in
this issue. The RAM usage is also lowered if you disable the WSL2 backend in Docker for Desktop settings.
Run your microservices
Run both the consumer and producer microservices in their respective folders, and see the consumer handle the events from the producer:
Producer
$ dotnet run
info: Dolittle.SDK.DolittleClientService[0]
      Connecting Dolittle Client
info: Microsoft.Hosting.Lifetime[0]
      Application started. Press Ctrl+C to shut down.
info: Microsoft.Hosting.Lifetime[0]
      Hosting environment: Production
info: Microsoft.Hosting.Lifetime[0]
      Content root path: /Users/jakob/Git/dolittle/DotNET.SDK/Samples/Tutorials/EventHorizon/Producer
info: Dolittle.SDK.Events.Processing.EventProcessors[0]
      Public Filter 2c087657-b318-40b1-ae92-a400de44e507 registered with the Runtime, start handling requests
info: Dolittle.SDK.Events.Processing.EventProcessors[0]
      EventHandler f2d366cf-c00a-4479-acc4-851e04b6fbba registered with the Runtime, start handling requests
Filtering event DishPrepared to public streams
info: DishHandler[0]
      Mr. Taco has prepared Bean Blaster Taco. Yummm!
Consumer
$ dotnet run
info: Dolittle.SDK.DolittleClientService[0]
      Connecting Dolittle Client
info: Microsoft.Hosting.Lifetime[0]
      Application started. Press Ctrl+C to shut down.
info: Microsoft.Hosting.Lifetime[0]
      Hosting environment: Production
info: Microsoft.Hosting.Lifetime[0]
      Content root path: /Users/jakob/Git/dolittle/DotNET.SDK/Samples/Tutorials/EventHorizon/Consumer
info: Dolittle.SDK.Events.Processing.EventProcessors[0]
      EventHandler 6c3d358f-3ecc-4c92-a91e-5fc34cacf27e registered with the Runtime, start handling requests
Handled event DishPrepared from public stream
Producer
$ npx ts-node index.ts
info: EventHandler f2d366cf-c00a-4479-acc4-851e04b6fbba registered with the Runtime, start handling requests.
info: Public Filter 2c087657-b318-40b1-ae92-a400de44e507 registered with the Runtime, start handling requests.
info: Filtering event {"Dish":"Bean Blaster Taco","Chef":"Mr. Taco"} to public stream
info: Mr. Taco has prepared Bean Blaster Taco. Yummm!
Consumer
$ npx ts-node index.ts
info: EventHandler 6c3d358f-3ecc-4c92-a91e-5fc34cacf27e registered with the Runtime, start handling requests.
info: Handled event {"Dish":"Bean Blaster Taco","Chef":"Mr. Taco"} from public stream
What’s next
2 - Concepts
The essential concepts of Dolittle
The Concepts section helps you learn about the abstractions and components of Dolittle.
To learn how to write a Dolittle application read our tutorial.
2.1 - Overview
Get a high-level outline of Dolittle and it’s components
Dolittle is an event-driven microservices platform built to harness the power of events. It’s a reliable ecosystem for microservices to thrive so that you can build complex applications with small, focused microservices that are loosely coupled, event driven and highly maintainable.
Components
- Events are “facts that have happened” in your system and they form the truth of the system.
- Event Handlers & Filter and Projections process events.
- The Runtime is the core of all Dolittle applications and manages connections from the SDKs and other Runtimes to its Event Store. The Runtime is packaged as a Docker image
- The SDK is a client-library that handles communication with the Runtime for your code.
- The Head is the user code that uses the Dolittle SDK. This is where your business-code lives, or is called from. You create this as a docker-image where your code uses the SDK. It will usually contain your domain-code and a frontend.
- The Event Store is the underlying database where the events are stored.
- A Microservice is one or more Heads talking to a Runtime.
- Microservices can produce public events and consume such events that flow over the Event Horizon.
flowchart LR
    subgraph MSP["Microservice (Consumer)"]
        subgraph H1[Head]
            F1[Frontend] --> Domain1
            subgraph B1[Backend]
                Domain1[Domain code] --> SDK1[SDK]
            end
        end
        SDK1 --> R1[Runtime]
        R1 --> ES1[(Event Store)]
    end
    subgraph MS1["Microservice (Producer)"]
        subgraph H2[Head]
            F2[Frontend] --> Domain2[Domain code]
            subgraph Backend
            Domain2 --> SDK2[SDK]
            end
        end
        SDK2 --> R2[Runtime]
        R2 --> ES2[(Event Store)]
    end
    R1 --Event Horizon gets<br/>public events--> R2
Event-Driven
Dolittle uses an Event-Driven Architecture and supports Event Sourcing, which means to “capture all changes to an applications state as a sequence of events”, these events then form the “truth” of the system. Events cannot be changed or deleted as they represent facts about things that have happened.
With event sourcing your applications state is no longer stored primarilly as a snapshot of your current state but rather as a whole history of all the state-changing events. These events can be replayed to recreate the state whenever needed.
For example: you can replay them in a test environment to see how a changed system would have behaved. By running through events up to a point in time the system can also reproduce the state it had at any point in time.
Event sourcing supports high scalability by being loose coupling. The events are the only thing that needs to be shared between different parts of the system, and separate parts can be made with different trade-offs for the scale they need to handle.
The history of events also forms a ready-made audit log to help with debugging and auditing.
Microservice
A microservice, in our parlance, consists of one or many heads talking to one Runtime. Each microservice is autonomous and has its own resources and event store.
The core idea is that a microservice is an independently scalable unit of deployment that can be reused in other parts of the software however you like. You could compose as one application running inside a single process, or you could spread it across a cluster. It really is a deployment choice once the software is giving you this freedom.
This diagram shows the anatomy of a microservice with one head.
flowchart LR
    Frontend --> Backend
    subgraph Head
        Backend --> SDK
    end
    SDK --> Runtime
    Runtime --> ES[(Event Store)]
    Runtime --> RC[(Read Cache)]
Read Cache
The
Read Cache in these pictures is not necessarily part of Dolittle. Different
projections call for different solutions depending on the sort of load and data to be stored.
Multi-tenancy
Since compute is usually the most expensive resource, the Dolittle Runtime and SDK’s has been built from the ground up with multi-tenancy in mind. Multi-tenancy means that a single instance of the software and its supporting infrastructure serves multiple customers, making optimal use of resources. Dolittle supports multi-tenancy by separating the event stores and resources for each tenant so that each tenant only has access to its own data.
This diagram shows a microservice with 2 tenants, each of them with their own resources.
flowchart LR
    Frontend --> Backend
    subgraph Head
        Backend --> SDK
    end
    SDK --> Runtime
    Runtime --> ES1[("Tenant 1
    Event Store")]
    Runtime --> RC1[("Tenant 1
    Read Cache")]
    Runtime --> ES2[("Tenant 2
    Event Store")]
    Runtime --> RC2[("Tenant 2
    Read Cache")]
What Dolittle isn’t
Dolittle is not a traditional backend library nor an event driven message bus like Kafka. Dolittle uses Event Sourcing, which means that the state of the system is built from an append-only Event Store that has all the events ever produced by the application.
Dolittle isn’t a Command-Query Responsibility Segregation (CQRS) framework with formalized commands and queries, but it used to be. Dolittle allows you to write your own CQRS -abstractions on top of the SDK if you so desire.
Technology
The Event Store is implemented with MongoDB, and the resources -system give you access to a tenanted MongoDatabase for easy storage of your read-cache.
What’s next
2.2 - Events
The source of truth in the system
An Event is a serializable representation of “a fact that has happened within your system”.
“A fact”
An event is a change (fact) within our system. The event itself contains all the relevant information concerning the change. At its simplest, an event can be represented by a name (type) if it’s enough to describe the change.
More usually, it is a simple Data Transfer Object (DTO) that contains state and properties that describe the change. It does not contain any calculations or behavior.
“that has happened”
As the event has happened, it cannot be changed, rejected, or deleted. This forms the basis of Event Sourcing If you wish to change the action or the state change that the event encapsulates, then it is necessary to initiate an action that results in another event that nullifies the impact of the first event.
This is common in accounting, for example:
Sally adds 100$ into her bank, which would result in an event like “Add 100$ to Sally’s account”. But if the bank accidentally adds 1000$ instead of the 100$ then a correcting event should be played, like “Subtract 900$ from Sally’s account”. And with event sourcing, this information is preserved in the event store for eg. later auditing purposes.
Naming
To indicate that the event “has happened in the past”, it should be named as a verb in the past tense. Often it can contain the name of the entity that the change or action is affecting.
- ✅
DishPrepared
- ✅
ItemAddedToCart
- ❌
StartCooking
- ❌
AddItemToCart
“within your system”
An event represents something interesting that you wish to capture in your system. Instead of seeing state changes and actions as side effects, they are explicitly modeled within the system and captured within the name, state and shape of our Event.
State transitions are an important part of our problem space and should be modeled within our domain — Greg Young
Naming
An event should be expressed in language that makes sense in the domain, also known as Ubiquitous Language. You should avoid overly technical/CRUD-like events where such terms are not used in the domain.
For example, in the domain of opening up the kitchen for the day and adding a new item to the menu:
- ✅
KitchenOpened
- ✅
DishAddedToMenu
- ❌
TakeoutServerReady
- ❌
MenuListingElementUpdated
Main structure of an Event
This is a simplified structure of the main parts of an event. For the Runtime, the event is only a JSON-string which is saved into the Event Store.
Event {
    Content object
    EventLogSequenceNumber int
    EventSourceId string
    Public bool
    EventType {
        EventTypeId Guid
        Generation int
    }
}
For the whole structure of an event as defined in protobuf, please check Contracts.
Content
This is the content of the to be committed. It needs to be serializable to JSON.
EventLogSequenceNumber
This is the events position in the Event Log. It uniquely identifies the event.
EventSourceId
EventSourceId represents the source of the event like a “primary key” in a traditional database. The value of the event source id is simply a string, and we don’t enforce any particular rules or restrictions on the event source id.
By default, partitioned event handlers use it for partitioning.
Public vs. Private
There is a basic distinction between private events and public events. In much the same way that you would not grant access to other applications to your internal database, you do not allow other applications to receive any of your private events.
Private events are only accessible within a single Tenant so that an event committed for one tenant cannot be handled outside of that tenant.
Public events are also accessible within a single tenant but they can also be added to a public Stream through a public filterfor other microservices to consume. Your public event streams essentially form a public API for the other microservices to subscribe to.
Changes to public events
Extra caution should be paid to changing public events so as not to break other microservices consuming those events. We’re developing strategies to working with changes in your events and microservices.
EventType
An EventType is the combination of an EventTypeId to uniquely identify the type of event it is and the event type’s Generation.
This decouples the event from a programming language and enables the renaming of events as the domain language evolves.
For the Runtime, the event is just a JSON-string. It doesn’t know about the event’s content, properties, or type (in its respective programming language). The Runtime saves the event to the event log and from that point the event is ready to be processed by the EventHandlers & Filters. For this event to be serialized to JSON and then deserialized back to a type that the client’s filters and event handlers understand, an event type is required.
This diagram shows us a simplified view of committing a single event with the type of DishPrepared. The Runtime receives the event, and sends it back to us to be handled. Without the event type, the SDK wouldn’t know how to deserialize the JSON message coming from the Runtime.
sequenceDiagram
    participant SDK
    participant Runtime
    participant Event Store
    SDK->>Runtime: Commit(DishPrepared)
    Runtime->>Event Store: Serialize the event into<br/>JSON and save it
    Runtime->>SDK: Commit successful
    Runtime->>Runtime: Process the event in<br/>handlers and filters
    Runtime->>SDK: Send the JSON of the event<br/>to the event-handler
    SDK->>SDK: Deserialize according to EventTypeId<br/>found in JSON and call on the handler
Event types are also important when wanting to deserialize events coming from other microservices. As the other microservice could be written in a completely different programming language, event types provide a level of abstraction for deserializing the events.
Why not use class/type names instead of GUIDs?
When consuming events from other microservices it’s important to remember that they name things according to their own domain and conventions.
As an extreme example, a microservice could have an event with a type CustomerRegistered. But in another microservice in a different domain, written in a different language, this event type could be called user_added.
GUIDs also solve the problem of having duplicate names, it’s not hard to imagine having to have multiple events with the type of CustomerRegisterd in your code coming from different microservices.
Generations
Generations are still under development. At the moment they are best to be left alone.
As the code changes, the structures and contents of your events are also bound to change at some point. In most scenarios, you will see that you need to add more information to events. These iterations on the same event type are called generations. Whenever you add or change a property in an event, the generation should be incremented to reflect that it’s a new version of the event. This way the filters and handlers can handle different generations of an event.
2.3 - Streams
Get an overview of Event Streams
So, what is a stream? A stream is simply a list with two specific attributes:
- Streams are append-only. Meaning that items can only be put at the very end of the stream, and that the stream is not of a fixed length.
- Items in the stream immutable. The items or their order cannot change.
An event stream is simply a stream of events. Each stream is uniquely identified within an Event Store by a GUID. An event can belong many streams, and in most cases it will at least belong to two streams (one being the event log).
As streams are append-only, an event can be uniquely identified by its position in a stream, including in the event log.
Event streams are perhaps the most important part of the Dolittle Runtime. To get a different and more detailed perspective on streams, please read our section on event sourcing and streams.
Rules
There are rules on streams to maintain idempotency and the predictability of Runtime. These rules are enforced by the Runtime:
- The ordering of the events cannot change
- Events can only be appended to the end of the stream
- Events cannot be removed from the stream
- A partitioned stream cannot be changed to be unpartitioned and vice versa
Partitions
If we dive deeper into event streams we’ll see that we have two types of streams in the Runtime; partitioned and unpartitioned streams.
A partitioned stream is a stream that is split into chunks. These chunks are uniquely identified by a PartitionId (string). Each item in a partitioned stream can only belong to a single partition.
An unpartitioned stream only has one chunk with a PartitionId of 00000000-0000-0000-0000-000000000000.
There are multiple reasons for partitioning streams. One of the benefits is that it gives a way for the developers to partition their events and the way they are processed in an Event Handler. Another reason for having partitions becomes apparent when needing to subscribe to other streams in other microservices. We’ll talk more about that in the Event Horizon section.
Public vs Private Streams
There are two different types of event streams; public and private. Private streams are exposed within their Tenant and public streams are additionally exposed to other microservices.
Through the Event Horizon other microservices can subscribe to your public streams. Using a public filter you can filter out public events to public streams.
Stream Processor
A stream processor consists of an event stream and an event processor. It takes in a stream of events, calls the event processor to process the events in order, keeps track of which events have already been processed, which have failed and when to retry. Each stream processor can be seen as the lowest level unit-of-work in regards to streams and they all run at the same time, side by side, in parallel.
Since the streams are also uniquely identified by a stream id we can identify each stream processor by their SourceStream, EventProcessor pairing.
// structure of a StreamProcessor
StreamProcessor {
    SourceStream Guid
    EventProcessor Guid
    // the next event to be processed
    Position int
    // for keeping track of failures and retry attempts
    LastSuccesfullyProcessed DateTime
    RetryTime DateTime
    FailureReason string
    ProcessingAttempts int
    IsFailing bool
}
The stream processors play a central role in the Runtime. They enforce the most important rules of Event Sourcing; an event in a stream is not processed twice (unless the stream is being replayed) and that no event in a stream is skipped while processing.
Stream processors are constructs that are internal to the Runtime and there is no way for the SDK to directly interact with stream processors.
Dealing with failures
What should happen when a processor fails? We cannot skip faulty events, which means that the event processor has to halt until we can successfully process the event. This problem can be mitigated with a partitioned stream because the processing only stops for that single partition. This way we can keep processing the event stream even though one, or several, of the partitions fail. The stream processor will at some point retry processing the failing partitions and continue normally if it succeeds.
Event Processors
There are 2 different types of event processors:
- Filters that can create new streams
- Processors that process the event in the user’s code
These are defined by the user with Event Handlers & Filters.
When the processing of an event is completed it returns a processing result back to the stream processor. This result contains information on whether or not the processing succeeded or not. If it did not succeed it will say how many times it has attempted to process that event, whether or not it should retry and how long it will wait until retrying.
Multi-tenancy
When registering processors they are registered for every tenant in the Runtime, resulting in every tenant having their own copy of the stream processor.
Formula for calculating the total number of stream processors created:
(((2 x event handlers) + filters) x tenants) + event horizon subscriptions = stream processors
Let’s provide an example:
For both the filter and the event processor “processors” only one stream processor is needed. But for event handlers we need two because it consists of both a filter and an event processor. If the Runtime has 10 tenants and the head has registered 20 event handlers we’d end up with a total of 20 x 2 x 10 = 400 stream processors.
2.4 - Event Handlers & Filters
Overview of event handlers and filters
In event-sourced systems it is usually not enough to just say that an Event occurred. You’d expect that something should happen as a result of that event occurring as well.
In the Runtime we can register 2 different processors that can process events; Event Handlers and Filters.
They take in a Stream of events as an input and does something to each individual event.
Each of these processors is a combination of one or more Stream Processors and Event Processor.
What it does to the event is dependent on what kind of processor it is. We’ll talk more about different processors later in this section.
Registration
In order to be able to deal with committed events, the heads needs to register their processors. The Runtime offers endpoints which initiates the registration of the different processors. Only registered processors will be ran. When the head disconnects from the Runtime all of the registered processors will be automatically unregistered and when it re-connects it will re-register them again. Processors that have been unregistered are idle in the Runtime until they are re-registered again.
Scope
Each processor processes events within a single scope. If not specified, they process events from the default scope. Events coming over the Event Horizon are saved to a scope defined by the event horizon Subscription.
Filters
The filter is a processor that creates a new stream of events from the event log. It is identified by a FilterId and it can create either a partitioned or unpartitioned stream. The processing in the filter itself is however not partitioned since it can only operate on the event log stream which is an unpartitioned stream.
flowchart LR
    EL[(Event Log)] --> StreamProcessor --> F[EventProcessor<br/>Filter code] --> S[(Stream)]
The filter is a powerful tool because it can create an entirely customized stream of events. It is up to the developer on how to filter the events, during filtering both the content and the metadata of the event is available for the filter to consider. If the filter creates a partitioned stream it also needs to include which partition the event belongs to.
However with great power comes great responsibility. The filters cannot be changed in a way so that it breaks the rules of streams. If it does, the Runtime would notice it and return a failed registration response to the head that tried to register the filter.
Public Filters
Since there are two types of streams there are two kinds of filters; public and private. They function in the same way, except that private filters creates private streams and a public filter creates public streams. Only public events can be filtered into a public stream.
Event Handlers
The event handler is a combination of a filter and an event processor. It is identified by an EventHandlerId which will be both the id of both the filter and the event processor.
flowchart LR
    subgraph implicit filter
        direction LR
        EL[(Event Log)] --> FSP[StreamProcessor] --> F[Filter based on<br/>EventType] --> S[(Stream)]
    end
    S --> SP[StreamProcessor]
    SP --> EP["EventProcessor<br/>Handle() function"]
The event handler’s filter is filtering events based on the EventType that the event handler handles.
Event handlers can be either partitioned or unpartitioned. Partitioned event handlers uses, by default, the EventSourceId of each event as the partition id. The filter follows the same rules for streams as other filters.
Changes to event handlers
As event handlers create a stream based on the types of events they handles, they have to uphold the rules of streams. Every time an event handler is registered the Runtime will check that these rules are upheld and that the event handlers definition wouldn’t invalidate the already existing stream. Most common ways of breaking the rules are:
Disallowed: Removing events from the stream
The event handler stops handling an event type that it has already handled. This would mean that events would have to be removed from the stream, breaking the append-only rule.
Given an event handler that handles DishPrepared and RecipeAdded events, and the following event log we would get the stream as follows:
flowchart LR
    subgraph Log[Event Log]
        DP1L[1: DishPrepared]
        RA1L[2: RecipeAdded]
        DA1L[3: DishAddedToMenu]:::Dashed
        DP2L[4: DishPrepared]
    end
    EH[Event Handler v1<br/>Handles:<br/>DishPrepared<br/>DishServed]
    DP1L --> EH --> DP1S
    RA1L --> EH --> RA1S
    DP2L --> EH --> DP2S
    subgraph S1[Stream before]
        DP1S[1: DishPrepared]
        RA1S[2: RecipeAdded]
        DP2S[3: DishPrepared]
    end

    classDef Dashed stroke-dasharray: 5, 5
The Event Handler creates an invalid stream by removing an already handled event type:
flowchart LR
    subgraph Log[Event Log]
        DP1L[1: DishPrepared]
        RA1L[2: RecipeAdded]:::Dashed
        DA1L[3: DishAddedToMenu]:::Dashed
        DP2L[4: DishPrepared]
    end
    EH2[Event Handler v2<br/>Handles:<br/>DishPrepared]
    DP1L --> EH2 --> DP1S2
    DP2L --> EH2 --> DP2S2

    subgraph S2[Stream after]
        DP1S2[1: DishPrepared]
        RA1S2{{?: RecipeAdded}}:::Error
        DP2S2[2: DishPrepared]
    end

    classDef Dashed stroke-dasharray: 5, 5
    classDef Error stroke:#ff0000,stroke-width:2px,stroke-dasharray: 5, 5
Since the RecipeAdded event-type has already been committed to the stream, the stream would have to be changed to remove the RecipeAdded event-type. This would break the append-only rule, as the stream would have to be changed. This change is invalid, and will be rejected by the Runtime.
Disallowed: Adding events in positions other than the end of the stream
The event handler starts handling a new event type that has already occurred in the event log. This would mean changing the ordering of events in the streams and break the append-only rule.
flowchart LR
    subgraph Log[Event Log]
        DP1L[1: DishPrepared]
        RA1L[2: RecipeAdded]:::Dashed
        DA1L[3: DishAddedToMenu]:::Dashed
        DP2L[4: DishPrepared]
    end
    EH[Event Handler v1<br/>Handles:<br/>DishPrepared]
    DP1L --> EH --> DP1S
    DP2L --> EH --> DP2S
    subgraph S1[Stream before]
        DP1S[1: DishPrepared]
        DP2S[3: DishPrepared]
    end

    classDef Dashed stroke-dasharray: 5, 5
The Event Handler creates an invalid stream by adding a new event at a position before the end of the existing stream:
flowchart LR
    subgraph Log[Event Log]
        DP1L[1: DishPrepared]
        RA1L[2: RecipeAdded]
        DA1L[3: DishAddedToMenu]:::Dashed
        DP2L[4: DishPrepared]
    end
    EH2[Event Handler v2<br/>Handles:<br/>DishPrepared<br/>RecipeAdded]
    DP1L --> EH2 --> DP1S2
    RA1L --> EH2 --> RA1S2
    DP2L --> EH2 --> DP2S2

    subgraph S2[Stream after]
        DP1S2[1: DishPrepared]
        RA1S2{{2: RecipeAdded}}:::Error
        DP2S2[3: DishPrepared]
    end

    classDef Dashed stroke-dasharray: 5, 5
    classDef Error stroke:#ff0000,stroke-width:2px
It is possible to add a new type of event into the handler if it doesn’t invalidate the stream. For example, you can add a new event type to the handler if it hasn’t ever been committed before any of the other types of events into the event log.
Replaying events
An event handler is meant to handle each events only once, however if you for some reason need to “replay” or “re-handle” all or some of the events for an event handler, you can use the Dolittle CLI to initiate this while the microservice is running.
The replay does not allow you to change what event types the event handler handles. To do this, you need to change the event handlers EventHandlerId. This registers a completely new event handler with the Runtime, and a completely new stream is created. This way no old streams are invalidated.
If you want to have an event handler for read models which replays all of its events whenever it changes, try using Projections instead, as they are designed to allow frequent changes.
Idempotence
As creating a new event handler will handle all of its events, it’s very important to take care of the handle methods' side effects. For example, if the handler sends out emails those emails would be re-sent.
New functionality
The replay functionality was added in version 7.1.0 of the Runtime, so you’ll need a version newer than that to replay Event Handler events.
Multi-tenancy
When registering processors they are registered for every tenant in the Runtime, resulting in every tenant having their own copy of the Stream Processor.
2.5 - Projections
Overview of projections
A Projection is a special type of Event Handler, that only deals with updating or deleting Read Models based on Events that it handles. The read model instances are managed by the Runtime in a read model store, where they are fetched from whenever needed. This is useful, for when you want to create views from events, but don’t want to manually manage the read model database.
Read models defines the data views that you are interested in presenting, while a projection specifies how to compute this view from the event store. There is a one-to-one relationship between a projection and their corresponding read model. A projection can produce multiple instances of that read model and it will assign each of them a unique key. This key is based on the projections key selectors.
Example of a projection:
flowchart LR
    subgraph Business moments
        direction LR
        CR["Customer Registered<br/>Id: 123<br/>Name: John Doe"]
        DAO["Debit Account Opened<br/>Id: 456<br/>Balance: 0"]
        DP["Debit Performed<br/>Account: 456<br/>Amount: $20"]
        WP["Withdrawal Performed<br/>Account: 56<br/>Amount: $10"]
    end
    subgraph Operations
        CR --> O1["Customer = Id<br/>Name = Name"]
        DAO --> O2["Id = Id<br/>Type = Debit"]
        DP --> O3["Id = Id<br/>Amount += Amount"]
        WP --> O4["Id = Id<br/>Amount -= Amount"]
    end
    subgraph Read Model
        O1 --> RM
        O2 --> RM
        O3 --> RM
        O4 --> RM["Account Details
        Id: 456
        Type: Debit
        Customer: 123
        Name: John Doe
        Balance: $10"]
    end
Read model
A read model represents a view into the data in your system, and are used when you want to show data or build a view. It’s essentially a Data transfer object (DTO) specialized for reading.
They are computed from the events, and are as such read-only object without any behaviour seen from the user interface.
Some also refer to read models as materialized views.
As read models are computed objects, you can make as many as you want based on whatever events you would like.
We encourage you to make every read model single purpose and specialized for a particular use.
By splitting up or combining data so that a read model matches exactly what an end-user sees on a single page, you’ll be able to iterate on these views without having to worry how it will affect other pages.
On the other hand, if you end up having to fetch more than one read model to get the necessary data for a single page, you should consider combining those read models.
The read models are purely computed values, which you are free to throw them away or recreate lost ones at any point in time without loosing any data.
The Runtime stores the read models into a read model store, which is defined in the resources.json. Each read model gets its own unique key, which is defined by the projections key selector.
Projection
A projections purpose is to populate the data structure (read model) with information from the event store. Projections behave mostly like an event handler, but they don’t produce a Stream from the events that it handles. This means that changing a projection (like adding or removing handle methods from it) will always make it replay and recalculate the read models from the start of the Event Log. This makes it easier to iterate and develop these read models.
Idempotence
As changing projections will replay all of the events to it, it’s very important that the handle methods of a projection are
idempotent and only modify the read models state. A projection should not have side effects, like sending out emails as on replay those emails would be resent.
This is a simplified structure of a projection:
Projection {
    ProjectionId Guid
    Scope Guid
    ReadModel type
    EventTypes EventType[]
}
For the whole structure of a projections as defined in protobuf, please check Contracts.
Key selector
Each read model instance has a key, which uniquely identifies it within a projection. A projection handles multiple instances of its read models by fetching the read model with the correct key. It will then apply the changes of the on methods to that read model instance.
The projection fetches the correct read model instance by specifying the key selector for each on method. There are 3 different key selector:
- Event source based key selector, which defines the read model instances key as the events
EventSourceId.
- Event property based key selector, which defines the key as the handled events property.
- Partition based key selector, which defines the key as the events streams
PartitionId.
2.6 - Tenants
What is a Tenant & Multi-tenancy
Dolittle supports having multiple tenants using the same software out of the box.
What is a Tenant?
A Tenant is a single client that’s using the hosted software and infrastructure. In a SaaS (Software-as-a-Service) domain, a tenant would usually be a single customer using the service. The tenant has its privileges and resources only it has access to.
What is Multi-tenancy?
In a multi-tenant application, the same instance of the software is used to serve multiple tenants. An example of this would be an e-commerce SaaS. The same basic codebase is used by multiple different customers, each who has their own customers and their own data.
Multi-tenancy allows for easier scaling, sharing of infrastructure resources, and easier maintenance and updates to the software.
flowchart TB
    T1((Tenant A)) --> A[Application]
    T2((Tenant B)) --> A
    T3((Tenant C)) --> A
    A --> DB1[(Tenant A)]
    A --> DB2[(Tenant B)]
    A --> DB3[(Tenant C)]
Multi-tenancy in Dolittle
In Dolittle, every tenant in a Microservice is identified by a GUID. Each tenant has their own Event Store, and Read Cache managed by the Runtime. These event stores are defined in the Runtime configuration files. The tenants all share the same Runtime, which is why you need to specify the tenant which to connect to when using the SDKs.
2.7 - Event Horizon
Learn about Event Horizon, Subscriptions, Consumers and Producers
At the heart of the Dolittle runtime sits the concept of Event Horizon. Event horizon is the mechanism for a microservice to give Consent for another microservice to Subscribe to its Public Stream and receive Public Events.
flowchart BT
    subgraph Producer
        ProdEventLog[(Event Log)] -->|Public events| PublicFilter[Public Filter]
        PublicFilter -->|matches go into| PublicStream[(Public Stream)]
        Consent(((Consent))) -->|gives access to| PublicStream
    end
    subgraph Consumer
        direction LR
        Subscription(((Subscription)))
        Subscription -->|stores| ConEventLog[(Scoped Event Log)]
    end
    Subscription -->|asks for events| Consent
Producer
The producer is a Tenant in a Microservice that has one or more public streams that Consumer can subscribe to.
Only public events are eligible for being filtered into a public stream.
Once an event moves past the event horizon, the producer will no longer see it. The producer doesn’t know or care, what happens with an event after it has gone past the event horizon.
Consent
The producer has to give consent for a consumer to subscribe to a Partition in the producers public stream. Consents are defined in event-horizon-consents.json.
Consumer
A consumer is a tenant that subscribes to a partition in one of the Producer’s public streams. The events coming from the producer will be stored into a Scoped Event Log in the consumer’s event store. This way even if the producer would get removed or deprecated, the produced events are still saved in the consumer.
To process events from a scoped event log you need scoped event handlers & filters.
The consumer sets up the subscription and will keep asking the producer for events. The producers Runtime will check whether it has a consent for that specific subscription and will only allow events to flow if that consent exists. If the producer goes offline or doesn’t consent, the consumer will keep retrying.
Subscription
A subscription is setup by the consumer to receive events from a producer. Additionally the consumer has to add the producer to its microservices.json.
This is a simplified structure of a Subscription in the consumer.
Subscription {
    // the producers microservice, tenant, public stream and partition
    MicroserviceId Guid
    TenantId Guid
    PublicStreamId Guid
    PartitionId string
    // the consumers scoped event log
    ScopeId Guid
}
Multiple subscriptions to same scope
If multiple subscriptions route to the same
scoped event log, the ordering of the events cannot be guaranteed. There is no way to know in which order the subscriber receives the events from multiple producers as they are all independent of each other.
Event migration
We’re working on a solution for event migration strategies using Generations. As of now there is no mechanism for dealing with generations, so they are best left alone.
Extra caution should be paid to changing public events so as not to break other microservices consuming those events.
2.8 - Event Store
Introduction to the Event Store
An Event Store is a database optimized for storing Events in an Event Sourced system. The Runtime manages the connections and structure of the stored data. All Streams, Event Handlers & Filters, Aggregates and Event Horizon Subscriptions are being kept track inside the event store.
Events saved to the event store cannot be changed or deleted. It acts as the record of all events that have happened in the system from the beginning of time.
Each Tenant has their own event store database, which is configured in resources.json.
Scope
Events that came over the Event Horizon need to be put into a scoped collection so they won’t be mixed with the other events from the system.
Scoped collections work the same way as other collections, except you can’t have Public Streams or Aggregates.
Default scope
Technically all collections are scoped, with the default scopeID being 00000000-0000-0000-0000-000000000000.
This is left out of the naming to make the event store more readable. When we talk about scoped concepts, we always refer to non-default scopes.
Structure of the Event Store
This is the structure of the event store implemented in MongoDB. It includes the following collections in the default Scope:
event-logaggregatesstream-processor-statesstream-definitionsstream-<streamID>public-stream-<streamID>
For scoped collections:
Following JSON structure examples have each property’s BSON type as the value.
event-log
The Event Log includes all the Events committed to the event store in chronological order. All streams are derived from the event log.
Aggregate events have "wasAppliedByAggregate": true set and events coming over the Event Horizon have "FromEventHorizon": true" set.
This is the structure of a committed event:
{
    // this it the events EventLogSequenceNumber,
    // which identifies the event uniquely within the event log
    "_id": "decimal",
    "Content": "object",
    // Aggregate metadata
    "Aggregate": {
        "wasAppliedByAggregate": "bool",
        // AggregateRootId
        "TypeId": "UUID",
        // AggregateRoot Version
        "TypeGeneration": "long",
        "Version": "decimal"
    },
    // EventHorizon metadata
    "EventHorizon": {
        "FromEventHorizon": "bool",
        "ExternalEventLogSequenceNumber": "decimal",
        "Received": "date",
        "Concent": "UUID"
    },
    // the committing microservices metadata
    "ExecutionContext": {
        //
        "Correlation": "UUID",
        "Microservice": "UUID",
        "Tenant": "UUID",
        "Version": "object",
        "Environment": "string",
    },
    // the events metadata
    "Metadata": {
        "Occurred": "date",
        "EventSource": "string",
        // EventTypeId and Generation
        "TypeId": "UUID",
        "TypeGeneration": "long",
        "Public": "bool"
    }
}
aggregates
This collection keeps track of all instances of Aggregates registered with the Runtime.
{
    "EventSource": "string",
    // the AggregateRootId
    "AggregateType": "UUID",
    "Version": "decimal"
}
stream
A Stream contains all the events filtered into it. It’s structure is the same as the event-log, with the extra Partition property used for partitions
The streams StreamId is added to the collections name, eg. a stream with the id of 323bcdb2-5bbd-4f13-a7c3-b19bc2cc2452 would be in a collection called stream-323bcdb2-5bbd-4f13-a7c3-b19bc2cc2452.
{
    // same as an Event in the "event-log" + Partition
    "Partition": "string",
}
public-stream
The same as a stream, except only for Public Stream with the public prefix in collection name. Public streams can only exist on the default scope.
stream-definitions
This collection contains all Filters registered with the Runtime.
Filters defined by an Event Handler have a type of EventTypeId, while other filters have a type of Remote.
{
    // id of the Stream the Filter creates
    "_id": "UUID",
    "Partitioned": "bool",
    "Public": "bool",
    "Filter": {
        "Type": "string",
        "Types": [
            // EventTypeIds to filter into the stream
        ]
    }
}
stream-processor-states
This collection keeps track of all Stream Processors Event Processors and their state. Each event processor can be either a Filter on an Event Processor that handles the events from an event handler.
Filter:
{
    "SourceStream": "UUID",
    "EventProcessor": "UUID",
    "Position": "decimal",
    "LastSuccesfullyProcessed": "date",
    // failure tracking information
    "RetryTime": "date",
    "FailureReason": "string",
    "ProcessingAttempts": "int",
    "IsFailing": "bool
}
Event Processor:
Partitioned streams will have a FailingPartitions property for tracking the failing information per partition. It will be empty if there are no failing partitions. The partitions id is the same as the failing events EventSourceId. As each partition can fail independently, the "Position" value can be different for the stream processor at large compared to the failing partitions "position".
{
    "Partitioned": true,
    "SourceStream": "UUID",
    "EventProcessor": "UUID",
    "Position": "decimal",
    "LastSuccessfullyProcessed": "date",
    "FailingPartitions": {
        // for each failing partition
        "<partition-id>": {
            // the position of the failing event in the stream
            "Position": "decimal",
            "RetryTime": "date",
            "Reason": "string",
            "ProcessingAttempts": "int",
            "LastFailed": "date"
        }
    }
}
subscription-states
This collection keeps track of Event Horizon Subscriptions in a very similar way to stream-processor-states.
{
    // producers microservice, tenant and stream info
    "Microservice": "UUID",
    "Tenant": "UUID",
    "Stream": "UUID",
    "Partition": "string",
    "Position": "decimal",
    "LastSuccesfullyProcessed": "date",
    "RetryTime": "date",
    "FailureReason": "string",
    "ProcessingAttempts": "int",
    "IsFailing": "bool
}
Commit vs Publish
We use the word Commit rather than Publish when talking about saving events to the event store. We want to emphasize that it’s the event store that is the source of truth in the system. The act of calling filters/event handlers comes after the event has been committed to the event store. We also don’t publish to any specific stream, event handler or microservice. After the event has been committed, it’s ready to be picked up by any processor that listens to that type of event.
2.9 - Event Sourcing
Overview of Event Sourcing with the Dolittle SDK and Runtime
Event Sourcing is an approach that derives the current state of an application from the sequential Events that have happened within the application. These events are stored to an append-only Event Store that acts as a record for all state changes in the system.
Events are facts and Event Sourcing is based on the incremental accretion of knowledge about our application / domain. Events in the log cannot be changed or deleted. They represent things that have happened. Thus, in the absence of a time machine, they cannot be made to un-happen.
Here’s an overview of the data-flow in Event Sourcing:
flowchart TB
    Presentation --produces--> Events[/Events/]
    Events --stored in--> EventStore[(Event Store)]
    EventStore --- SendToConsumers["Events are<br/>sent to consumers"]:::transparent
    SendToConsumers --> External([External Systems])
    SendToConsumers --> Consumer --Generates the read cache--> ReadCache[(Read Cache)]
    ReadCache -->|Query for read data| Presentation

    classDef transparent stroke-width:0px,fill:#fff0;
Problem
A traditional model of dealing with data in applications is CRUD (create, read, update, delete). A typical example is to read data from the database, modify it, and update the current state of the data. Simple enough, but it has some limitations:
- Data operations are done directly against a central database, which can slow down performance and limit scalability
- Same piece of data is often accessed from multiple sources at the same time. To avoid conflicts, transactions and locks are needed
- Without additional auditing logs, the history of operations is lost. More importantly, the reason for changes is lost.
Advantages with Event Sourcing
- Horizontal scalability
- With an event store, it’s easy to separate change handling and state querying, allowing for easier horizontal scaling. The events and their projections can be scaled independently of each other.
- Event producers and consumers are decoupled and can be scaled independently.
- Flexibility
- The Event Handlers react to events committed to the event store. The handlers know about the event and its data, but they don’t know or care what caused the event. This provides great flexibility and can be easily extended/integrated with other systems.
- Replayable state
- The state of the application can be recreated by just re-applying the events. This enables rollbacks to any previous point in time.
- Temporal queries make it possible to determine the state of the application/entity at any point in time.
- Events are natural
- Audit log
- The whole history of changes is recorded in an append-only store for later auditing.
- Instead of being a simple record of reads/writes, the reason for change is saved within the events.
Problems with Event Sourcing
- Eventual consistency
- As the events are separated from the projections made from them, there will be some delay between committing an event and handling it in handlers and consumers.
- Event store is append-only
- As the event store is append-only, the only way to update an entity is to create a compensating event.
- Changing the structure of events is hard as the old events still exist in the store and need to also be handled.
Projections
The Event Store defines how the events are written in the system, it does not define or prescribe how things are read or interpreted. Committed events will be made available to any potential subscribers, which can process the events in any way they require. One common scenario is to update a read model/cache of one or multiple views, also known as a projections or materialized views. As the Event Store is not ideal for querying data, a prepopulated view that reacts to changes is used instead. Dolittle has built-in support for a specific style of projection, and allows free-form handling of events through event handlers.
Compensating events
To negate the effect of an Event that has happened, another Event has to occur that reverses its effect. This can be seen in any mature Accounting domain where the Ledger is an immutable event store or journal. Entries in the ledger cannot be changed. The current balance can be derived at any point by accumulating all the changes (entries) that have been made and summing them up (credits and debts). In the case of mistakes, an explicit correcting action would be made to fix the ledger.
Commit vs Publish
Dolittle doesn’t publish events, rather they are committed. Events are committed to the event log, from which any potential subscribers will pick up the event from and process it. There is no way to “publish” to a particular subscriber as all the events are available on the event log, but you can create a Filter that creates a Stream.
Reason for change
By capturing all changes in the forms of events and modeling the why of the change (in the form of the event itself), an Event Sourced system keeps as much information as possible.
A common example is of a e-shopping that wants to test a theory:
A user who has an item in their shopping cart but does not proceed to buy it will be more likely to buy this item in the future
In a traditional CRUD system, where only the state of the shopping cart (or worse, completed orders) is captured, this hypothesis is hard to test. We do not have any knowledge that an item was added to the cart, then removed.
On the other hand, in an Event Sourced system where we have events like ItemAddedToCart and ItemRemovedFromCart, we can look back in time and check exactly how many people had an item in their cart at some point and did not buy it, subsequently did. This requires no change to the production system and no time to wait to gather sufficient data.
When creating an Event Sourced system we should not assume that we know the business value of all the data that the system generates, or that we always make well-informed decisions for what data to keep and what to discard.
Further reading
2.10 - Aggregates
Overview of Aggregates
An Aggregate is Domain-driven design (DDD) term coined by Eric Evans. An aggregate is a collection of objects and it represents a concept in your domain, it’s not a container for items. It’s bound together by an Aggregate Root, which upholds the rules (invariants) to keep the aggregate consistent. It encapsulates the domain objects, enforces business rules, and ensures that the aggregate can’t be put into an invalid state.
Example
For example, in the domain of a restaurant, a Kitchen could be an aggregate, where it has domain objects like Chefs, Inventory and Menu and an operation PrepareDish.
The kitchen would make sure that:
- A
Dish has to be on the Menu for it to be ordered
- The
Inventory needs to have enough ingredients to make the Dish
- The
Dish gets assigned to an available Chef
Here’s a simple C#ish example of what this aggregate root could look like:
public class Kitchen
{
    Chefs _chefs;
    Inventory _inventory;
    Menu _menu;

    public void PrepareDish(Dish dish)
    {
        if (!_menu.Contains(dish))
        {
            throw new DishNotOnMenu(dish);
        }
        foreach (var ingredient in dish.ingredients)
        {
            var foundIngredient = _inventory
                .GetIngredient(ingredient.Name);
            if (!foundIngredient)
            {
                throw new IngredientNotInInventory(ingredient);
            }

            if (foundIngredient.Amount < ingredient.Amount)
            {
                throw new InventoryOutOfIngredient(foundIngredient);
            }
        }
        var availableChef = _chefs.GetAvailableChef();
        if (!availableChef)
        {
            throw new NoAvailableChefs();
        }
        availableChef.IsAvailable = false;
    }
}
Aggregates in Dolittle
With Event Sourcing the aggregates are the key components to enforcing the business rules and the state of domain objects. Dolittle has a concept called AggregateRoot in the Event Store that acts as an aggregate root to the AggregateEvents applied to it. The root holds a reference to all the aggregate events applied to it and it can fetch all of them.
Structure of an AggregateRoot
This is a simplified structure of the main parts of an aggregate root.
AggregateRoot {
    AggregateRootId Guid
    EventSourceId string
    Version int
    AggregateEvents AggregateEvent[] {
        EventSourceId Guid
        AggregateRootId Guid
        // normal Event properties also included
        ...
    }
}
AggregateRootId
Identifies this specific type of aggregate root. In the kitchen example this would a unique id given to the Kitchen class to identify it from other aggregate roots.
EventSourceId
EventSourceId represents the source of the event like a “primary key” in a traditional database. In the kitchen example this would be the unique identifier for each instance of the Kitchen aggregate root.
Version
Version is the position of the next AggregateEvent to be processed. It’s incremented after each AggregateEvent has been applied by the AggregateRoot. This ensures that the root will always apply the events in the correct order.
AggregateEvents
The list holds the reference ids to the actual AggregateEvent instances that are stored in the Event Log. With this list the root can ask the Runtime to fetch all of the events with matching EventSourceId and AggregateRootId.
Designing aggregates
When building your aggregates, roots and rules, it is helpful to ask yourself these questions:
- “What is the impact of breaking this rule?"
- “What happens in the domain if this rule is broken?"
- “Am I modelling a domain concern or a technical concern?"
- “Can this rule be broken for a moment or does it need to be enforced immediately?"
- “Do these rules and domain objects break together or can they be split into another aggregate?"
Further reading
2.11 - Concurrency
On the benefits and complexities of running event handlers concurrently
Concurrent processing of event-handlers is a feature of v9 of the Runtime. To use it you require a v9 Runtime and a compatible SDK (v22 or later of the .NET SDK).
Introduction
When your Event handlers are processing long streams of events you might want to have them processed concurrently to speed up the processing. This can be achieved by setting the concurrency -attribute on the processor’s EventHandler -attribute.
// instead of
[EventHandler("...")]
public class SequentialHandler
{
    // ..
}

// use
[EventHandler(eventHandlerId: "...", concurrency: 100)]
public class ConcurrentHandler
{
    // ..
}
Sequential processing
An event handler with just an ID set in the EventHandler -attribute, the events will be processed sequentially. Having no concurrency set is the same as setting it to 1.
[EventHandler("...")]
public class HandleSequentially
{
    public Task Handle(CustomerCreated e, EventContext ctx)
    {
        //..
    }

    public Task Handle(CustomerDeleted e, EventContext ctx)
    {
        //..
    }
}
This is the default. All the events in the stream will be processed in-order as they arrive. When running a re-play or with an existing stream of events the processing will happen one-by-one.
Concurrent processing
An event handler with concurrency set in the EventHandler -attribute, the events will be processed concurrently.
[EventHandler(eventHandlerId: "...", concurrency: 100)]
public class HandleConcurrently
{
    public Task Handle(CustomerCreated e, EventContext ctx)
    {
        // ..
    }

    public Task Handle(CustomerDeleted e, EventContext ctx)
    {
        //..
    }
}
The stream of events will be split up by the EventSourceId of the events, and up to 100 (in this case) of these will be processed concurrently. This means that an event-stream of a million events with a thousand different event-sources will be processed 100 at a time. There will be one event-handler -instance per event-source.
If you are using Aggregates to commit events the EventSourceId will be the EventSourceId of the aggregate-root. If you are committing events directly to the Event Store as demonstrated in the Getting started tutorial the EventSourceId will be part of the call to the Event Store.
Enabling concurrency often yields a dramatic increase in speed of processing large streams of events, but there are consequences you need to be aware of when writing concurrent event-handlers.
Consequences
Your event-handler will no longer be a single processor moving along a stream of events, which will affect how they behave. You may no longer assume that something that happened “earlier” in the event-stream will have happened in your current handling-method, as it might still be waiting for processing on a different event-source-id. This introduces a dependency between the part of your system that inserts events (in particular the event-source and its Id), and the processing of these events.
Example
Let’s illustrate with an example.
We have created a system with customers and orders as different aggregates. We use a customer-number as the event-source-id for the customer, and the order-number as the event-source-id for the order.
We have an event-handler that handles CustomerCreated, CustomerDeleted, OrderCreated OrderLineAdded and OrderShipped -events.
[AggregateRoot("...")]
public class Customer : AggregateRoot
{
    readonly CustomerNumber _id;

    public Customer(EventSourceId id) : base(id) => _id = id;

    public Create() => Apply(new CustomerCreated(_id));
    public Delete() => Apply(new CustomerDeleted(_id));
}

[AggregateRoot("...")]
public class Order : AggregateRoot
{
    readonly OrderNumber _id;

    public Order(EventSourceId id) : base(id) => _id = id;

    public Create(CustomerNumber c) => Apply(new OrderCreated(_id, c));
    public Add(OrderLine line) => Apply(new OrderLineAdded(_id, line)
    public Ship() => Apply(new OrderShipped(_id));
}
In our system we have the following event-stream for a customer 5, and order 42 with 2 lines:
%%{init: {'gitGraph': { 'showBranches': false }}}%%
gitGraph
    commit id: "1: CustomerCreated(5)"
    commit id: "2: OrderCreated(42, 5)"
    commit id: "3: OrderLineAdded(42, 1)"
    commit id: "4: OrderLineAdded(42, 2)"
    commit id: "5: OrderShipped(42)"
    commit id: "6: CustomerDeleted(5)"
Our event-handler that handles these sequentially will get the events in that order, and process them.
[EventHandler("...")]
public class HandleSequentially
{
    public Task Handle(CustomerCreated e, EventContext ctx)
    {
        //..
    }

    public Task Handle(CustomerDeleted e, EventContext ctx)
    {
        //..
    }

    public Task Handle(OrderCreated e, EventContext ctx)
    {
        //..
    }

    public Task Handle(OrderLineAdded e, EventContext ctx)
    {
        //..
    }

    public Task Handle(OrderShipped e, EventContext ctx)
    {
        //..
    }
}
A concurrent event-handler will process each event-source-id concurrently, so the CustomerCreated and CustomerDeleted -events will be processed in order, and the OrderCreated, OrderLineAdded and OrderShipped -events will be processed in-order, but the ordering between these two event-source-ids is no longer guaranteed.
[EventHandler("...", concurrency: 100)]
public class HandleConcurrentlyByEventSourceId
{
    public Task Handle(CustomerCreated e, EventContext ctx)
    {
        //..
    }

    public Task Handle(CustomerDeleted e, EventContext ctx)
    {
        //..
    }

    public Task Handle(OrderCreated e, EventContext ctx)
    {
        //..
    }

    public Task Handle(OrderLineAdded e, EventContext ctx)
    {
        //..
    }

    public Task Handle(OrderShipped e, EventContext ctx)
    {
        //..
    }
}
%%{init: {'gitGraph': { 'showBranches': false }}}%%
gitGraph
    commit id: "start"
    branch customer
    commit id: "CustomerCreated(5)"
    commit id: "CustomerDeleted(5)"
    checkout main
    branch order
    commit id: "OrderCreated(42, 5)"
    commit id: "OrderLineAdded(42, 1)"
    commit id: "OrderLineAdded(42, 2)"
    commit id: "OrderShipped(42)"
One possible actual ordering of these events as they run through your concurrently processing event-handler could be:
%%{init: {'gitGraph': { 'showBranches': false }}}%%
gitGraph
    commit id: "start"
    branch customer
    commit id: "CustomerCreated(5)"
    checkout main
    merge customer tag:"customer exists"
    branch order
    commit id: "OrderCreated(42, 5)"
    checkout main
    merge order tag:"order exists"
    checkout customer
    commit id: "CustomerDeleted(5)"
    checkout main
    merge customer tag:"customer deleted"
    checkout order
    commit id: "OrderLineAdded(42, 1)"
    checkout main
    merge order tag: "line 1 added"
    checkout order
    commit id: "OrderLineAdded(42, 2)"
    checkout main
    merge order tag: "line 2 added"
    checkout order
    commit id: "OrderShipped(42)"
    checkout main
     merge order tag: "order shipped"
As you can see, the CustomerDeleted -event is processed before the OrderLineAdded -events. If the handle-method for OrderLineAdded -event needs to access the customer, it will not be able to do so, as the customer has been deleted. The same is true for the OrderShipped -event, it might also need to access the customer, and it will not be able to do so.
Is this a good thing, is it even acceptable? That is up to you to decide. It is important to be aware of this, and to design your system accordingly.
If your processing exists to create an order-page for the customer, having the customer deletion happen before all the order-events might be a good thing, as you know this customer will end up deleting their account and you do not need to create a page that will never be shown. However, you need to be aware of it, and make sure that the handler does not crash when the customer has been deleted.
Mitigations
Concurrency adds complexity to your system, and you need to be aware of this complexity and design your system accordingly. There are ways to mitigate this complexity.
Option 1 - don’t use concurrency
The simplest way to mitigate this is to not use concurrent event-handlers. If you do not need the performance boost, or if you do not want to deal with the complexity of concurrent processing, just use sequential processing.
Option 2 - use the same EventSourceId
If you need to use concurrency the best way to deal with them is to have the same EventSourceId for the events that you want guarantee the ordering of. In the example above, if we want to guarantee that the OrderCreated, OrderLineAdded and OrderShipped -events are processed in-order, we can use the CustomerId as the EventSourceId for all of them.
In fact the events need not come from the same event-source, as long as they have the same EventSourceId they will be processed in-order.
[AggregateRoot("...")]
public class Customer : AggregateRoot
{
    readonly CustomerNumber _id;

    public Customer(EventSourceId id) : base(id) => _id = id;

    public Create() => Apply(new CustomerCreated(_id));
    public Delete() => Apply(new CustomerDeleted(_id));
}

[AggregateRoot("...")]
public class CustomerOrders : AggregateRoot
{
    readonly CustomerNumber _customerNumber;
    readonly OrderNumber _orderNumber;

    public Order(EventSourceId customerNumber) : base(customerNumber) => _customerId = id;

    public Create(OrderId o) => Apply(new OrderCreated(_orderNumber, _customerNumber));
    public Add(OrderLine line) => Apply(new OrderLineAdded(_orderNumber, line)
    public Ship() => Apply(new OrderShipped(_orderNumber));

    void On(OrderCreated e) => _orderNumber = e.OrderId;
}
Option 3 - consolidate to a single aggregate
You could put the orders into the customer -aggregate to guarantee that they are processed in-order.
[AggregateRoot("...")]
public class Customer : AggregateRoot
{
    readonly CustomerNumber _id;
    readonly List<Order> _orders = new List<Order>();

    public Customer(EventSourceId id) : base(id) => _id = id;

    public Create() => Apply(new CustomerCreated(_id));
    public Delete() => Apply(new CustomerDeleted(_id));

    public CreateOrder(OrderNumber o) => Apply(new OrderCreated(_id));

    public AddOrderLine(OrderNumber o, OrderLine line) =>
        _orders.Any(o => o.Number == o)
            ? Apply(new OrderLineAdded(_id, line)
            : throw new InvalidOperationException("Order does not exist");

    public ShipOrder(OrderNumber o) =>
        _orders.Single(o => o.Number == o).Shipped == false
            ? Apply(new OrderShipped(_id))
            : throw new InvalidOperationException("Order already shipped");

    void On(OrderCreated e) => _orders.Add(new Order(e.OrderId));
    void On(OrderLineAdded e) => _orders.Single(o => o.Id == e.OrderId).AddLine(e.Line);
    void On(OrderShipped e) => _orders.Single(o => o.Id == e.OrderId).Ship();

    class Order
    {
        public OrderNumber Number { get; init; }
        public bool Shipped { get; private set; } = false
        readonly List<OrderLine> _lines = new List<OrderLine>();

        public Order(OrderNumber number) => _number = number;

        public AddLine(OrderLine line) => _lines.Add(line);
        public Ship() => Shipped  = true;
    }
}
Option 4 - defensive handling
When you write your event-handlers you may be able to write them such that they can handle the events out of order, or at least only guaranteed in-order within an event-source. This is not always possible, but if it is, it is a good way to mitigate the complexity of concurrent processing.
This depends on what you do in your handler. If you are storing a read-model you may have to deal with partial or missing data, if you are calling on external services you might have to deal with them being unavailable, or not supporting the order in which you are calling them.
Summary
Activating concurrency can lead to great performance improvements, but it comes at a cost. To safely use concurrency you should be aware of the implications of concurrent processing, and design your system accordingly.
- handling order will depend on the
EventSourceId of the events
- multiple event-handlers will be running concurrently
- watch out for shared state
- watch out for resource-usage
- good to have a single
EventSourceId per unit of replay
Conclusion
Activating concurrency can lead to great performance improvements, but it comes at a cost. To safely use concurrency you should be aware of the implications of concurrent processing, and design your system accordingly.
2.12 - Resource System
How to get access to storage
When using the Dolittle SDK you get access to the Resource System which is a way to get access to storage. The Resources you get will be separated by Tenants and unique in your current context. This means that you can depend on the stored data not leaking between tenants. The event-store and the read-cache are the only permanent storage options available through the Resource System.
Read Cache
The Read Cache, or ReadModels, is available from the Resource System as an IMongoDatabase that you can reference in your code. The database will be connected, and you can use normal MongoDB queries to get access to the data you store there.
Example
A minimal example of an AspNet Core web application that uses the Dolittle SDK and the Read Cache could look like this:
using Dolittle.SDK;
using Dolittle.SDK.Tenancy;
using MongoDB.Driver;
using ResourceSystemDemo;

var builder = WebApplication.CreateBuilder(args);

// Add Dolittle to the web-application's host.
builder.Host.UseDolittle();

var app = builder.Build();

await app.StartAsync();

// get a client
var dolittleClient = await app.GetDolittleClient();

// get a reference the the development-tenant's read-cache
var tenantedReadCache = dolittleClient
    .Resources
    .ForTenant(TenantId.Development)
    .MongoDB
    .GetDatabase();

var id = Guid.NewGuid().ToString();

// the ReadModel has only Id and Value in this example
var readModel = new ReadModel(id, "this is my data");

// in this example the collection-name is "models"
const string collectionName = "models";
tenantedReadCache
    .GetCollection<ReadModel>(collectionName)
    .InsertOne(readModel);

// get the inserted read-model back from storage
var retrievedFromStorage = tenantedReadCache
    .GetCollection<ReadModel>(collectionName)
    .AsQueryable()
    .Where(rm => rm.Id == id)
    .Single();

Console.WriteLine(
    $"retrieved read-model was {retrievedFromStorage}"
);

// to keep running: await app.WaitForShutdownAsync();
await app.StopAsync();
In your actual code you would need to decide the collection-name and build your ReadModels to match your needs.
Note that the interactions with the tenantedReadCache are all done using a normal MongoDB driver. This means that you can use the full power of MongoDB to query and update your data.
Accessing the Event Store directly
The Event Store is available from the Dolittle SDK directly. The backing data-storage is MongoDB, but no MongoDB driver access is available from the SDK. To interact with the Event Store there are methods available to
- commit events
- commit public events
- get all the events for an aggregate-root
- get all the events in a stream for an aggregate-root
Committing events and public events
With a Dolittle Client from the Dolittle SDK you can commit events to the Event Store directly (skipping any aggregates).
// assume we have the app like above
var dolittleClient = await app.GetDolittleClient();

var tenantedEventStore = dolittleClient
    .EventStore
    .ForTenant(TenantId.Development);

// assume we have an Event -type called SomeEvent with Id and Value
var someEvent = new SomeEvent(
    Id: Guid.NewGuid().ToString(),
    Value: "this is my data");

tenantedEventStore
    .CommitEvent(
        content: someEvent,
        eventSourceId: "Demo"
    );

// assume we have another Event -type called SomePublicEvent
var somePublicEvent = new SomePublicEvent(
    Id: Guid.NewGuid().ToString(),
    Value: "this is data going on the public stream");

tenantedEventStore
    .CommitPublicEvent(
        content: somePublicEvent,
        eventSourceId: "Demo"
    );
Getting events for an aggregate-root
Committed events from the Event Store are available if they are associated with an aggregate-root. You need to know the aggregate-root’s ID and the event-source id to get the events. Remember that the aggregate-root ID identifies the type of aggregate-root and event-source ID identifies the instance of that aggregate-root-type.
You can either get all the events as a collection, or you can get it as a streaming IAsyncEnumerable.
We have a minimal aggregate-root type called Lookout with an aggregate-root id:
[AggregateRoot("B92DE697-2E09-4AE1-99A2-3BB72925B0AF")]
public class Lookout : AggregateRoot
{
    public void SeeSomething() =>
        Apply(new SomeEvent(Guid.NewGuid(), "something happened"));
}
We call on the lookout with the id “Alice” to see something through the Dolittle Client:
await dolittleClient
    .Aggregates
    .ForTenant(TenantId.Development)
    .Get<Lookout>("Alice")
    .Perform(
        alice => alice.SeeSomething()
    );
We can now access the events from an instance of that aggregate-root type like this:
var events = await dolittleClient
    .EventStore
    .ForTenant(TenantId.Development)
    .FetchForAggregate("B92DE697-2E09-4AE1-99A2-3BB72925B0AF", "Alice");

Console.WriteLine($"Alice has seen something {events.Count} times");
If we want to get the events as a streaming IAsyncEnumerable (there may be many events) we can do it like this:
var stream = dolittleClient
    .EventStore
    .FetchStreamForAggregate("B92DE697-2E09-4AE1-99A2-3BB72925B0AF", "Alice");

await foreach (var chunk in stream)
{
    Console.WriteLine("streaming to: " + chunk.AggregateRootVersion);
    foreach(var evt in chunk)
    {
        Console.WriteLine("evt: " + evt.Content);
    }
}
A much simpler way to handle events is usually to write an EventHandler or Projection that will handle the events for you.
Summary
The Resource System is a way to get access to storage in your Dolittle application. The Read Cache is a way to get access to a MongoDB database that is unique to your tenant. The Event Store is a way to get access to the events that have been committed to the Event Store by Aggregate-Roots for your tenant.
3 - Platform
Overview of the Aigonix Platform
Aigonix Platform is our PaaS(Platform-as-a-Service) solution for hosting your Dolittle microservices in the cloud.
3.1 - Requirements
Requirements for running microservices in the Aigonix platform
To be compatible with the environment of the Aigonix platform, there are certain requirements we impose on your microservices.
If they are not met, your application might behave unexpectedly - or in the worst case - not work at all.
The following list of requirements is subject to change, but we will always notify you when you have an application running in our platform before making any changes.
1. Your application must use the resource system
To ensure data privacy, security and proper segregation of your tenant’s data, our platform has a resource management system.
This system controls access and connection settings for resources on a per request basis and will provide your microservice with the necessary information for accessing these resources programmatically.
The connection information will not be the same as when developing locally, so you must not embed connection settings in your code.
This requirement applies to read and write data to databases or files, or while making API-calls to services, both to internal resources provided by the Aigonix platform and external 3rd party services.
For the resource management system to work, and to protect your application and users from data leakage, we encrypt and authenticate all interactions with your application through the platform.
This means that your microservices will be completely isolated by default, and all endpoints that should be accessible outside our platform needs to be exposed explicitly and configured with appropriate encryption and authentication schemes.
To enable same-origin authentication flows and adhere to internet best practices, the platform will take control of a set of URIs for the hostnames you have allocated to your application. The following paths and any sub-path of these (in any form of capitalisation) are reserved for the platform:
- /.well-known
- /robots.txt
- /sitemap
- /api/Dolittle
- /Dolittle
3. Your microservices must be stateless, scalable and probeable
To allow for efficient hosting of your application, we have to able to upgrade, re-start, move and scale your microservices to handle the load and perform necessary security upgrades.
This means that you must not rely on any in-memory state for anything apart from the per-transaction state, and you must not rely on there being a single instance of your microservices at any point in time.
To ensure that your microservices are healthy and ready to perform work, your microservices must expose both liveness and readiness probes.
The microservice should respond to the liveness probe whenever it has successfully started and is in a functional state, and should respond to the readiness probe whenever it is free to handle incoming requests from users.
4. Your application must adhere to semantic versioning of your microservices
We rely on semantic versioning to properly track changes of your microservices (from an operational aspect) and to decide on the correct course of action when new versions of your microservices are built.
Minor or patch increments will result in automatic upgrades of your running microservices without any human interaction, while major increments require manual approval and potential updates of configuration or data structures.
This means that you must increment the major number when making changes to your microservices that require changes in the platform for your application to work properly.
5. Your frontend must be a static single-page application
To ensure that any user-facing frontend is served quickly and with minimal data-usage, we serve your frontend using separate servers with appropriate caching, compression and CDN strategies.
This means that your frontend must be built as a single-page application to static HTML, CSS and js files.
These files must be built and versioned alongside your backend microservices to ensure that the frontend and backend versions are aligned and function properly.
3.2 - Deploy an application
How to deploy an application in the Aigonix Platform
This guide is for the users of our Platform. If you aren’t already a user, please contact us to host your microservices!
Prerequisites
Familiar with the following:
- Docker containers
- Kubernetes
- Microsoft Azure
Recommendation
For users on Windows OS, we recommend that you use WSL/Ubuntu as your shell/terminal instead of CMD/Powershell.
Installation
Install the following software:
Configuration
After an environment has been provisioned for you in the Dolittle PaaS, you will receive these details to use with the deployment commands in the following sections:
Subscription ID
Resource Group
Cluster Name
Application Namespace
ACR Registry
Image Repository
Deployment Name
Application URL
Setup
All commands are meant to be run in a terminal (Shell)
AZURE
Login to Azure:
AKS - Azure Container Service
Get credentials from Dolittle’s AKS cluster
az aks get-credentials -g <Resource Group> -n <Cluster Name> --subscription <Subscription ID>
ACR - Azure Container Registry
Get credentials to Azure Container Registry
az acr login -n <ACR Registry> --subscription <Subscription ID>
Deployment
To deploy a new version of your application, follow these steps. For use semantic versioning, e.g. “1.0.0”.
Docker
Build your image
docker build -t <Image Repository>:<Tag> .
Push the image to ACR
docker push <Image Repository>:<Tag>
Kubernetes
Patch the Kubernetes deployment to run your new version
kubectl patch --namespace <Application Namespace> deployment <Deployment Name> -p '{"spec": { "template": { "spec": { "containers": [{ "name":"head", "image": "<Image Repository>:<Tag>"}] }}}}'
Debugging
kubectl commands:
Show the status of your application pods
kubectl -n <Application Namespace> get pods
Show deployed version of your application
kubectl -n <Application Namespace> get deployment -o wide
Show the logs of the last deployed version of the application
kubectl -n <Application Namespace> logs deployments/<Deployment Name>
Logs for the application, last 100 lines
kubectl -n <Application Namespace> logs deployments/<Deployment Name> --tail=100
3.3 - Update configurations
How to update configuration files in the Aigonix Platform
This guide is for the users of our Platform. If you aren’t already a user, please contact us to host your microservices!
Prerequisites
Familiar with the following:
Recommendation
For users on Windows OS, we recommend that you use WSL/Ubuntu as your shell/terminal instead of CMD/Poweshell.
Installation
Install the following software:
Configuration
After an environment has been provisioned for you in the Dolittle PaaS, you will receive a yaml file per environment. The files will be similar to this:
---
apiVersion: v1
kind: ConfigMap
metadata:
  namespace: application-namespace
  name: app-dev-ms-env-variables
  labels:
    tenant: Customer
    application: App-Dev
    microservice: MS-A
data:
  OPENID_AUTHORITY: "yourapp.auth0.com"
  OPENID_CLIENT: "client-id"
  OPENID_CLIENTSECRET: "client-secret"

---
apiVersion: v1
kind: ConfigMap
metadata:
  namespace: application-namespace
  name: app-dev-ms-config-files
  labels:
    tenant: Customer
    application: App-Dev
    microservice: MS-A
data:
  myapp.json: |
    {
       "somekey": "somevalue"
    }
The files represent configmap resources in Kubernetes. We recommend that you store the files in a version control system(VCS) of your choice.
Purpose
Each yaml file consists of 2 configmaps per micro-service:
app-dev-ms-env-variables: This configmap is for your environmental variables that will be passed on to the container at start up.app-dev-ms-config-files: This configmap is for add/override files. The default mount point is app/data
Please do NOT edit/change the following:
---
apiVersion: v1
kind: ConfigMap
metadata:
  namespace: application-namespace
  name: app-dev-ms-env-variables
  labels:
    tenant: Customer
    application: App-Dev
    microservice: MS-A
data:
The above mentioned data is vital to the deployment and must not be altered in any way. Any changes here may result in forbidden response when the apply command is run.
You may alter the content under data:
  OPENID_AUTHORITY: "yourapp.auth0.com"
  OPENID_CLIENT: "client-id"
  OPENID_CLIENTSECRET: "client-secret"
  connectionstring__myconnection: "strings"
Alter existing or add new key/value pairs.
myapp.json: |
    {
       "somekey": "somevalue"
    }

customSetting.json: |
  {
    "settings": {
       "connection":"connectionstring"
     }
  }
Alter existing or add new JSON data that will be linked to a specific file that will be available at runtime under app/data/
Setup
You need to setup your AKS credentials.
Update configurations
To update the configurations:
kubectl apply -f <filename>
You must be in the directory of the yaml file before running the command.
To update/add a single key in the config:
kubectl patch -n <Application Namespace> configmap <Configmap Name> -p '{"data":{"my-key":"value that i want"}}'
To remove a single key from the configuration:
kubectl patch -n <Application Namespace> configmap <Configmap Name> -p '{"data":{"my-key":null}}'
See configurations
JSON output
kubectl get -n <Application Namespace> configmap <Configmap Name> -o json
YAML output:
kubectl get -n <Application Namespace> configmap <Configmap Name> -o yaml
For an advanced print out, you need a tool called jq for parsing
kubectl get -n configmap -o json | jq -j ‘.data | to_entries | .[] | “(.key): (.value)\n”’
3.4 - Update secrets
How to update secrets in the Aigonix Platform
This guide is for the users of our Platform. If you aren’t already a user, please contact us to host your microservices!
Prerequisites
Familiar with the following:
Recommendation
For users on Windows OS, we recommend that you use WSL/Ubuntu as your shell/terminal instead of CMD/Poweshell.
Installation
Install the following software:
Secrets
After an environment has been provisioned for you in the Dolittle PaaS, you will receive a yaml file per environment. The files will be similar to this:
---
apiVersion: v1
kind: Secret
metadata:
  namespace: application-namespace
  name: apps-dev-ms-secret-env-variables
  labels:
    tenant: Customer
    application: App-Dev
    microservice: MS-A
type: Opaque
data:
   OPENID_SECRET: b3BlbiBpZCBzZWNyZXQ=
The files represent the Secrets -resource in Kubernetes. We recommend that you store the files in a version control system(VCS) of your choice.
Purpose
Each yaml file consists of a secret per micro-service:
app-dev-ms-secret-env-variables: This secret is for your environmental variables that will be passed on to the container at start up. One important thing to remember is that the values have to be encoded using base64.
Please do NOT edit/change the following:
---
apiVersion: v1
kind: Secret
metadata:
  namespace: application-namespace
  name: apps-dev-ms-secret-env-variables
  labels:
    tenant: Customer
    application: App-Dev
    microservice: MS-A
type: Opaque
data:
The above mentioned data is vital to the deployment and must not be altered in any way. Any changes here may result in forbidden response when the apply command is run.
You may alter existing or add new key/value pairs.
  OPENID_SECRET: b3BlbiBpZCBzZWNyZXQ=
  DB_PASSWORD: c29tZSBwYXNzd29yZA==
Setup
You need to setup your AKS credentials.
Encode secrets
To encode values:
echo -n "my super secret pwd" | base64 -w0
The above command will give you:
bXkgc3VwZXIgc2VjcmV0IHB3ZA==
The value can then be added to the secrets:
MY_SECRET: bXkgc3VwZXIgc2VjcmV0IHB3ZA==
Update secrets
To update the secrets:
kubectl apply -f <filename>
You must be in the directory of the yaml file before running the command.
To update/add a single key in the secrets:
kubectl patch -n <Application Namespace> secret <Secrets Name> -p '{"data":{"my-key":"value that i want encoded using base64"}}'
To remove a single key from the configuration:
kubectl patch -n <Application Namespace> secret <Secrets Name> -p '{"data":{"my-key":null}}'
See secrets
JSON output:
kubectl get -n <Application Namespace> secret <Secrets Name> -o json
YAML output:
kubectl get -n <Application Namespace> secret <Secrets Name> -o yaml
For an advanced print out, you need a tool called jq for parsing the JSON in you shell:
kubectl get -n <Application Namespace> secret <Secrets Name> -o json | jq -j '.data | to_entries | .[] | "\(.key): \(.value)\n"'
3.5 - FAQ
Frequently asked questions about the Aigonix Platform
Can I login without allowing cookies?
If you’re getting strange results with logon through Sentry or another OIDC service - check that you’re allowing cookies for the domains!
Without cookies you cannot logon - at all. Sorry!
3.6 - Aigonix Studio
Overview of the Dolittle Studio
Aigonix Studio is your management-tool to interact with services and products you run in the Aigonix Platform. It is a web-based application that is available at dolittle.studio.
3.6.1 - Overview
Overview of Aigonix Studio
Aigonix Studio is the web-based interface for managing your Applications and Microservices in the Aigonix Platform. It is the main interface for interacting with the platform and is where you will spend most of your time when interacting with the platform.
In Studio you can create and manage Applications, Environments, Microservices and other products and services.
Getting started
To access Studio you need to be a customer of Aigonix. If you are not a customer, you can contact us to learn more and hopefully become one.
Once you have access to Studio, you can log in using your credentials at dolittle.studio. You can now create your first Application and start deploying your Microservices into that application.
Components
When you run your Microservices in the Aigonix Platform you will have access to a number of components that will help you manage your services.
You will define each Application with its Environments, and add Microservices to them. You define which Docker image to use for each Microservice, and whether or not you want to use the Dolittle Runtime. You can use a publicly available image, or store your container image in the provided container-registry.
If you use the Dolittle Runtime one will be made available to your Head and through it you will have access to Tenanted resources like the Event Store and Read Cache. If you do not use the Dolittle Runtime the service will run the assigned Docker-image without permanent storage (stateless).
You can make your services available to the internet if you so wish. If you do not they will only be available within the platform.
flowchart TB
    subgraph Legend
        S[Docker Container]
        R>Dolittle Runtime]
        D[(Database)]
        F[\Studio function/]
    end
    subgraph Customer
        subgraph app1[Application with 3 Environments]
            subgraph app1dev[Development Environment]
                subgraph App1DevMS1[Microservice with Runtime]
                    App1DevMS1head[Head] --SDK--> App1DevMS1runtime>Runtime]

                    App1DevMS1runtime --uses--> App1DevMS1EventStore[(Event Store)]
                    App1DevMS1runtime --makes available--> App1DevMS1ReadCache[(Read Cache)]
                end
                subgraph App1DevMS2[Microservice]
                    App1DevMS2Head[Head]

                end
                App1DevMS1EventStore --in--> app1devDB[(Dev Database)]
                App1DevMS1ReadCache --in--> app1devDB
                Logs1dev[\Log viewer/] -.gathers logs.-> App1DevMS1head
                Logs1dev -.gathers logs.-> App1DevMS2Head
            end
            subgraph app1test[Test Environment]
                subgraph App1TestMS1[Microservice with Runtime]
                    App1TestMS1Head[Head] --uses--> App1TestMS1Runtime>Runtime]

                    App1TestMS1Runtime --uses--> App1TestMS1EventStore[(Event Store)]
                    App1TestMS1Runtime --makes available--> App1TestMS1ReadCache[(Read Cache)]
                end
                subgraph App1TestMS2[Microservice]
                    App1TestMS2Head[Head]
                end
                App1TestMS1EventStore --in--> app1testDB[(Test Database)]
                App1TestMS1ReadCache --in--> app1testDB

                Logs1test[\Log viewer/] -.gathers logs.-> App1TestMS1Head
                Logs1test -.gathers logs.-> App1TestMS2Head
            end
            subgraph app1prod[Production Environment]
                subgraph App1ProdMS1[Microservice with Runtime]
                    App1ProdMS1Head[Head] --uses-->  App1ProdMS1Runtime>Runtime]

                    App1ProdMS1Runtime --uses--> App1ProdMS1EventStore[(Event Store)]
                    App1ProdMS1Runtime --makes available--> App1ProdMS1ReadCache[(Read Cache)]
                end
                subgraph App1ProdMS2[Microservice]
                    App1ProdMS2Head[Head]
                end

                App1ProdMS1EventStore --in--> app1prodDB[(Prod Database)]
                App1ProdMS1ReadCache --in--> app1prodDB

                Logs1prod[\Log viewer/] -.gathers logs.-> App1ProdMS1Head
                Logs1prod[\Log viewer/]  -.gathers logs.-> App1ProdMS2Head
            end
            Docs1[\Documentation/]


            app1devDB -.regular backups.-> Backups1[\Backups/]
            app1testDB -.regular backups.-> Backups1
            app1prodDB -.regular backups.-> Backups1
        end
        subgraph app2[Application with 1 Environment]
            subgraph app2prod[Production Environment]
                subgraph App2ProdMS1[Microservice with Runtime]
                    App2ProdMS1Head[Head] --uses--> App2ProdMS1Runtime>Runtime]

                    App2ProdMS1Runtime --uses--> App2ProdMS1EventStore[(Event Store)]
                    App2ProdMS1Runtime --makes available--> App2ProdMS1ReadCache[(Read Cache)]
                end
                subgraph App2ProdMS2[Microservice]
                    App2ProdMS2Head[Head]
                end
                App2ProdMS1EventStore --in--> app2prodDB[(Prod Database)]
                App2ProdMS1ReadCache --in--> app2prodDB

                Logs2prod[\Log viewer/] -.gathers logs.-> App2ProdMS1Head
                Logs2prod -.gathers logs.-> App2ProdMS2Head
            end

            Docs2[\Documentation/]

            app2prodDB -.regular backups.-> Backups2[\Backups/]
        end
        ACR[\Container Registry/]
    end
3.6.2 - Application
What is an Application in the Aigonix Platform
An Application is a logical grouping of Microservices. It is the top-level container for your Microservices and is used to group them together. An Application can have multiple Environments, which are used to separate your Microservices into different stages of your development process.
When you create a new application you will define a name for it and which environments the application
should have.
Microservices
Each application acts as a separate area wherein your microservices run. When you navigate in an application in Studio you will see the services that are deployed in that application.
Each microservice will be listed with their name, container-image, which version of the Dolittle Runtime (if any) they are set up with, their publich URL (if any) and their status. If your application has multiple environments you can switch between them using the dropdown in the top right corner.
You can navigate into each Microservice to see more details about it, such as the logs for the service, the configuration for the service and metrics like the CPU and Memory consumption of the service. You can change the configuration of the service and restart it from this view.
Functions
There are several functions available in an Application -view. You can create new Microservices, and you can access the backups of the databases that are used by the services in that application.
Each application has its own docker-image container registry, which you can access from the application view.
There is a log-viewer, which consolidates logs from all the services in the application into one view. Here you can filter the logs by service, time and search for specific text. You can also have a live-view of the logs, which will update the view as new logs are generated.
There is a documentation-view in the application that contains sections on how to access the container-registry, how to access the underlying Kubernetes cluster if needed and how to setup Azure Pipelines to deploy your containers directly to the application.
3.6.3 - Environment
An environment within an Applicaiton in the Aigonix Platform
An environment is a grouping of Microservices within an Application. Environments are commonly used to separate instances of your Microservices into different stages of your development process.
When you create an Application you define which environment(s) you want in that Application. The available
options are Development, Test and Production. You can choose to have all three, or just one or two of them.
Microservices
Each environment acts as a separate area wherein your microservices run. When you navigate to an Application in Studio it will list the Microservices running in the current environment. The current Environment is displayed and can be changed in a drop-down box on the top right corner of the page.
Databases
Each environment has its own database. The database is used by the Microservices in that environment to store their data. The database is a MongoDB database and is managed by the Aigonix Platform. You can access the database backups through the Studio interface. If necessary you can also access the database through port-forwarding to the Kubernetes cluster. You will need to contact Aigonix Support to get the elevated permissions needed to access the database directly.
3.6.4 - Microservice
What is a Microservice in the Aigonix Platform
A Microservice is a single unit of deployment in the Aigonix Platform. It is a containerized application that runs in a Kubernetes cluster. Each Microservice is deployed as a separate container in the cluster.
A Microservice lives inside an Application and can be deployed to multiple Environments in that application.
A Microservice in the Aigonix Platform is a Head and optionally a Runtime and data-storage. If you use the Dolittle Runtime you will have access to the Event Store and Read Cache for that Microservice.
If you do not use the Dolittle Runtime the Microservice will be stateless and will not have access to any storage. Any state you need to store will have to be stored in an external service. You will have access to the local file-system, but that is not persisted between Microservice restarts, and we do not recommend relying upon it.
Docker image
Each Microservice is deployed using a Docker image. You can use a publicly available image, or you can use a Docker image that you have built yourself and stored in the container-registry that is available for each application.
Head
Head is the name of the pod where your Microservice Docker image is deployed. It is the entry-point for your Microservice and is the only part of your Microservice that may be exposed to the internet. A Microservice must have a Head and can have a Runtime.
Dolittle Runtime
Each Microservice can be deployed with the Dolittle Runtime. The Dolittle Runtime is available as a docker image, and will be deployed alongside your Head. Your code communicates with the Runtime through the Dolittle SDK. The Runtime is used to connect to the Event Store and will make the resource-system available to you, where you can get the Tenanted Read Cache and to publish events to the Event Horizon.
Configuration
Each Microservice can be configured with a set of environment variables and configuration-files. These variables are available to your code and can be used to configure your Microservice. The Aigonix Studio gives you an interface to manage these variables and files.
Your code can read the environment variables and configuration-files. The files will be available under the /app/data -folder in your container. The Aigonix Platform will make sure that the files are available in the container when it is deployed. Therefore any files your image contains in /app/data will not be available when running in the Aigonix Platform.
You can upload files through Aigonix Studio, and you can also download the files and environment variables from Studio.
Secrets
You can also use the environment variables to store secrets, like connection strings and API-keys. Mark these environment-variables as secret to ensure that they be stored encrypted in the platform. You may want to look into a proper secret-management system, like Azure Key Vault or Amazon Key Management System if you have a lot of secrets, and just store the access-keys in the environment variables.
3.6.5 - Integrations
Integrating with existing ERP -systems through Aigonix
Integrations in Aigonix lets you work with your existing business-data in an ERP-system. The integrations support an Event Driven Architecture and is designed to make translation from ERP-specific terms to domain terms easy.
By setting up integrations your business data from an ERP -system (Infor M3) synchronize to an message stream. This data can then be used by your Microservices to provide functionality to your users and customers.
This article will introduce you to the concepts of the Aigonix integrations and show you how to set up a connection to an ERP -system and how to map data from the ERP -system into messages. It also describes how to consume these messages in your services.
Conceptual overview
The Aigonix integrations acts as a bridge for your organization’s valuable business data that exists in the ERP-system.
Aigonix integration connects to an ERP -system and is built to support an Event Driven Architecture. It translates the business-data in your ERP -system to messages, which your services can consume and react to.
Your services can also affect changes in the ERP -system by sending messages through the integration. You can now build services that can react to changes in the business data, and that can affect changes in the business data, without needing a direct connection to the ERP -system.
Working directly with ERP-systems is often difficult. They are locked down and frequently store the data in terms their own, obscure language. The Aigonix integration makes it easy to map business-data in the ERP -system into messages with domain terms that your services can understand. These messages are then securely available in standard message formats. For ease of use a REST -interface to resources representing the business-data in the domain-terms is available.
graph TB
    People(People) --set up connection--> Connection[Aigonix integrations]
    People --use--> Services
    Connection <--changes--> ERP[ERP-system]
    Connection <--messages--> KT[/Messages/]
    Services <--reacts to--> KT
Central to this is the concept of a message-type. You define how to translate data from the ERP -system into messages. Message-types are defined in the Aigonix Studio -interface where you can select the tables and fields you want to translate. This mapping then translates the changes in business-data into messages whenever such a change is detected.
Connections
In order to translate data from the ERP -system into messages a connection must be specified. The connection defines how to connect to the ERP -system and the message-types how to translate the data into messages. Once you define the connection you can either run an instance of the ERP Integration service yourself (on-premises), or automatically host one in the Aigonix platform. This service is the conduit between the messages and the ERP -system. It discovers changes and translates those into messages. It also reacts to messages and calls programs in the ERP-system at your request.
Message-types
The message-types are defined in the Aigonix Studio -interface, and deployed to the ERP Integration service. They are defined in terms of the data in the ERP -system.
Setting up a connection
Navigate to “Integrations” in the Aigonix Studio -interface. You will see a list of all the connections that have been set up for your organization. If this is the first time you are setting up a connection the list will be empty.
Click on the “Set up M3 connection” -button. A wizard that will guide you through the process of setting up the connection. The wizard will ask you for the following information:
- a name for the connection
- whether you want to self-host or use the hosted version of connection
- the URL and credential of the Metadata Publisher -service for your M3 -instance
- the ION-access -configuration for your M3 -instance
During setup the connection will come alive as you configure it. This gives immediate feedback on whether the connection is working or not.

Step 0: Name and deploy the connection
The first step of the wizard is to give the connection a name and to choose whether you want to self-host the connection or use the hosted version. We recommend setting a name that describes the role of the ERP-system (e.g. is it the production system or a test system) and whether it is self-hosted or hosted.
If you choose to self-host the connection you must download the connector bundle and run it on a machine that has access to the M3 -instance and the internet. The bundle contains a docker-image that will run the connector and a configuration file that tells the connector how to “call home”.
If you choose to use the hosted version of the connection you must provide the URL and credentials for the Metadata Publisher -service for your M3 -instance. These endpoints must be available from the Aigonix cluster. This may require network-configuration, if your M3 -instance is firewalled.

Once the connector has started and it will call home. The parts of the connection display their status and you can start telling it how to connect to the ERP -system.

The Metadata Publisher -service is a service that is part of your organization’s M3 -instance. It is publishes metadata about the M3 -instance. This metadata tells the connector which tables exist in your M3 -instance, and which fields they contain.
You enter the URL and credentials for the Metadata Publisher -service. If you are running the connection hosted on the Aigonix platform the Metadata publisher -service must be able to reach it. This may require network-configuration. If you are running the connection self-hosted you must make sure that the connector can reach the Metadata Publisher -service and the Kafka -topics it it consumes and produces to.
Once the connection has connected to the Metadata Publisher -service it will display the tables that are available in your M3 -instance.
If you do not configure the Metadata Publisher -service you will not be able to map any custom tables or fields in your M3 -instance. This means that you will be restricted to mapping the “standard” tables and fields that are available in any M3 -instances.

Step 2: Connect to ION
The Aigonix integration connects to your organization’s M3 -instance using Infor ION. It is the communication channel that the connector uses to get data from and send messages to your M3 -instance.
Granting access to ION is done through the Infor ION API management -interface. You need to create an “Authorized App” and upload the generated credentials to the connection.
When you have uploaded the credentials they will be transmitted to the connector, which will verify that it can access to the ION -endpoint. When the connection is successful the section displays this status.
If you are running the connection hosted on the Aigonix platform the ION -endpoint must be able to reach it. This may require network-configuration. If you are running the connection self-hosted you must make sure that the connector can reach the ION -endpoint, and the Kafka-topics it it consumes and produces to.
If you do not configure the ION -instance the connection will not be able to read data and affect changes in your organization’s M3 -instance.
The steps to create ION -credentials are as follows:
-
Open Infor ION API. Open the menu from the upper left corner and select ‘Infor ION API’.
-
Select ‘Authorized Apps’ from the left hand menu followed by the ‘+’ icon to add a new account.
-
Provide a name. Example: “Dolittle_Bridge”.
-
Under ‘Type’, select ‘Backend Service’.
-
Provide a description. Example: “Integration Connector”.
-
Toggle on ‘Use Bridge Authentication. Optional: You can toggle on ‘User Impersonation’ if you would like to monitor specific user activity.
-
Click the save icon button.
-
Scroll down and click ‘Download Credentials’ button. If you would like to use an account you’ve previously created, you can access the account via ‘Authorized Apps’ then selecting the account name.
-
When the dialog pops up, toggle on ‘Create Service Account’ and provide a username from your M3 account you would like to associate with the ION service account.
-
Last, click ‘Download’.

Mapping tables
At this point you have a connection to your M3 -instance, and are ready to start mapping data from it to messages with the mapping interface. This interface is available by clicking on the “message types”, next to “configuration”.
Step 0: Create a message-type
A message-type maps from a table in your M3 -instance to a messages on a stream. It defines for the connection which table to get data from, and how to translate that data into a message that your service consume.
This is where you translate from the “language” of your M3 -instance to the “language” of your services.
You can map a table to many different messages, picking the relevant fields for each message.
Initially you will see an empty list of message-types, click the “create new message types” -button to create your first one.

Step 1: Name the message-type
You can now name and describe your new message, type.
The name will be used to identify the message-type, and will be the basis for the messages you receive. For example: if you name your message-type “Item” you will receive messages with the type “ItemUpdated” and “ItemDeleted”.
When you use the REST API later, it will interpret these messages and create a “Item” resource for you, with the fields you mapped.

Step 2: Select the table
Once you have named your message-type you select the table that you want to map data from.
It may be hard to know which table contains the data you need - this is where an M3 -expert would be very helpful. Luckily the mapping-wizard can help you find the table you need, and the fields in that table.
Begin by searching for the table - if you know its name you can type it in, otherwise you can search for it. The wizard will display a list of tables that match your search. Click on a table to select it.
In our example we will create a message-type for items in the master catalogue. We search for “item master” and find some tables. The “MITMAS” table is the one we want, so we select it.

Step 3: Select the fields
Once you have selected the table you can select the fields that you want to map.
The wizard will display the fields that are available in the table you selected, with their description from the metadata. You can select any number of fields. There is also a toggle to only display the selected fields, as tables can have hundreds of fields.

Step 4: Name the fields
Once you have selected the fields you want to map you they will get a suggested name.
This is where you translate from the field-names in the M3 -instance to the field-names in your message-type. The suggested name will be based on the metadata for the table, and may not be what you need in your message-type. You are encouraged to change the field-names to something that is relevant to your message-type.
Setting a relevant message-type -name and field -names is how you translate from the language of your M3 -instance to the language of your services. This is how you make the data from your M3 -instance available to your services in terms they understand.
Remember that you can map tables to many message-types. We do not recommend mapping all the fields in a table to one message-type that simply represents that table. While this can be useful in some cases, but coming up with a relevant message-type -name and field -names is more valuable. This protects the services that consume the messages from the details of the M3 -instance.
In our example we have selected some fields from the “MITMAS” table. We have named the message-type “Item” and the fields “GrossWeight”, “Height”, “Length”, “Name”, “Category”, “ItemNumber” and “Width”. As the picture shows direct access to the business-data in M3 would have required the knowledge that the MITMAS -table had the relevant fields MNGRWE, MMHEI, MMLEN, MMITDS, MMITGR, MMITNO and MMWTD in whatever service needed to work with the data.
By translating the field-names we make the data available in a language that is relevant to our services.

Step 5: Save the message-type
Once you have named the fields you can save the mapping. This saves your mapping, but it does not yet deploy it to the connector, which means that the connector will not yet start translating data from the M3 -instance into messages. You can deploy the mapping by clicking the “Deploy” -button in the top right corner of the mapping interface.
Having a separate deployment-step lets you “play” with message-types and mappings without affecting the connector. Finding good terms to use is often an iterative process, and we recommend working with the message-type -mappings for a while until you are happy with it.
Saving will show the new message-type in the list of message-types. You can see from the illustration that this message-type has not yet been deployed, as it has no date in the “Deployed” -column.

Step 6: Deploy the message-type
when you are happy with your mapping you deploy it to the connection. This will make the connection start translating data from the M3 -instance into messages. You can deploy multiple mappings by marking them in the list and clicking the “Deploy” -button in the top right corner of the mapping interface.
The connection will now start to monitor the table you have selected, and any changes to it will be translated into messages. These messages will be available on the stream that you can consume from your services. You can expect all existing data in the table to be part of the initial set of messages, and then any changes will appear as they happen.

Step N: Refine the message-types
By navigating into the “message types” -tab in the connection you can always go back and refine your message-types. You can add more fields, remove fields, rename fields and change the name of the message-type. You can also delete the message-type if you no longer need it.
You can delete message-types on the connection, or you can add new ones. You also control deployment of the message-type -mappings from this list.

Consuming data
Having mapped the business-data from your ERP -instance into messages-types and deployed these message-type to the connection you can now consume messages in your services.
The connection will translate changes in the ERP -instance into messages that are available as a stream on a Kafka -topic.
If you do not want or need a full stream of changes, just the “latest state” of the message-type (in our example - the latest state of an item in the catalogue) you can activate a REST -interface. This is often what you need if you want to display the data in a user interface, or work with it in tools like Power-BI.
Option 1: Event stream (messages on a Kafka topic)
Once you have set up a connection and mapped some data you can start consuming the data in your services. The data is transferred from your ERP -system and translated into the message-types you have defined. These messages are then available on a Kafka-topic that you can consume from your services.
Consuming this stream of messages will give you a full history of the changes in the ERP -system from when the connector first accessed the table. This is useful when you build services that react to changes in the ERP -system, or affect changes in the ERP -system. Building services that communicate through events that communicate changes is the core of an Event Driven Architecture.
To know what kinds of messages to expect on the Kafka -topic and how to connect to it you navigate to the “consume data (event streams)” -tab in the connection. Here you will find a link to an Async API Specification -document that describes the messages that are available on the stream. You can use this document to generate code for your services that will consume the messages.

The data in the event-stream is only available through credentialed access. You need to create a credentials for your services to use when they connects to the Kafka -topic. You create credentials by clicking the “Generate new service account” -button. This will create a new service account that can connect to the Kafka -topic.
These credentials give direct read or write access to the data, so it is important to keep them safe. We recommend using a secrets management solution to store the credentials and not storing them in your code.
You can download the credentials for the service account by clicking the “Download credentials” -button.
You can delete credentials that you no longer need or want to invalidate by selecting the credential entries in the list and clicking the “Delete” -button.

Option 2: REST API (latest state of a message-type)
It is common to need to display or use the business-data, without actually dealing with the changes in the ERP -system. For example: you may want to display the latest state of an item in the catalogue, but you do not need to deal with all the changes that lead to that state.
In our experience this is the most common use-case for working with business-data. More involved scenarios benefit greatly from an Event Driven Architecture, but for simple scenarios it is often overkill.
Aigonix integration does not just transfer the messages, it also provides a ready-made service that projects these changes into a “latest-state” view automatically. In this case you can use the REST -interface to get the latest state of the message-type. We chose to create this as a REST -service because many toolsets and frameworks have good support for consuming REST -services.
This is available under the “consume data (REST)” -tab in the connection. Here you will find a link to a Swagger interface where you can exercise the service, and a link to an Open API Specification -document that describes the REST -service. You can use this document to generate code for your services that will consume the REST -service.
Like the event-stream the data in the REST -service is only available through credentialed access. You create credentials by clicking the “Generate new credentials” -button. This will create a new credential that can be used to access the REST -service. You set the name and description for the credential, and a token will be generated for you. This token is a bearer-token that should be in the “Authorization” -header of the HTTP -requests to the REST service.
We recommend using a secrets management solution to store the credentials and not storing them in your code.
The token is only shown once, so make sure to copy it and store it somewhere safe. If you lose the token you will have to generate a new credential.
You can also delete credentials that you no longer need or want to invalidate by selecting the credential entries in the list and clicking the “Delete” -button.

Summary
In this article we have seen how to set up a connection to an ERP -system and how to map data from the ERP -system into messages. We have also shown how to consume these messages in your services. This is the core of the Aigonix integration, and it is how you make your business-data available to your services.
The Aigonix integration is designed to make it easy to work with your business-data and to make it easy to translate from the “language” of your ERP -system to the “language” of your services. This is done by mapping the data from the ERP -system into messages that are available as a stream. You can also use the REST -interface to get the latest-state of the message-types.
By setting up a connection to your organization’s ERP -system you make the business-data available to your services. This lets you build services that react to changes in the business-data expressed in your domain-language and that affect changes in the business-data, without needing a direct connection to the ERP -system.
Details (for the technically inclined)
The Aigonix integration works by connecting to the ERP -system (M3) and translating changes in the business-data into messages. This is done by the ERP Integration service, which knows how to poll and to set up webhooks for ION. It translates to messages, and sends that to the correct streams. The ERP integration service exposes webhooks that ION can use to notify of changes, and it polls at intervals to discover changes in data.
An interface to configure the ERP Integrations service exists in Aigonix studio, which is how you configure message-types and set up new connections. The ERP Integration service can run on-premises, or it can be hosted in the Aigonix platform. In either case it is controlled by your setup in Aigonix studio.
You decide whether to self-host or use the Aigonix platform to run the integration-service. This decision typically relies on your networking rules.
graph TB
    subgraph Enterprise with M3
        ION --calls--> M3P[Programs]
        M3P --enact changes--> M3DB
        ION --accesses--> M3DB[(Business data)]
        MDP[Metadata publisher] --describes schema--> M3DB
    end
    subgraph Aigonix platform
        MS[Your services] --consumes--> KT
        subgraph Aigonix integrations
            Connection --configures--> ERPI
            Mapping --defines mapping for--> ERPI[ERP Integration service]
            ERPI --publishes--> KT[/Messages/]
        end
    end
    ERPI --polling--> ION
    ION --webhooks--> ERPI
    Mapping --gets metadata from--> MDP
    People(People) --map messages--> Mapping
    People --configure connection--> Connection
    People --use--> MS
3.6.6 - Container Registry
Your docker image container registry
All Microservices running in the Aigonix Platform are running in Docker containers. You can run public images, or you can run your own images. If you do not wish to publish the images of your Microservices to publicly available registries you can use one Aigonix provides for you.
This container registry is available at a unique host for your customer account. You can find the host in the documentation for your Application in Studio. It will look like {your-random-id}.azurecr.io.
To list what images are available in the registry you can navigate to the container-registry in Aigonix Studio, or you use the az command-line tool. You will need to log in to the Azure CLI and then you can run
az acr repository list --name {your-random-id} -o table
from your command-line. This will list all the images available in the registry.
To push a new image to the registry you tag the image with the registry host and then push it to the registry. You can do this with the docker command-line tool. Let us say you have an image called my-image that you want to push to the registry. You would then run
docker tag my-image {your-random-id}.azurecr.io/my-image:latest
docker push {your-random-id}.azurecr.io/my-image:latest
from your command-line. This will push the image to the registry and make it available for you to use in your Microservices. This image will not be available on public registries, it will only be available to you.
4 - References
Reference documentation
I’m the overview of the reference folder. I’ll appear when you click on the “References”
4.1 - Dolittle CLI
The Dolittle CLI tool command reference
This section helps you learn about how to use the Dolittle CLI tool. If you’re new to the CLI, jump down to the how to install section to get started.
Command overview
| Syntax |
Description |
|
dolittle runtime aggregates list |
List all running Aggregate Roots |
Details |
dolittle runtime aggregates get |
Get details about a running Aggregate Root |
Details |
dolittle runtime aggregates events |
Get committed events for an Aggregate Root Instance |
Details |
dolittle runtime eventhandlers list |
List all running Event Handlers |
Details |
dolittle runtime eventhandlers get |
Get details about a running Event Handler |
Details |
dolittle runtime eventhandlers replay |
Replay events for a running Event Handler |
Details |
dolittle runtime eventtypes list |
List all registered Event Types |
Details |
dolittle runtime projections list |
List all running Projections |
Details |
dolittle runtime projections get |
Get details about a running Projection |
Details |
dolittle runtime projections replay |
Replay a running Projection |
Details |
How to install
There are two ways to install the Dolittle CLI tool, directly as a binary or using the dotnet tool command if you’re using .NET.
To install the tool globally on your machine, run:
dotnet tool install --global Dolittle.Runtime.CLI
This should make the dolittle command anywhere. You might have to modify your PATH environment variable to make it work, and the .NET installer should guide you in how to do this. If it doesn’t, you can have a look at the dotnet tool install documentation for more help.
Installing as a binary
To install the tool manually, head over to the Runtime latest release page on GitHub, expand the “Assets” section at the bottom of the release, and download the binary for your setup.
Next you’ll have to place this file somewhere in your PATH to make it available as a command, on a *nix-like system, /usr/local/bin is usually a nice place, in the process of moving it we also recommend that you rename it to just dolittle.
Lastly you will need to make the file executable by running chomd a+x /usr/local/bin/dolittle and you should be all set.
Updates
The Dolittle CLI tool does currently not check for new versions by itself.
So you will need to either download a new binary from the releases page and replace the current one, or run dotnet tool update --global Dolittle.Runtime.CLI to get a fresh version with new features.
Subcommands
4.1.1 - Runtime
Commands related to management of a Runtime
dolittle runtime [subcommand]
Options
| Option |
Description |
--runtime host[:port] |
The address to the management endpoint of a Runtime. |
--output table|json |
Select the format the output of the subcommand. Defaults to table. |
--wide |
If set, prints more details in table format for a wider output. |
--help |
Show help information. |
Details
The dolittle runtime commands interacts with a Runtime you can access from your machine.
You can specify an endpoint using the --runtime <host[:port]> option.
If you don’t specify an endpoint, the CLI will try to locate a Runtime it can interact with itself.
Currently it looks for Docker containers running a dolittle/runtime:* image with the management port (51052) exposed.
If there are more than one available Runtime and you have not specified an endpoint, you’ll be presented with an interactive selector to choose one.
Subcommands
4.1.1.1 - Aggregates
Commands related to management of Aggregates
dolittle runtime aggregates [subcommand]
Options
| Option |
Description |
--runtime host[:port] |
The address to the management endpoint of a Runtime. See details. |
--output table|json |
Select the format the output of the subcommand. Defaults to table. |
--wide |
If set, prints more details in table format for a wider output. |
--help |
Show help information. |
Subcommands
4.1.1.1.1 - List
Lists all the Aggregate Roots currently registered by Clients to the Runtime
dolittle runtime aggregates list [options]
Options
| Option |
Description |
--tenant <id> |
Only show Aggregate Root information for the specified Tenant. |
--runtime host[:port] |
The address to the management endpoint of a Runtime. See details. |
--output table|json |
Select the format the output of the subcommand. Defaults to table. |
--wide |
If set, prints more details in table format for a wider output. |
--help |
Show help information. |
4.1.1.1.2 - Get
Gets details of a specific Aggregate Root currently registered by Clients to the Runtime
dolittle runtime aggregates get <identifier> [options]
Arguments
| Argument |
Description |
<identifier> |
The id or the alias of the Aggregate Root to get details for. |
Options
| Option |
Description |
--tenant <id> |
Only show Aggregate Root information for the specified Tenant. |
--runtime host[:port] |
The address to the management endpoint of a Runtime. See details. |
--output table|json |
Select the format the output of the subcommand. Defaults to table. |
--wide |
If set, prints more details in table format for a wider output. |
--help |
Show help information. |
4.1.1.1.3 - Events
Gets committed events for a specific Aggregate Root Instance that is currently registered by Clients to the Runtime
dolittle runtime aggregates events <identifier> <eventsource> [options]
Arguments
| Argument |
Description |
<identifier> |
The id or the alias of the Aggregate Root to get details for. |
<eventsource> |
The Event Source of the Aggregate Root Instance to get committed events for. |
Options
| Option |
Description |
--tenant <id> |
Only show committed events for the specified Tenant. Defaults to the development Tenant. |
--runtime host[:port] |
The address to the management endpoint of a Runtime. See details. |
--output table|json |
Select the format the output of the subcommand. Defaults to table. |
--wide |
If set, prints more details in table format for a wider output. |
--help |
Show help information. |
4.1.1.2 - Event Handlers
Commands related to management of Event Handlers
dolittle runtime eventhandlers [subcommand]
Options
| Option |
Description |
--runtime host[:port] |
The address to the management endpoint of a Runtime. See details. |
--output table|json |
Select the format the output of the subcommand. Defaults to table. |
--wide |
If set, prints more details in table format for a wider output. |
--help |
Show help information. |
Subcommands
4.1.1.2.1 - List
Lists all the Event Handlers currently registered by Clients to the Runtime
dolittle runtime eventhandlers list [options]
Options
| Option |
Description |
--tenant <id> |
Only show Event Handler information for the specified Tenant. |
--runtime host[:port] |
The address to the management endpoint of a Runtime. See details. |
--output table|json |
Select the format the output of the subcommand. Defaults to table. |
--wide |
If set, prints more details in table format for a wider output. |
--help |
Show help information. |
4.1.1.2.2 - Get
Gets details of a specific Event Handler currently registered by Clients to the Runtime
dolittle runtime eventhandlers get <identifier> [options]
Arguments
| Argument |
Description |
<identifier> |
The identifier of the Event Handler to get details for. Format: id/alias[:scope] |
Options
| Option |
Description |
--tenant <id> |
Only show Stream Processor status for the specified Tenant. |
--runtime host[:port] |
The address to the management endpoint of a Runtime. See details. |
--output table|json |
Select the format the output of the subcommand. Defaults to table. |
--wide |
If set, prints more details in table format for a wider output. |
--help |
Show help information. |
4.1.1.2.3 - Replay
Initiates reprocessing of events for a specific Event Handler currently registered by Clients to the Runtime
Replay all events
Initiates reprocessing of all events (from position 0 in the Event Handler Stream) for all Tenants.
If you want to only reprocess all events for a specific Tenant, use the replay from 0 command.
dolittle runtime eventhandlers replay all <identifier> [options]
Arguments
| Argument |
Description |
<identifier> |
The identifier of the Event Handler to replay. Format: id/alias[:scope] |
Options
| Option |
Description |
--runtime host[:port] |
The address to the management endpoint of a Runtime. See details. |
--help |
Show help information. |
Replay events from a specific position in the Event Handler Stream
Initiates reprocessing of events from the specified position (in the Event Handler Stream) for a specific Tenant.
This command will fail if the specified position is higher than the current position for the Event Handler, which would cause some events to be skipped.
dolittle runtime eventhandlers replay from <identifier> <position> [options]
Arguments
| Argument |
Description |
<identifier> |
The identifier of the Event Handler to replay. Format: id/alias[:scope] |
<position> |
The position in the Event Handler stream to star reprocessing events from. Cannot be greater than the current position. |
Options
| Option |
Description |
--tenant <id> |
The Tenant to replay events for. Defaults to the Development tenant. |
--runtime host[:port] |
The address to the management endpoint of a Runtime. See details. |
--help |
Show help information. |
4.1.1.3 - Event Types
Commands related to management of Event Types
dolittle runtime eventtypes [subcommand]
Options
| Option |
Description |
--runtime host[:port] |
The address to the management endpoint of a Runtime. See details. |
--output table|json |
Select the format the output of the subcommand. Defaults to table. |
--wide |
If set, prints more details in table format for a wider output. |
--help |
Show help information. |
Subcommands
4.1.1.3.1 - List
Lists all the Event Types currently registered by Clients to the Runtime
dolittle runtime eventtypes list [options]
Options
| Option |
Description |
--runtime host[:port] |
The address to the management endpoint of a Runtime. See details. |
--output table|json |
Select the format the output of the subcommand. Defaults to table. |
--wide |
If set, prints more details in table format for a wider output. |
--help |
Show help information. |
4.1.1.4 - Projections
Commands related to management of Projections
dolittle runtime projections [subcommand]
Options
| Option |
Description |
--runtime host[:port] |
The address to the management endpoint of a Runtime. See details. |
--output table|json |
Select the format the output of the subcommand. Defaults to table. |
--wide |
If set, prints more details in table format for a wider output. |
--help |
Show help information. |
Subcommands
4.1.1.4.1 - List
Lists all the Projections currently registered by Clients to the Runtime
dolittle runtime projections list [options]
Options
| Option |
Description |
--tenant <id> |
Only show Stream Processor status for the specified Tenant. |
--runtime host[:port] |
The address to the management endpoint of a Runtime. See details. |
--output table|json |
Select the format the output of the subcommand. Defaults to table. |
--wide |
If set, prints more details in table format for a wider output. |
--help |
Show help information. |
4.1.1.4.2 - Get
Gets details of a specific Projection currently registered by Clients to the Runtime
dolittle runtime projection get <identifier> <scope> [options]
Arguments
| Argument |
Description |
<identifier> |
The identifier or alias of the Projection to get details for |
<scope> |
The scope of the Projection to get details for. Only required when the identifier or alias matches multiple projections |
Options
| Option |
Description |
--tenant <id> |
Only show Stream Processor status for the specified Tenant. |
--runtime host[:port] |
The address to the management endpoint of a Runtime. See details. |
--output table|json |
Select the format the output of the subcommand. Defaults to table. |
--wide |
If set, prints more details in table format for a wider output. |
--help |
Show help information. |
4.1.1.4.3 - Replay
Initiates a replay of a Projection currently registered by Clients to the Runtime
Initiates a replay of all events to rebuild Projection read models. This command drops all persisted read models, and potential copies in MongoDB, and restarts the Projection to build new ones.
dolittle runtime projection replay <identifier> <scope> [options]
Arguments
| Argument |
Description |
<identifier> |
The identifier or alias of the Projection to replay |
<scope> |
The scope of the Projection to replay. Only required when the identifier or alias matches multiple projections |
Options
| Option |
Description |
--tenant <id> |
Only replay the Projection for the specified Tenant. If not provided, replays for all Tenants |
--runtime host[:port] |
The address to the management endpoint of a Runtime. See details. |
--help |
Show help information. |
4.2 - Runtime
Reference documentation for the Runtime configuration
I’m the overview of the reference folder. I’ll appear when you click on the “References”
4.2.1 - Compatibility
Runtime compatibility table
By Runtime version:
| Runtime |
DotNET SDK |
JavaScript SDK |
| 8.8.0 - 8.8.1 |
17.0.0 - 21.0.1 |
24.0.0 |
| 8.5.0 - 8.7.2 |
17.0.0 - 19.0.0 |
24.0.0 |
| 8.3.0 - 8.4.3 |
17.0.0 - 17.2.3 |
24.0.0 |
| 8.0.0 - 8.2.2 |
17.0.0 - 17.0.2 |
24.0.0 |
| 7.8.0 - 7.8.1 |
10.0.0 - 16.0.1 |
18.0.0 - 23.2.3 |
| 7.7.0 - 7.7.1 |
10.0.0 - 15.1.1 |
18.0.0 - 23.1.0 |
| 7.6.0 - 7.6.1 |
10.0.0 - 15.0.1 |
18.0.0 - 23.0.0 |
| 7.5.0 - 7.5.1 |
10.0.0 - 14.1.0 |
18.0.0 - 22.1.0 |
| 7.4.0 - 7.4.1 |
10.0.0 - 13.0.0 |
18.0.0 - 21.0.0 |
| 7.3.0 |
10.0.0 - 12.0.0 |
18.0.0 - 20.0.0 |
| 7.2.0 |
10.0.0 - 11.0.0 |
18.0.0 - 19.0.1 |
| 7.1.0 - 7.1.1 |
10.0.0 - 10.1.0 |
18.0.0 - 18.1.0 |
| 7.0.0 |
10.0.0 |
18.0.0 |
| 6.1.0 - 6.2.4 |
9.0.0 - 9.2.0 |
15.0.0 - 17.0.3 |
| 6.0.0 - 6.0.1 |
9.0.0 |
|
| 5.5.0 - 5.6.2 |
6.0.0 - 8.4.0 |
14.3.0 - 14.4.0 |
| 5.3.3 - 5.4.2 |
6.0.0 - 8.3.2 |
|
| 5.0.0 - 5.3.2 |
6.0.0 - 8.0.0 |
|
By DotNET SDK version:
| DotNET SDK |
Runtime |
| 20.0.0 - 21.0.1 |
8.8.0 - 8.8.1 |
| 18.0.0 - 19.0.0 |
8.5.0 - 8.8.1 |
| 17.1.0 - 17.2.3 |
8.3.0 - 8.8.1 |
| 17.0.0 - 17.0.2 |
8.0.0 - 8.8.1 |
| 15.1.2 - 16.0.1 |
7.8.0 - 7.8.1 |
| 15.1.0 - 15.1.1 |
7.7.0 - 7.8.1 |
| 14.2.0 - 15.0.1 |
7.6.0 - 7.8.1 |
| 13.0.1 - 14.1.0 |
7.5.0 - 7.8.1 |
| 13.0.0 |
7.4.0 - 7.8.1 |
| 12.0.0 |
7.3.0 - 7.8.1 |
| 11.0.0 |
7.2.0 - 7.8.1 |
| 10.1.0 |
7.1.0 - 7.8.1 |
| 10.0.0 |
7.0.0 - 7.8.1 |
| 9.1.0 - 9.2.0 |
6.1.0 - 6.2.4 |
| 9.0.0 |
6.0.0 - 6.2.4 |
| 8.4.0 |
5.5.0 - 5.6.2 |
| 8.1.0 - 8.3.2 |
5.3.3 - 5.6.2 |
| 6.0.0 - 8.0.0 |
5.0.0 - 5.6.2 |
By JavaScript SDK version:
| JavaScript SDK |
Runtime |
| 24.0.0 |
8.0.0 - 8.8.1 |
| 23.2.0 - 23.2.3 |
7.8.0 - 7.8.1 |
| 23.1.0 |
7.7.0 - 7.8.1 |
| 22.2.0 - 23.0.0 |
7.6.0 - 7.8.1 |
| 21.0.1 - 22.1.0 |
7.5.0 - 7.8.1 |
| 21.0.0 |
7.4.0 - 7.8.1 |
| 20.0.0 |
7.3.0 - 7.8.1 |
| 19.0.0 - 19.0.1 |
7.2.0 - 7.8.1 |
| 18.1.0 |
7.1.0 - 7.8.1 |
| 18.0.0 |
7.0.0 - 7.8.1 |
| 15.0.0 - 17.0.3 |
6.1.0 - 6.2.4 |
| 14.3.0 - 14.4.0 |
5.5.0 - 5.6.2 |
4.2.2 - Configuration
Runtime configuration files reference
The Runtime uses the ASP.NET Configuration System for reading configuration related to
setting up the logging and also configuration for the Runtime itself. It reads and overrides configuration in a prioritized manner where configuration from files is overridden by environment variables and command-line arguments.
Configuration points
Endpoints
Sets up the ports for the Runtime interface endpoints.
Private
The GRPC port for communication between Runtime and Clients, usually an application using the SDK, for Runtime functionalities.
- Port
- Type: Integer
- Default: 50053
Public
The GRPC port for communication between Runtimes using the Event Horizon.
- Port
- Type: Integer
- Default: 50052
Management
The GRPC port for communication between Runtimes and Clients for management related functionalities. The ´dolittle´ CLI uses this port for communicating with the Runtime.
- Port
- Type: Integer
- Default: 51052
ManagementWeb
The GRPC-Web port for communication between Runtimes and Clients for management related functionalities. A browser-application using GRPC-Web can communicate with the Runtime using this port.
- Port
- Type: Integer
- Default: 51152
Web
The REST-service endpoint for the Runtime. Only some functionalities are provided through this endpoint.
- Port
- Type: Integer
- Default: 8001
Metrics
The port where we provide metrics using Prometheus. Used for metrics scraping.
- Port
- Type: Integer
- Default: 9700
Eventstore:BackwardsCompatibility:Version
A required configuration denoting whether the event store should use the old formatting used in V6 of the runtime or the newer format. In V6 Runtime the Partition ID and Event Source ID were forced to by GUIDs and also stored as such in the database. In V7 we changed it so that these were strings, not GUIDs, thus the database scheme is slightly different and it needs to be configured explicitly. Only Runtimes that has event store databases with data from V6 of the Runtime should use the V6 option.
Type: String
Values
ReverseCalls
Contains a feature-flag for whether or not to use reverse calls implemented with actors.
- UseActors
- Type: boolean
- Default: True
Defines the platform specific information related to the running microservice.
- CustomerName
- Type: string
- Default: ‘[Not Set]’
- CustomerID
- Type: GUID
- Default: ‘ca900ec9-bae8-462e-b262-fa3efc825ca8’
- ApplicationName
- Type: string
- Default: ‘[Not Set]’
- ApplicationID
- Type: GUID
- Default: ‘4fe9492c-1d19-4e6b-be72-03208789906e’
- MicroserviceName
- Type: string
- Default: ‘[Not Set]’
- MicroserviceID
- Type: GUID
- Default: ‘4a5d2bc3-543f-459a-ab0b-e8e924093260’
- Environment
- Type: string
- Default: ‘Development’
Microservices
The addresses of other Runtimes used when subscribing to an event horizon stream.
This is a dictionary mapping specifying the host:port address for reaching the Public Endpoint on the given Microservice ID (Key of the objet)
Tenant-Specific Configuration
Configurations that are specific to a single tenant. All of the configurations for a tenant is behind the configuration key tenants:<Tenant-Guid>
Resources
Embeddings [Obsolete]
- Servers
- Description: The name of the host server. (Usually ‘localhost’)
- Type: Array[string]
- Database
- Description: The name of the mongo database
- Type: string
- MaxConnectionPoolSize
- Description: The max number of concurrent MongoDB connections
- Type: Integer
- Default: 1000
EventStore
- Servers
- Description: The name of the host server. (Usually ‘localhost’)
- Type: Array[string]
- Database
- Description: The name of the mongo database
- Type: string
- MaxConnectionPoolSize
- Description: The max number of concurrent MongoDB connections
- Type: Integer
- Default: 1000
Projections
- Servers
- Description: The name of the host server. (Usually ‘localhost’)
- Type: Array[string]
- Database
- Description: The name of the mongo database
- Type: string
- MaxConnectionPoolSize
- Description: The max number of concurrent MongoDB connections
- Type: Integer
- Default: 1000
ReadModels
- Host
- Description: The full host connection string of the MongoDB connection. (Usually
mongodb://localhost:27017)
- Type: string
- Database
- Description: The name of the mongo database
- Type: string
- MaxConnectionPoolSize
- Description: The max number of concurrent MongoDB connections
- Type: Integer
- Default: 1000
EventHorizon
Defines the event horizons for this tenant (only consents can be configured).
- <Microservice-GUID>
- Consents
- Description: The list of consents for a specific
Partition in a public Stream from this specific tenant to specific tenant in the Microservice from the key of this entry.
- Type: Array[Object]
- ConsumerTenant
- Description: The ID of the
Tenant in the Microservice given above in the key of this entry that gets a consent to subscribe to the configured Partition in the configured public Stream
- Type: GUID
- Stream
- Description: The ID of the public stream that the event horizon reads events from.
- Type: GUID
- Partition
- Description: The partition ID of the public stream that the event horizon reads events from.
- Type: GUID
- Consent
- Description: The ID of the consent. (Not used for anything yet)
- Type: GUID
runtime.yml
The Runtime uses a single YAML configuration file called runtime.yml located under the .dolittle/ folder. This file has a 1:1 correspondence with the Runtime Configuration meaning that all fields under the runtime.yml config file gets prefixed Dolittle:Runtime: (represented as an environment variable by Dolittle__Runtime__) used in the Asp.Net configuration system.
Example config
eventStore:
    backwardsCompatibility:
        version: V6
platform:
    customerID: 6d8eaf84-969c-4234-b78f-30632a608e5a
    applicationID: e0078604-ae62-378d-46fb-9e245d824c61
    microserviceID: ffb20e4f-9227-574d-31aa-d6e59b34495d
    customerName: TheCustomer
    applicationName: THeApplication
    microserviceName: TheMicroservice
    environment: Dev
microservices:
    d47c6fb7-2339-e286-2912-2b9f163a5aa3:
        host: some.host
        port: 50052
tenants:
    1c707441-95b3-4214-a4d1-4199c58afa23:
        resources:
            embeddings:
            servers:
            - my.host
            database: embeddings
            eventStore:
            servers:
            - my.host
            database: eventstore
            readModels:
            host: mongodb://my.host:27017
            database: readmodels
            projections:
            servers:
            - dev-mongo.application-e0078604-ae62-378d-46fb-9e245d824c61.svc.cluster.local
            database: projections
        eventHorizons:
            d47c6fb7-2339-e286-2912-2b9f163a5aa3:
            consents:
            -   consumerTenant: c5b5847a-68e6-4b31-ad33-8f2beb216d8b
                stream: d9b302bb-5439-4226-a225-3b4a0986f6ed
                partition: 00000000-0000-0000-0000-000000000000
                consent: 4d43e837-0a8e-4b3d-a3eb-5301f5650d91
Default configuration
When using the dolittle/runtime images it is provided with a default runtime.yml setting up only resources for the “Development Tenant” 445f8ea8-1a6f-40d7-b2fc-796dba92dc44
tenants:
  445f8ea8-1a6f-40d7-b2fc-796dba92dc44:
    resources:
      eventStore:
        servers:
          - localhost
        database: event_store
        maxConnectionPoolSize: 1000
      projections:
        servers:
          - localhost
        database: projections
        maxConnectionPoolSize: 1000
      embeddings:
        servers:
          - localhost
        database: embeddings
        maxConnectionPoolSize: 1000
      readModels:
        host: mongodb://localhost:27017
        database: readmodels
        useSSL: false
Note
In addition the dolittle/runtime -development tags also sets the EventStore Compatibility Version to V7
appsettings.json
All Runtime configurations in theory can also be provided through the Asp.Net appsettings.json configuration file by simply having a Dolittle:Runtime object in the root of the configuration:
{
    "Dolittle": {
        "Runtime": {
            "Platform": {
                "ApplicationID": ...
            },
            "Tenants": {
                "<Tenant-GUID>": {
                    "Resources": {
                        ...
                    }
                }
            }
        }
    },
    "Logging": {
        ...
    }
}
Environment variables
All configurations to the Runtime can be configured with environment variables by prefixing the environment variables with Dolittle__Runtime__
Legacy
The Legacy Runtime pre version V8 uses JSON configuration files. The files are mounted to the .dolittle/ folder inside the Docker image.
| Configuration file |
Required |
platform.json |
✔️ |
tenants.json |
✔️ |
resources.json |
✔️ |
event-horizon-consents.json |
✔️ |
microservices.json |
|
metrics.json |
|
endpoints.json |
|
Note
These files can be used to override configuration provided by default or by runtime.yml. The tenants.json is also completely obsolete and should not be used.
Note
The legacy file provider for event-horizon-consents.json is buggy. So if a Runtime needs to have event horizon consents configured then the configuration needs to be provided through the runtime.yml configuration (or environment variables).
Required. Configures the Microservice environment for the Runtime.
{
    "applicationName": "<application-name>",
    "applicationID": "<application-id>",
    "microserviceName": "<microservice-name>",
    "microserviceID": "<microservice-id>",
    "customerName": "<customer-name>",
    "customerID": "<customer-id>",
    "environment": "<environment-name>"
}
tenants.json
Required. Defines each Tenant in the Runtime.
resources.json
Required. Configurations for the resources available per Tenant:
eventStore: MongoDB configuration for the Event Storeprojections: MongoDB configuration for the storage of Projectionsembeddings: MongoDB configuration for the storage of EmbeddingsreadModels: MongoDB configuration for a database that can be used for any storage and accessed through the SDKs directly. This database should only be used to store data that can be rebuilt from replaying events.
The database name must be unique for all resources and tenants, reusing the same name will cause undefined behaviour in the Runtime and potential dataloss.
{
    <tenant-id>: {
        "eventStore": {
            "servers": [
                <MongoDB connection URI>
            ],
            "database": <MongoDB database name>,
            "maxConnectionPoolSize": 1000
        },
        "projections": {
            "servers": [
                <MongoDB connection URI>
            ],
            "database": <MongoDB database name>,
            "maxConnectionPoolSize": 1000
        },
        "embeddings": {
            "servers": [
                <MongoDB connection URI>
            ],
            "database": <MongoDB database name>,
            "maxConnectionPoolSize": 1000
        },
        "readModels": {
            "host": <MongoDB connection string>,
            "database": <MongoDB database name>,
            "useSSL": false
        }
    }
}
event-horizon-consents.json
Required. Defines the Consents a Producer tenant gives to Consumers so that they can receive events over the Event Horizon.
{
    // The producer tenant that gives the consent
    <tenant-id>: [
        {
            // the consumers microservice and tenant to give consent to
            "microservice": <microservice-id>,
            "tenant": <tenant-id>,
            // the producers public stream and partition to give consent to
            "stream": <stream-id>,
            "partition": <partition-id>,
            // an identifier for this consent
            "consent": <consent-id>
        }
    ]
}
Note
If there are no subscriptions, the file should only contain an empty JSON object {}.
microservices.json
Defines where the Producer microservices are so that the Consumer can Subscribe to them.
{
    // the id of the producer microservice
    <microservice-id>: {
        // producer microservices Runtime host and public port
        "host": <host>,
        "port": <port>
    }
}
endpoints.json
Defines the private and public ports for the Runtime.
{
    "public": {
        // default 50052
        "port": <port>
    },
    "private": {
        // default 50053
        "port": <port>
    }
}
metrics.json
The port to expose the Prometheus Runtimes metrics server on.
{
    // default 9700
    "Port": <port>
}
4.2.3 - Failures
The known failures and their associated codes
Event Store
| Code |
Failure |
b6fcb5dd-a32b-435b-8bf4-ed96e846d460 |
Event Store Unavailable |
d08a30b0-56ab-43dc-8fe6-490320514d2f |
Event Applied By Other Aggregate Root |
b2acc526-ba3a-490e-9f15-9453c6f13b46 |
Event Applied To Other Event Source |
ad55fca7-476a-4f68-9411-1a3b087ab843 |
Event Store Persistance Error |
6f0e6cab-c7e5-402e-a502-e095f9545297 |
Event Store Consistency Error |
eb508238-87ff-4519-a743-03be5196a83d |
Event Store Sequence Is Out Of Order |
45a811d9-bdf7-4ee1-b9bc-3f248e761799 |
Event Cannot Be Null |
eb51284e-c7b4-4966-8da4-64a862f07560 |
Aggregate Root Version Out Of Order |
f25cccfb-3ae1-4969-bee6-906370ffbc2d |
Aggregate Root Concurrency Conflict |
ef3f1a42-9bc3-4d98-aa2a-942db7c56ac1 |
No Events To Commit |
Filters
| Code |
Failure |
d6060ba0-39bd-4815-8b0e-6b43b5f87bc5 |
No Filter Registration Received |
2cdb6143-4f3d-49cb-bd58-68fd1376dab1 |
Cannot Register Filter Or Non Writeable Stream |
f0480899-8aed-4191-b339-5121f4d9f2e2 |
Failed To Register Filter |
Event Handlers
| Code |
Failure |
209a79c7-824c-4988-928b-0dd517746ca0 |
No Event Handler Registration Received |
45b4c918-37a5-405c-9865-d032869b1d24 |
Cannot Register Event Handler Or Non Writeable Stream |
dbfdfa15-e727-49f6-bed8-7a787954a4c6 |
Failed To Register Event Handler |
Event Horizon
| Code |
Failure |
9b74482a-8eaa-47ab-ac1c-53d704e4e77d |
Missing Microservice Configuration |
a1b791cf-b704-4eb8-9877-de918c36b948 |
Did Not Receive Subscription Response |
2ed211ce-7f9b-4a9f-ae9d-973bfe8aaf2b |
Subscription Cancelled |
be1ba4e6-81e3-49c4-bec2-6c7e262bfb77 |
Missing Consent |
3f88dfb6-93d6-40d3-9d28-8be149f9e02d |
Missing Subscription Arguments |
5 - Contributing
Contribute to the Dolittle open-source framework
Dolittle is an open-source framework that is open for contributions.
This project has adopted the code of conduct defined by the Contributor Covenant to clarify expected behavior in our community. Read our Code of Conduct for more information.
Code
If you want to contribute with code, you can submit a pull request with your changes. It is highly recommended to read through all of our coding guideling to see what we’re expecting from you as a contributor.
Documentation
Contributions can also be done through documentation, all of our repositories have a Documentation folder. It is higly recommended you read through our style guide and writing guide on documentation.
Issues
You can contribute by filing all of your issues under our Home repository.
5.1 - Tooling
Tooling for developers
5.1.1 - Code Analysis
The tools we use for ensuring code quality
Static code analysis and test coverage
At Dolittle we employ static code analysis and test coverage reports to ensure that we:
-
Maintain a consistent style accross our repositories. This ensures that the code is understandable and maintainable not just by the author, but all of our developers.
It also helps in the onboarding process or new developers by reducing the cognitive load of understanding our ever-growing codebase.
-
Keep up the test coverage for the code we write. This enables us as a company - to some extent - to measure our confidence in the code.
Having a high test coverage means developers don’t need a deep understanding of what a specific piece of code should do when fixing or improving it, which enables us to scale.
Specifications is also a good way to document the intended behaviour of the code.
-
Avoid common pitfalls related to secure and robust code. It is easy to make mistakes while writing code, and many of theese mistakes are widely known.
The static code analysis tools checks for these common mistakes so that we can learn from the community.
The tools we have set up continuously monitor our code and reports on pull requests to help motivate us to produce high quality code, and reduce the manual work for reviewers. We are currently in the process of figuring out what tools work best for us (there are a lot to choose from), and we have set up the experiment on these repositories:
We are currently evaluating two options, Codacy and Codeclimate.
Our requirements for a tool is:
- To keep track of test coverage over time. Additional features related to code quality is considered benefitial, but not neccesary.
- Support for C# and TypeScript.
- Integrate with our public GitHub repositories through the existing GitHub workflows.
- Report changes in status on pull requests.
Initially we evaluated the following possible options and how they fulfil our requirements:
- Codacy - meets all the requirements, well integrated with Github and easy to setup. Nice dashboard with drilldowns for issues and code coverage.
- Code Climate - meets all the requirements.
- SonarCloud - meets all the requirements and is a widely adopted tool.
- LGTM - does not seem to provide test coverage reports.
- Codecov - meets all the requirements, but past experiences revealed flaky API resulting in false build failures.
- Coveralls - meets all the requirements, but less features than the other options.
Based on that evaluation, we settled on Codacy, Code Climate and SonarCloud for our trial period. SonarCloud has not been setup at the time of writing.
How to use them
Each of the repositories that have a static code analysis and test coverage tool set up has a dashboard page where you check the current (and historical) status of the code.
These can be used to get a feeling of the current quality and progression over time, as well as listing out the current issues if you’re up for cleaning out some technical debt.
The repositories should have badges in the README.md file that links to the corresponding dashboard.
For everyday work, the tools will also checks any changes you push on pull requests. These checks make sure that you don’t decrease the code quality with the proposed changes.
These checks appear at the bottom of the pull request in GitHub like this:
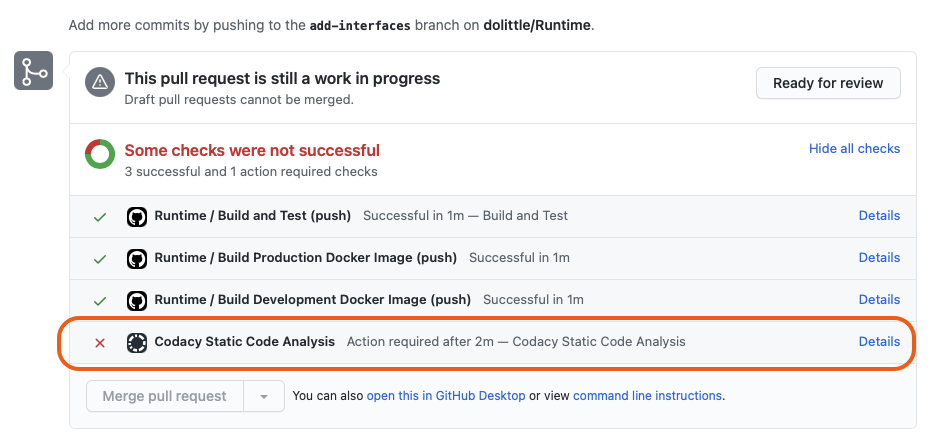
You can click the details link to see what issues have been introduced and how to resolve them before the pull request can be merged.
How to set it up
Codacy
- Sign up with Github provider
- Authorize for the Github user and Dolittle organization(s)
- (Optional) Invite people to Codacy
- Give Codacy access to a repository
- Adjust settings
- Configure excluded/ignored paths for static analysis
- Copy API token for sending coverage results and create corresponding secret in the repository
- Configure the workflow to create and send coverage results to API using the correct token (example workflow from Runtime)
- After running the workflow, check your dashboard in Codacy (example dashboard from the Runtime)
- Repeat steps 3-8 per repo
Runtime’s Codacy Dashboard:
Code Climate
- Sign up with Github provider
- Authorize for the Github user and Dolittle organization(s)
- Give CodeClimate access to a repository
- Adjust settings
- Configure excluded/ignored paths for static analysis
- Copy API token for sending coverage results and create corresponding secret in the repository
- Configure the workflow to create and send coverage results to API using the correct token (example workflow from DotNET.SDK)
- You need to setup both dotCover and a tool for converting dotCover format to Cobertura test reporting
- After running the workflow, check your dashboard in Code Climate (example dashboard from the .NET SDK)
- Repeat steps 3-8 per repo
.NET SDK’s Code Climate Dashboard:
5.2 - Documentation
Documentation of documentation and how to write it
5.2.1 - Get started
Get started writing documentation locally
All of Dolittles documentation is open-source and hosted on GitHub.
Add a new repository to the main Documentation repository
This guide teaches you how to add a new repository to the Dolittle documentation structure.
Start by cloning the Documentation repository:
$ git clone https://github.com/dolittle/documentation
Put your documentation in markdown files under the Source/content folder. You can also add images and other assets in the same folder. Please consult the writing guide for more information on how to write documentation.
All folder names given in this process will act as URL segments, take care not to change these after they have been deployed.
Writing
All documentation is written in markdown following the GitHub flavor.
Markdown can be written using simple text editors (Pico, Nano, Notepad), but more thorough editors like Visual Studio Code or Sublime Text are highly recommended. VSCode also has a markdown preview feature.
Read the writing guiden and style guide for more information.
Happy documenting
5.2.2 - Writing guide
A guide on how to write documentation
This document is meant to be read alongside the style guide to provide concrete examples on formatting the document and syntax of different Hugo shortcodes.
Documentation overview
All Dolittle documentation is generated using Hugo 0.58.3, with the Dot theme.
Writing documentation
All files MUST have a metadata header at the top of the file following the Hugo Front Matter format. Some of this metadata gets put into the generated HTML file.
The keywords and title properties are used for searching while the description shows up in the search results.
---
title: About contributing to documentation
description: Learn about how to contribute to documentation
keywords: Contributing
author: dolittle
// for topmost _index.md files add the correct repository property
repository: https://github.com/dolittle/Documentation
weight: 2
---
The main landing pages also have an icon attribute in the Front-Matter. These icons are from the Themify icon pack.
Documentation filenames
All files MUST be lower cased, words MUST be separated with a dash. Example: csharp-coding-styles.md. Hugo also takes care of converting between dashes and underscores as well as lower- and uppercase.
Links
Within the documentation -site
When adding links to other pages inside this site you need to refer to the page file-name without the file extension (.md). Also, you cannot use the “normal markdown” link [text](filename), you need to place the filename inside `{{<ref “filename”>}} - otherwise the link
will be broken. For instance, linking to the API documentation is done by adding a markdown link
as follows:
Renders to:
API
External resources
Linking to external resources is done in the standard Markdown way:
[Dolittle Home](https://github.com/dolittle/home)
Looks like this:
Dolittle Home
Hugo supports Mermaid shortcodes to write diagrams. Mermaid SHOULD be favored over using images when possible. Mermaid documentation
flowchart TB
    Understand --> Describe --> Understand
    Describe --> Implement --> Understand
    Implement --> Verify --> Understand
    Verify --> Deploy --> Understand
    Deploy --> Operate --> Understand
Some diagrams/figures might not be possible to do using Mermaid, these can then be images. Beware however how you create these images and make sure they comply with the look and feel. Also remember to add alt text to all images explaining them for screen readers.
Images
All images should be kept close to the markdown file using it.
To make sure the folders aren’t getting cluttered and to have some structure, put images in a images folder.
Images should not have backgrounds that assume the background of the site, instead you SHOULD be using file formats with support for transparency such as png.
<repository root>
└── Documentation
    └── MyArea
        └── [markdown files]
            └── images
                [image files]
To display images use the standard markdown format:

Renders to:

The URL to the image needs to be fully qualified, typically pointing to the GitHub URL.
This is something being worked on and registered as an issue
here.
The path is relative to the document where you declare the link from.
Notices
Hugo supports different levels of alerts:
Tip
Use tips for practical, non-essential information.
{{% alert %}}
You can also create ReadModels with the CLI tool.
{{% /alert %}}
Renders to:
You can also create ReadModels with the CLI tool.
Warning
Use warnings for mandatory information that the user needs to know to protect the user from personal and/or data injury.
{{% alert color="warning" %}}
Do not remove `artifacts.json` if you do not know what you're doing.
{{% /alert %}}
Renders to:
Do not remove artifacts.json if you do not know what you’re doing.
5.2.3 - Style guide
A set of standards for the documentation
This document is meant to serve as a guide for writing documentation. It’s not an exhaustive list, but serves as a starting point for conventions and best practices to follow while writing.
Comprehensive
Cover concepts in-full, or not at all. Describe all of the functionality of a product. Do not omit functionality that you regard as irrelevant for the user. Do not write about what is not there yet. Stay in the current.
Describe what you see. Use explicit examples to demonstrate how a feature works. Provide instructions rather than descriptions. Present your information in the order that users experience the subject matter.
Avoid future tense (or using the term “will”) whenever possible. For example, future tense (“The screen will display…") does not read as well as the present tense (“The screen displays…"). Remember, the users you are writing for most often refer to the documentation while they are using the system, not after or in advance of using the system.
Use simple present tense as much as possible. It avoids problems with consequences and time related communications, and is the easiest tense for translation.
Include (some) examples and tutorials in content. Many readers look first towards examples for quick answers, so including them will help save these people time. Try to write examples for the most common use cases, but not for everything.
Tone
Write in a neutral tone. Avoid humor, personal opinions, colloquial language and talking down to your reader. Stay factual, stay technical.
Example:
The applet is a handy little screen grabber.
Rewrite:
You use the applet to take screenshots.
Use active voice (subject-verb-object sequence) as it makes for more lively, interesting reading. It is more compelling than passive voice and helps to reduce word count. Examples.
Example:
The CLI tool creates the boilerplate.
Rewrite:
The boilerplate is created by the CLI tool.
Use second person (“you”) when speaking to or about the reader. Authors can refer to themselves in the first person (“I” in single-author articles or “we” in multiple-author articles) but should keep the focus on the reader.
Avoid sexist language. There is no need to identify gender in your instructions.
Use bold to emphasize text that is particularly important, bearing in mind that overusing bold reduces its impact and readability.
Use inline code for anything that the reader must type or enter. For methods, classes, variables, code elements, files and folders.
Use italic when introducing a word that you will also define or are using in a special way. (Use rarely, and do not use for slang.)
Hyperlinks should surround the words which describe the link itself. Never use links like “click here” or “this page”.
Use tips for practical, non-essential information.
You can also create ReadModels with the CLI tool.
Use warnings for mandatory information that the user needs to know to protect the user from personal and/or data injury.
Do not remove artifacts.json if you do not know what you’re doing.
Concise
Review your work frequently as you write your document. Ask yourself which words you can take out.
-
Limit each sentence to less than 25 words.
Example:
Under normal operating conditions, the kernel does not always immediately write file data to the disks, storing it in a memory buffer and then periodically writing to the disks to speed up operations.
Rewrite:
Normally, the kernel stores the data in memory prior to periodically writing the data to the disk.
-
Limit each paragraph to one topic, each sentence to one idea, each procedure step to one action.
Example:
The Workspace Switcher applet helps you navigate all of the virtual desktops available on your system. The X Window system, working in hand with a piece of software called a window manager, allows you to create more than one virtual desktop, known as workspaces, to organize your work, with different applications running in each workspace. The Workspace Switcher applet is a navigational tool to get around the various workspaces, providing a miniature road map in the GNOME panel showing all your workspaces and allowing you to switch easily between them.
Rewrite:
You can use the Workspace Switcher to add new workspaces to the GNOME Desktop. You can run different applications in each workspace. The Workspace Switcher applet provides a miniature map that shows all of your workspaces. You can use the Workspace Switcher applet to switch between workspaces.
-
Aim for economical expression.
Omit weak modifiers such as “quite,” “very,” and “extremely.” Avoid weak verbs such as “is,” “are,” “has,” “have,” “do,” “does,” “provide,” and “support.” (Weak modifiers have a diluting effect, and weak verbs require more wordy constructions.) A particularly weak verb construction to avoid is starting a sentence with “There is …” or “There are…")
-
Prefer shorter words over longer alternatives.
Example: “helps” rather than “facilitates” and “uses” rather than “utilizes.”
-
Use abbreviations as needed.
Spell out acronyms on first use. Avoid creating new abbreviation as they can confuse rathen than clarify concepts. Do not explain familiar abbreviations.
Example:
Dolittle uses Event Driven Architecture (EDA) and Command Query Responsibility Segregation (CQRS) patterns.
HTML and CSS are not programming languages.
Structure
Move from the known to the unknown, the old to the new, or the familiar to the unexpected. Structure content to help readers identify and skip over concepts which they already understand or see are not relevant to their immediate questions.
Avoid unnecessary subfolders. Don’t create subfolders that only contain a single page. Make the user have access to the pages with as few clicks as possible.
Headings and lists
Headings should be descriptive and concise. Use a level-one heading to start a broad subject area. Level-one headings are typically generic titles, such as Basic Skills, Getting Started, and so on. Use level-two, level-three, and level-four headings to chunk information into easy-to-identify sections. Do not use more than four heading levels.
Use specific titles that summarize the information in the associated sections. Avoid empty headings devoid of technical content such as “Going further,” “Next steps,” “Considerations,” and so on.
Use numbered lists when the entries in the list must follow a sequence. Use unnumbered lists where the entries are of the same importance and do not follow a sequence. Always introduce a list with a sentence or two.
External resources
This document is based on style guides from GNOME, IBM, Red Hat and Write The Docs.
5.2.4 - Structure overview
Understand the structure of dolittle documentation
Structure internally
Documentation lives in our Documentation repository’s Source folder. The 2 main pieces of this folder are content and repositories:
-
Source/repositories contain submodules to Dolittle repositories. We are moving away from this, please don’t add new submodules.
-
Source/content is the folder that Hugo uses to render dolittle.io, making it the root of the pages. It contains documentation and symlinks to each Source/repositories submodules Documentation folder.
Defining folder hierarchy on dolittle.io
To add structure (sub-folders) to the content folder and make these visible, Hugo expects an _index.md inside the subfolders. The _index.md files acts as a landing page for the subfolder and should contain a Front Matter section. This defines the title, description, keywords & relative weighting in its parent tree.
---
title: Page Title
description: A short description of the pages contents
keywords: comma, separated, keywords, to, help, searching
author: authorname
weight: 2
---
_index.md files within subfolders should only contain the Front Matter and nothing else unless needed. This makes the subfolder links on the sidebar work as only dropdowns without linking to the content of the _index.md. We prefer this as it makes for a more smooth experience on the site.
Only create subfolders when needed. Aim for a flat structure.
5.2.5 - API documentation
Learn about how to make sure APIs are documented
All public APIs MUST be documented regardless of what language and use-case.
All C# files MUST be documented using XML documentation comments.
For inheritance in documentation, you can use the <inheritdoc/> element.
JavaScript
All JavaScript files MUST be documented using JSDoc.
5.3 - Guidelines
5.3.1 - The Vision
Learn about the Dolittle vision

Our vision at Dolittle is to build a platform to solve problems for line-of-business applications that is easy
to use, increases developer productivity while remaining easy to maintain.
While our vision remains constant details around what needs to be implemented shifts over time as we learn more and gain experience on how the Dolittle framework is used in production. Dolittle will adapt as new techniques and technologies emerge.
Background
Dolittle targets the line of business type of application development. In this space there are very often requirements that
are somewhat different than making other types of applications. Unlike creating a web site with content, line of business
applications has more advanced business logic and rules associated with it. In addition, most line of business applications
tend to live for a long time once they are being used by users. Big rewrites are often not an option, as it involves a lot of
work to capture existing features and domain logic in a new implementation. This means that one needs to think more
about the maintainability of the product. In addition to this, in a fast moving world, code needs to built in a way that
allows for rapidly adapting to new requirements. It truly can be a life/death situation for a company if the company is
not able to adapt to market changes, competitors or users wanting new features. Traditional techniques for building software
have issues related to this. N-tier architecture tends to mix concerns and responsibilities and thus leading to
software that is hard to maintain. According to Fred Brooks and
“The Mythical Man-Month”, 90% of the cost
related to a typical system arise in the maintenance phase. This means that we should aim towards building our systems
in a way that makes the maintenance phase as easy as possible.
The goal of Dolittle is to help make this better by focusing on bringing together good software patterns and practices,
and sticking to them without compromise. Dolittle embraces a set of practices described in this article and aims to adhere
to them fully.
History
The project got started by Einar Ingebrigtsen in late 2008 with the first public commits going out
to Codeplex in early 2009. It was originally called Bifrost. Source control History between 2009 and 2012 still sits there. The
initial thoughts behind the project was to encapsulate commonly used building blocks. In 2009, Michael Smith
and Einar took the project in a completely different direction after real world experience with
traditional n-tier architecture and the discovery of commands. In 2012 it was moved to GitHub.
The original Bifrost repository can be found here.
From the beginning the project evolved through the needs we saw when consulting for different companies. Amongst these were Komplett.
It has always had a high focus on delivering the building blocks to be able to deliver the true business value. This has been
possible by engaging very close with domain experts and developers working on line of business solutions.
A presentation @ NDC 2011 showcases the work that was done, you can find it here.
From 2012 to 2015 it got further developed @ Statoil and their needs for a critical LOB application; ProCoSys.
In 2015, Børge Nordli became the primary Dolittle resource @ Statoil and late 2015 he started
maintaining a fork that was used by the project. Pull Requests from the fork has been
coming in steadily.
The effort of design and thoughtwork going into the project is a result of great collaboration over the years.
Not only by the primary maintainers; Michael, Børge and Einar - but all colleagues and other contributors to the project.
5.3.2 - Code of conduct
Learn about what is expected from you on conduct
Contributor Covenant Code of Conduct
Our Pledge
In the interest of fostering an open and welcoming environment, we as
contributors and maintainers pledge to making participation in our project and
our community a harassment-free experience for everyone, regardless of age, body
size, disability, ethnicity, gender identity and expression, level of experience,
nationality, personal appearance, race, religion, or sexual identity and
orientation.
Our Standards
Examples of behavior that contributes to creating a positive environment
include:
- Using welcoming and inclusive language
- Being respectful of differing viewpoints and experiences
- Gracefully accepting constructive criticism
- Focusing on what is best for the community
- Showing empathy towards other community members
Examples of unacceptable behavior by participants include:
- The use of sexualized language or imagery and unwelcome sexual attention or
advances
- Trolling, insulting/derogatory comments, and personal or political attacks
- Public or private harassment
- Publishing others' private information, such as a physical or electronic
address, without explicit permission
- Other conduct which could reasonably be considered inappropriate in a
professional setting
Our Responsibilities
Project maintainers are responsible for clarifying the standards of acceptable
behavior and are expected to take appropriate and fair corrective action in
response to any instances of unacceptable behavior.
Project maintainers have the right and responsibility to remove, edit, or
reject comments, commits, code, wiki edits, issues, and other contributions
that are not aligned to this Code of Conduct, or to ban temporarily or
permanently any contributor for other behaviors that they deem inappropriate,
threatening, offensive, or harmful.
Scope
This Code of Conduct applies both within project spaces and in public spaces
when an individual is representing the project or its community. Examples of
representing a project or community include using an official project e-mail
address, posting via an official social media account, or acting as an appointed
representative at an online or offline event. Representation of a project may be
further defined and clarified by project maintainers.
Enforcement
Instances of abusive, harassing, or otherwise unacceptable behavior may be
reported by contacting hello@dolittle.com. All
complaints will be reviewed and investigated and will result in a response that
is deemed necessary and appropriate to the circumstances. The project team is
obligated to maintain confidentiality with regard to the reporter of an incident.
Further details of specific enforcement policies may be posted separately.
Project maintainers who do not follow or enforce the Code of Conduct in good
faith may face temporary or permanent repercussions as determined by other
members of the project’s leadership.
Attribution
This Code of Conduct is adapted from the Contributor Covenant, version 1.4,
available at http://contributor-covenant.org/version/1/4
5.3.3 - Core values
Learn about what we at Dolittle believe in
At Dolittle we believe that good software stems from a set of core values.
These values guides us towards our core principles
and also manifested in our development principles
that translates it into guidelines we use for our development.
This page describes these core values to help put ourselves into the pit of success.
Privacy
We value privacy at all levels. Core to everything we do is rooted in this.
This means we will always strive towards making the right technology choice that
lets the owner of data have full control over where it is stored and the ownership
is always very clear. These things should always be at the back every developers
mind when making choices. It is easy to forget that even a little log statement
could violate this.
Empowering developers
The Dolittle mission is to empower developers to create great, sustainable,
maintainable software so that they can make their users feel like heroes.
This is part of our DNA - representing how we think and how we approach every
aspect of our product development. Our products range from libraries to frameworks
to tooling, and every step of the way we try to make it as easy as possible
for the developer consuming our technology.
Delivering business value
When empowering developers, this is because we want to make it easier to create
great technical solutions without having to implement all the nitty and gritty
details of doing so; so that our end-users - the developers we are building for,
can focus on delivering the business value for their businesses. For Dolittle the
developer using our technology is our end-users and represent our business value.
Our promise in this is that we will build relevant technology and not technology
for the technology sake. Obviously, this is balanced with innovation and we will
try out things, but close the feedback loop as tight as possible so that we try
things out and iterate on it to see if things are delivering business value.
User focused
At the end of the day, whatever we are building and at any level - we build things
that affect an end user. There is always a person at the end of everything being
done. This is critical to remember. We build software to help people build software
that are more relevant and improves the lives of the actual end user using the
software.
With this in hand, we work hard to understand the persona; who are we building for
and what is the effect of building something.
Embracing change
The world is constantly changing, so should software. Adapting to new knowledge,
new opportunities and new challenges is how the world has always moved on. It is
therefor a vital piece of Dolittle to be able to embrace this change. This is a
mindset and something we strongly believe in, and is also something we stribe
towards in our codebase; making it possible to adapt and change to new requirements
without having to recreate everything.
Being pragmatic
Pragmatism is important, keeping things real, relevant and practical is at the core
of this. However, it should be treated as a trumph card for taking shortcuts and
not adhering to our principles - “as that would be the pragmatic way”. It is related
to the approach, which tool and in general the how. We also keep our focus on
the outcome and never deviate from what outcome we are trying to achieve.
5.3.4 - Core principles
Learn about the core principles of Dolittle
Security
From everything we do; security is at the heart. We want users to feel
secure when using systems built on top of the Dolittle frameworks and
platform. Zero trust
is way of thinking that basically ensures that all data and resources
are accessed in a secure manner.
Storage over compute
For everything we do at Dolittle and in the Dolittle frameworks,
we always favor using more storage than compute. Compute-power is
always the most expensive part of systems while storage is the
cheapest. This means if one has the chance and it sustainable -
duplicates in storage for different purposes is always preferred.
Since the Dolittle architecture is built around events and the
source of truth is sitting inside an event store, there is a great
opportunity of leveraging the storage capabilities out there and
really not be afraid of duplicates. This do however mean one needs
to embrace the concept of eventual consistency.
Multi-tenancy
Since compute is the most expensive, the Dolittle frameworks and platform
has been built from the ground up with multi-tenancy in mind.
This basically means that a single process running the Dolittle runtime,
can represent multiple tenants of the application the runtime represents.
This makes for a more optimal use of resources. The way one then does
things is based on the execution context with the tenant information in
it, we can use the correct connection-string for a database for instance
or other information to a resource.
Tenant segregation
With everything being multi-tenant we also focus on segregating the tenants.
This principle means that we do not share a resource - unless it can cryptographically
guarantee that data could not be shared between two tenants by accident.
Everything in the Dolittle frameworks has been built from the ground up
with this in mind and with the resource system at play, you’ll be able to
transparently work as if it was a single tenant solution and the Dolittle frameworks
in conjunction with the platform would then guarantee the correct resource.
Privacy
Data should in no way made available to arbitrary personnel. Only if the data owner
has consented should one get access to data. Much like GDPR
is saying for personal data and the consent framework defined, business to business
should be treated in the same way. This means that developers trying to hunt down
a bug, shouldn’t just be granted access to a production system and its data without
the consent of the actual data owner. An application developer that builds a
multi-tenant application might not even be the data owner, while its customers
probably are. This should be governed in agreements between the application owner and
the data owner.
Just enough software
A very core value we have at Dolittle is to not deliver more than just enough.
We know the least at the beginning of a project and the only way we can know
if anything works is to put it into the hands of others. Only then can we
really see what worked and what didn’t. Therefor it is essential that we only
do just enough. In the words of Sarah Lewis; “We thrive not when we’ve done
it all, but when we still have more to do”
(See her TED talk here.
Others has said similar things with the same sentiments - like LinkedIns Reid Hoffman said;
“If you’re not embarrassed by your first product release, you’ve released it too late.”.
In order to be able to do so and guarantee a consistent level og quality, you have
to have some core values and guiding principles to help you along the way.
5.3.5 - Logging
Learn about how you should use logging in your code
Logs are an important tool for developers to both understand program flow, and trace down bugs and errors as they appear in their software.
Comprehensive, cohesive and focused log messages are key to the efficacy of logs as a development tool.
To ensure that we empower developers with our software, we have put in place five guiding principles for writing log messages.
Structured log messages
Traditionally log messages have been stored as strings with data embedded with string formatting.
While being simple to store and transmit, these strings loose semantic and contextual information about data types and parameters.
This in turn makes searching and displaying log messages labour intensive and require specialized tools.
Modern logging frameworks support structured or semantic log messages.
These frameworks split the definition of the human readable log message from the data it contains.
All popular logging frameworks support the message template format specification, or a subset thereof.
logger.Trace("Committing events for {AggregateRoot} on {EventSource}", aggregateRoot.Id, eventSourceId);
TRACE 2020/04/03 12:19:58 Committing events for 9eb48567-c3ac-434b-90f1-26660723103b on 2fd8866a-9a4b-492b-8e98-791118552426
{
    "level": "trace",
    "timestamp": "2020-04-03T12:19:58.060Z",
    "category": "Dolittle.Commands.Coordination.Runtime",
    "template": "Committing events for {AggregateRoot} on {EventSource}",
    "data": {
        "AggregateRoot": "9eb48567-c3ac-434b-90f1-26660723103b",
        "EventSource": "2fd8866a-9a4b-492b-8e98-791118552426"
    }
}
Log message categories
To allow filtering of log messages from different parts of the source code during execution flow, log messages must contain a category.
In most languages this category is defined by the fully qualified name of the types that define the code executed, including the package or namespace in which the type resides.
These categories are commonly used during debugging to selectively enable Debug or Trace messages for parts of the software by defining filters on the log message output.
Log message levels
We define five log message levels that represent the intent or severity of the log message.
They are, in decreasing order of severity:
Error - unrecoverable failure, resulting in end-user error.Warning - recoverable failure, performance or functionality is degraded.Information - information that is needed to use the software, and user activity traces.Debug - execution activity and sub-activity checkpoints.Trace - detailed execution trace with data that affects flow path.
Error
An error log message indicates that an unrecoverable failure has occurred, and that the current execution flow has stopped as a consequence of the failure.
The current activity that the software was performing is not possible to complete, and will therefore in most cases lead to an end user error message being shown.
For languages that have the concept of exceptions or errors, these must be included in an error log message.
An error log message indicates that immediate action is required to recover full software functionality.
Warning
While an error message indicates an unrecoverable failure, warning log messages indicate a recoverable failure or abnormal or unexpected behavior.
The current execution flow is able to continue to complete the current activity by recovering to a fail-safe state, albeit with possible degraded performance or functionality.
Typical examples would be that an expected data structure that was not found but it is possible to continue with default values, or multiple data structures were found where there should only be one, but it is safe to continue.
A warning log message indicates that cleanup or validation is required at a later point in time to recover or verify the intended software functionality.
Warning log messages are also used to warn developers about wrong usage of functionality, and deprecated functionality that will be removed in the future.
Informational log messages tracks the general execution flow of the software, and provides the developer with required information to use the software correctly.
These log messages have long term value, and typically include host startup information and user interactions with the application.
Information level log messages is typically the lowest severity messages that will be written by default, and must therefore not be used to log messages that are not useful for while the software is working as expected.
Debug
Debug log messages are used by developers to figure out where failures occur during execution flow while investigating interactively with the software.
These log messages represents high-level checkpoints of activities and sub-activities during execution flow, to give hints for what log message categories and source code to investigate in more detail.
Debug messages should not contain any data other than correlation and trace identifiers used to identify unique failing interactions.
Trace
Trace log messages are the most verbose of the log messages.
They are used by developers to figure out what caused a failure or an unexpected behavior, and should therefore contain the data that affects the execution flow path.
Typical uses of trace log messages are public methods on interface implementations, and contents of collections used for lookup.
Log output
The logs of an applications is its source of truth. It is important that log messages are consistent in where they are outputted and the format in which they are outputted. They should be outputted to a place where they can be easily retrieved by anyone who is supposed to read them. Log messages are normally outputted to the console, but they can also be appended to files. The log messages that are outputted should be readable and have a consistent style and format.
Configuring
We’re not necessarily interested in all of the logging levels or all of the categories each time we run an application. The logging should be easily configurable so that we can choose what we want to see in terms of categories and the levels of the logging. For instance software running in a production environment should consider only logging information, warning and error log messages. While we may want to show more log messages when running in development mode. It is also important to keep in mind that logging can possibly have a considerable performance cost. This is especially important to consider when deploying software with lots of logging to production environments.
Asp.Net Core
We’re using Microsoft’s logger in the Dolittle framework for .Net. We can use the ‘appsettings.json’ to configure the logging and we can provide different configurations for different environments like production and development. Look here for information on Microsoft’s logger.
Log message
Log messages should be written in a style that makes it easy to navigate and filter out irrelevant information so that we can find the cause of any error that has occurred by simply reviewing the them. Logs should be focused and comprehensive for both humans and machines. They should also be consistent in format and style across platforms, languages and frameworks.
Stick to English
There are arguably many reasons to stick to English-only log messages. One technical reason is that English ensures us that we stick to ASCII character set.
This is important because we don’t necessarily know what happens to the log message. If the log messages uses specials character sets it might not render correctly or can become corrupt and thus unreadable.
Log context
Each log message should contain enough information so that the intended reader understands exactly what is going on without having to read any prior log messages. When we write log messages it is in the context of the code that we write, in the context of where the log statement is, and it is easy to forget that this context information is not implicit in the outputted log. And depending on the content of those log messages they might even not be comprehendible in the end.
There are possibly multiple aspects of ‘context’ in regards to logging. One might be the current environment or execution context of the application for when the logging is performed and the other might be domain specific context, meaning information regarding where the logging is taking place in the execution flow of an operation or values of interest like IDs and names.
Log messages should have the appropriate information regarding the context relevant to the information that is intended to be communicated. For example for multi-threaded applications it would make sense to add information of the executing thread id and correlations between actions. And for multi-tenanted applications it would make sense to have information about the tenant the procedures are performed in.
It is important to consider the weight of the contextual information added to each log message. Adding lots of context information to every log message makes the log messages bloated and less human-readable. The amount of context information on a log message should be in proportion to the log message level. For instance an information log message should not contain lots of contextual information that is not strictly needed for the end-user to use the software while a trace or debug log message should contain the necessary information to deduce the cause of an error. For warning and error log messages that are produced as a result of an exception or error it is important to include the stacktrace of the exception/error as part of the log message. Usually the methods or procedures to create log messages at these levels has its own parameter for an exception/error that outputs a log with the stacktrace nicely formatted.
For statically typed languages the namespace of the code executing the logging statement is usually provided with the log message which is helpful information for the developers in the case of troubleshooting.
Keep in mind the reader of the logs
We add logs to software because someone most likely has to read them someday. Thus it makes sense that we should keep in mind the target audience when writing log messages. Which person is most likely going to read a log message affects all the aspects of that log message; The log message content, level and category is dependent on that. Information log messages is intended for the end-user while trace and debug messages are most likely only read in the case of troubleshooting, meaning that only developers will read them. The content of the log message be targeted towards the intended audience.
Sensitive information like personal identifiable information, passwords and social security numbers has no place in log messages.
5.3.6 - C# coding styles
Learn about how to write C# in Dolittle
This is the to be considered the coding standard for Dolittle and is subject to automated
verification during automated builds and also part of code-reviews such as those done for
pull requests.
Values, principles and patterns & practices
It is assumed that all code written is adhering to our core values and
core principles.
Compactness
In general, code should be compact in the sense that any “noise” of language artifacts or similar
that aren’t really needed SHALL NOT be used. This to increase readability, not decrease it.
Things that are implicit, SHALL be left implicit and not turned into explicits.
Keywords
Use of var
Types are implicitly provided by the compiler and considered noise during declaration.
If one feel the need for explicitly declaring variables with their type, it is often a
symptom of something else being wrong - such as large methods that you can’t get a feel
for straight away. This is most likely breaking the Single Responsibility Principle.
You MUST use var and let the compiler infer the type implicitly.
Private members
In C# the private modifier is not needed as this is the default modifier if nothing is specified.
Private members SHALL NOT have a private modifier.
Example:
public class SomeClass
{
    string _someString;
}
this
Explicit use of this SHALL NOT be used. With the convention for prefixing private members,
the differentiation is clear.
Prefixes and postfixes
A very common thing in naming is to include pre/post fixes that describes the technical implementation
or even the pattern that is being used in the implementation. This does not serve as useful information.
Examples of this is Manager, Helper, Repository, Controller and more (e.g. EmployeeRepository).
You SHOULD NOT pre or postfix, but rather come up with a name that describes what it is.
Take EmployeeRepositorysample, the postfix Repository is not useful for the consumer;
a better name would be Employees.
Member variables
Member variables MUST be prefixed with an underscore.
Example:
public class SomeClass
{
    string _someInstanceMember;
    static string _someStaticMember;
}
One type per file
All files MUST contain only one type.
Class naming
Naming of classes SHALL be unambiguous and by name tell exactly what it is providing.
Example:
// Coordinates uncommitted event streams
public class UncommittedEventStreamCoordinator {}
Interface naming
Its been a common naming strategy to include Iin front of any interface.
Prefixing with Ican have other meaning as well, such as the actual word “I”.
This can give better naming to interfaces and better meaning to names.
Examples:
// Implemented by types that can provide configuration
public interface ICanConfigure {}

// Implemented by a type that can provide a container instance
public interface ICanCreateContainer
You SHOULD try look for this way of naming, as it provides a whole new level of expressing intent in the code.
Private methods
Private methods MUST be placed at the end of a class.
Example:
public class SomeClass
{
    public void PublicMethod()
    {
        PrivateMethod();
    }


    void PrivateMethod()
    {

    }
}
Exceptions
flow
Exceptions are to be considered exceptional state. They MUST NOT be used to control
program flow. Exceptional state is typically caused by infrastructure problems or other
problems causing normal flow to be able to continue.
types
You MUST create explicit exception types and NOT use built in ones.
The exception type can implement one of the standard ones.
Example:
public class SomethingIsNull : ArgumentException
{
    public SomethingIsNull() : base("Something was null") {}
}
Throwing
If there is a reason to throw an exception, your validation code and actual throwing
MUST be in a separate private method.
Example:
public class SomeClass
{
    public void PublicMethod(string something)
    {
        ThrowIfSomethingIsNull(something);
    }

    void ThrowIfSomethingIsNull(string something)
    {
        if( something == null ) throw new SomethingIsNull();
    }
}
Async / Await
In C# the async / await keywords should be used with utmost care. It is a thing that
without really thinking it through can bleed throughout your codebase without necessarily
a good reason. Alongside async / await comes the Task type that needs to be there.
The places where threading is necessary, it MUST be dealt with internally to the
implementation and not bleed throughout its APIs. Dolittle has a very good handle on its
entrypoints and from these entrypoints, the need for scaling out across multiple threads
are rarely needed. With the underlying infrastructure being relied on, web requests are
already threaded. Since we enter the system and returns back as soon possible, we have a
good grip of when this is needed. Threads can easily get out of hand and actually slow
down systems.
Exposing IList / ICollection
Public APIs SHALL NOT have mutable types as return types, such as IList, ICollection.
The responsibility for maintaining state should be with the owner of it. By exposing the
ability for changing state outside the owner, you lose control over who can change state
and side-effects occur that aren’t clear. Instead you should always expose immutable types
like IEnumerable instead.
Mutability
One of the biggest cause of side-effects in a system is the ability to mutate state and possibly
state one does not necessarily own. The example is something creates an instance of an object
and exposes public getters and setters for its properties and inviting anyone to change
this state. This makes it hard to track which part of the system actually changed the state.
Be very conscious about ownership of instances. Avoid mutability. Most of the time it is
not needed. Instead, create new objects with the mutation in place.
5.3.7 - C# Specifications
Learn about how to write C# specifications
All the C# code has been specified by using Machine Specifications with an adapted style.
Since we’re using this for specifying units as well, we have a certain structure to reflect this. The structure is reflected in the folder structure and naming of files.
Folder structure
The basic folder structure we have is:
(project to specify).Specs
    (namespace)
        for_(unit to specify)
            given
                a_(context).cs
            when_(behavior to specify).cs
A concrete sample of this would be:
Dolittle.Specs
    Commands
        for_CommandContext
            given
                a_command_context_for_a_simple_command_with_one_tracked_object.cs
            when_committing.cs
The implementation SHOULD then look something like this :
    public class when_committing : given.a_command_context_for_a_simple_command_with_one_tracked_object_with_one_uncommitted_event
    {
        static UncommittedEventStream   event_stream;

        Establish context = () => event_store_mock.Setup(e=>e.Save(Moq.It.IsAny<UncommittedEventStream>())).Callback((UncommittedEventStream s) => event_stream = s);

        Because of = () => command_context.Commit();

        It should_call_save = () => event_stream.ShouldNotBeNull();
        It should_call_save_with_the_event_in_event_stream = () => event_stream.ShouldContainOnly(uncommitted_event);
        It should_commit_aggregated_root = () => aggregated_root.CommitCalled.ShouldBeTrue();
    }
The specifications should read out very clearly in plain English, which makes the code look very different from what we do for our units. For instance we use underscore (_) as space in type names, variable names and the specification delegates. We also want to keep things as one-liners, so your Establish, Because and It statements should preferably be on one line. There are some cases were this does not make any sense, when you need to verify more complex scenarios. This also means that an It statement should be one assert.
Moq is used for for handling mocking / faking of objects.
5.3.8 - Copyright header
Learn about the requirements of copyright headers in code files
Code files
All code files MUST to have the following copyright header, this includes even automated test files for all languages. The format needs to adhere to the following.
// Copyright (c) Dolittle. All rights reserved.
// Licensed under the MIT license. See LICENSE file in the project root for full license information.
For XML based languages, this would look like:
<!-- Copyright (c) Dolittle. All Rights Reserved. Licensed under the MIT License. See LICENSE file in the project root for full license information. -->
Other languages might have other ways to represents comments, for instance bash/shell scripts or similar:
# Copyright (c) Dolittle. All rights reserved.
# Licensed under the MIT license. See LICENSE file in the project root for full license information.